Who Goes Blogging 2: Custom Domain
Make your portfolio site professional by applying a custom domain to it
In the previous post, we got ourselves up and running with a website generated by Hugo, deployed to GitHub, and hosted by GitHub Pages.
Now, we’re going to add a custom domain to our website so that we hide the <username>.github.io domain that GitHub Pages is kindly hosting for us for free.
At the same time, we’re going to make our website blazingly fast for users by adding a caching layer with a content distribution network (CDN).
Lastly, I’m going to throw in a bonus guide on how to redirect from multiple top-level domains (TLDs) to one (e.g. <your-domain>.com redirects to <your-domain>.co.uk).
Pre-requisites
There’s not much more to add from the last post. I talk a lot about domains and domain name system (DNS), which is the address-finder of the Internet, and an entirely huge beast in its own right.
Again - I won’t try to replicate already great guides out there on the topic. So if you’d like to find out more, see below for some helpful guides.
- https://www.digitalocean.com/community/tutorials/an-introduction-to-dns-terminology-components-and-concepts
- https://opensource.com/article/17/4/introduction-domain-name-system-dns
Applying a Custom Domain to GitHub Pages
Let’s add a degree of professionalism to our site by having a custom domain apply to it. You’ll need to make sure you own a domain first before you go ahead, so have a look at a few providers and see which works best for you from a comparison list. I bought mine from namecheap just because of the price and WhoisGuard features. There may be other providers that have the same features, so make sure to make your own comparison!
In the case of
.co.ukdomains, because it is a UK domain that resides in the EU (for now), the WhoIS lookup is disabled by default - which is a huge win for privacy. WhoisGuard is available for non-EU domains and I highly recommend it.
GitHub has a series of documentation on applying a custom domain to GitHub Pages in much greater detail than what I am about to write out, should you wish to find out more information.
Acquire a Domain
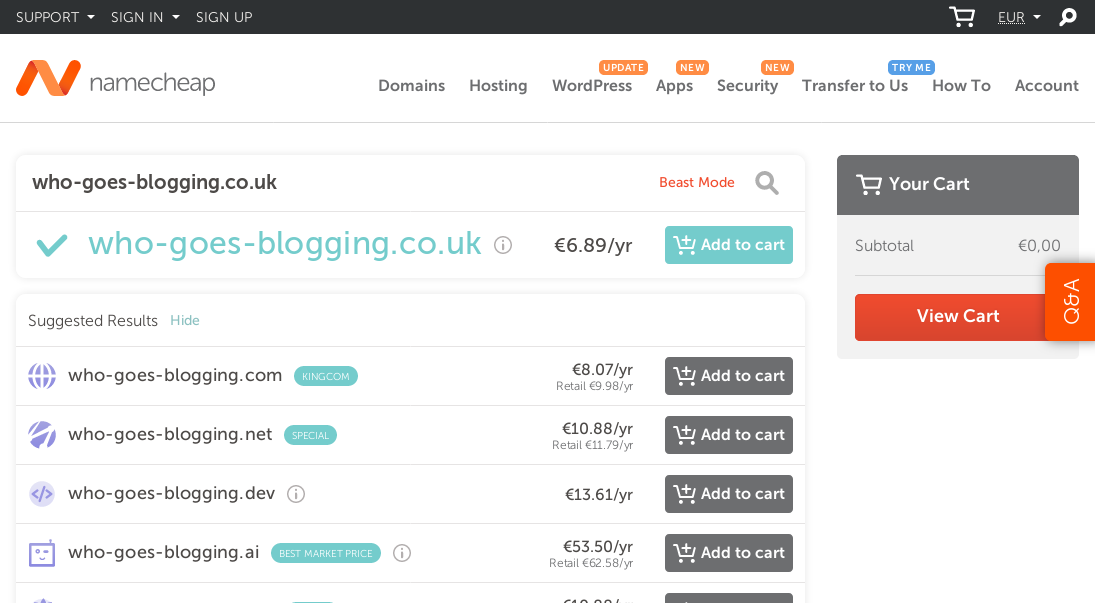
The rest of the post will depict a lot of Namecheap semantics, since that is the registrar I have access to. You can choose to follow the guide alongside a different registrar if you wish, at a high-level they will be pretty similar. For now, let’s move on ahead with Namecheap and navigate through to the domain purchase page.
The hardest part is deciding on the domain name…
Once you’ve set up an account and purchased your domain, your accounts domain landing page will look something like the below.
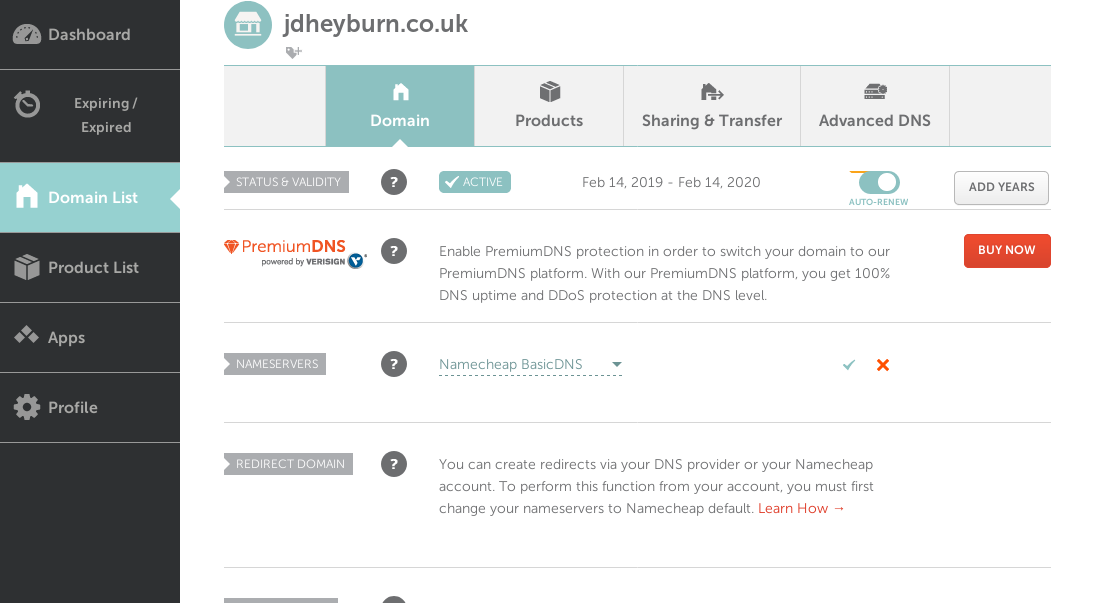
Make sure you have auto-renew selected, otherwise you can kiss that domain goodbye when it expires!
When you purchase a domain from Namecheap, by default it will be pointing to their own domain name service (DNS) nameservers, as you can see from the picture above.
This means when we type in our new domain into a browser, it will contact Namecheap for the IP address for that record.
Currently Namecheap is none the wiser about these records, which isn’t very exciting. Let’s move on to adding the CDN for the website.
Adding Our CDN Layer
As discussed in a previous post, a CDN can provide us with many benefits. Go check out the page for a refresher of what those are and for why I selected Cloudflare. You can use whichever you like, however the remainder of this guide will focus on Cloudflare in particular - the concepts can still be applied at a high level to other CDNs.
Like with any introduction of an architectural component, a CDN has some drawbacks, such as making your service now dependent on a third party for which you have no control over. Namely Cloudflare in particular has had some high profile outages of recent date, but has been extremely reliable in my previous experiences with them.
You can go here for a list of pros and cons of CDNs. Given this information I believe you can make your own mind up on what is best for yourself. For me, I the benefits far outweigh the downsides.
Cloudflare our Domain
Create an account with Cloudflare if you haven’t done so already. Once done you’ll need to click Add Site at the top of the browser dashboard. Enter your newly purchased domain from the previous section.
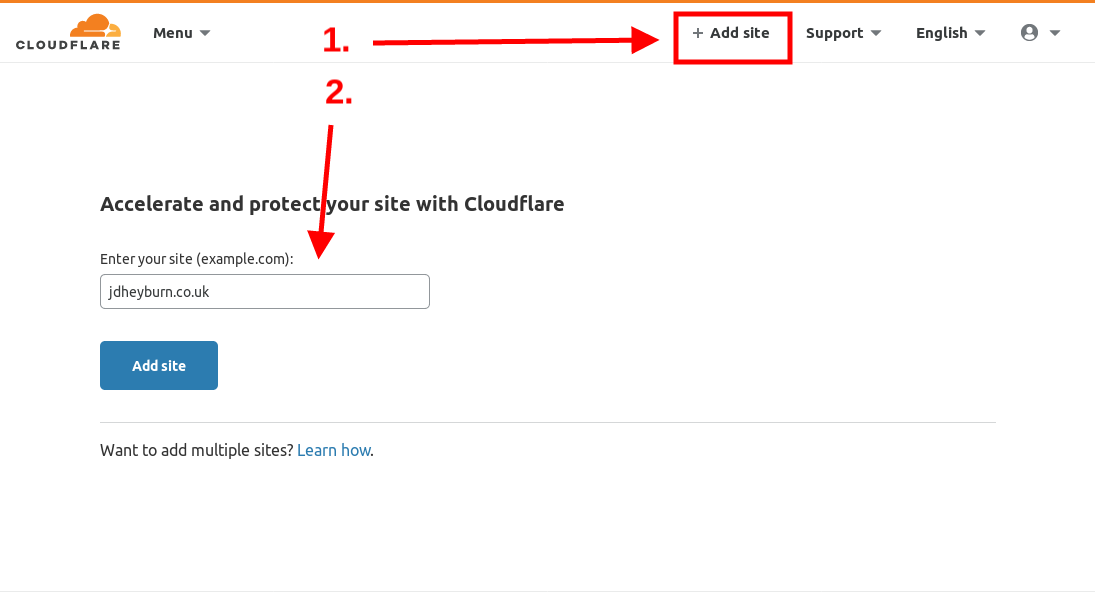
Enter your newly purchased domain from the previous section
Go ahead now and select the free plan, if you want to go more advanced then you can do so.
Once that’s created you’ll see Cloudflare scan the DNS records for this domain you’ve added - for now let’s navigate back to the Cloudflare Dashboard and selecting the domain. You’ll be presented with a page similar to below, minus all the activity!
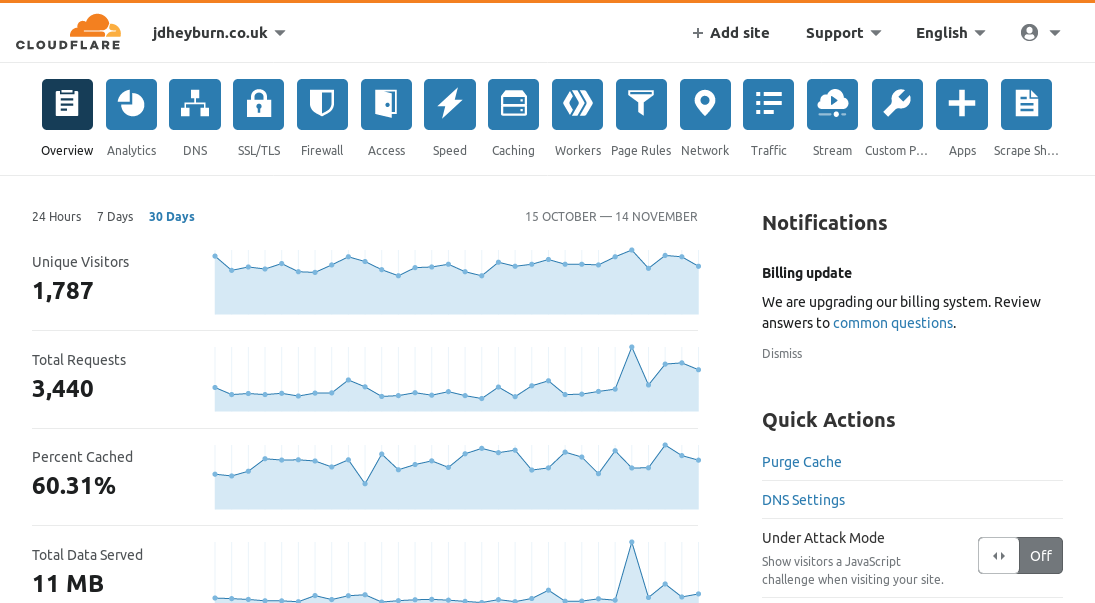
Name me a more iconic duo than numbers and graphs. I’ll wait…
Update Cloudflare DNS Records
In order for Cloudflare to provide its benefits, it acts as the DNS server for your domain. This means that it will forward requests of our website to the IP addresses where our website is being hosted. It’s place in the topology is like this:
1. Domain registrar ---> 2. DNS server and CDN provider ---> 3. Web server location
Translated to our architecture:
1. Namecheap ---> 2. Cloudflare ---> 3. GitHub Pages
What we need to do is instruct Cloudflare where to direct clients of the website. There are several ways of doing this, whether you want your website to be available at www.<your-domain>.co.uk (CNAME record), or <your-domain>.co.uk (APEX (A) record). Both of which are well documented by GitHub already. For the purpose of this post, I’ll guide you on my set up which is an ALIAS record.
Back to Cloudflare, you’ll need to load up the dashboard for your domain and navigate to the DNS icon in the taskbar at the top. Clicking on Add record will allow you to add the A records that point to GitHub Pages’s IP addresses. As of writing (and documented) they are:
185.199.108.153
185.199.109.153
185.199.110.153
185.199.111.153
Let’s add these to the Cloudflare DNS page below.
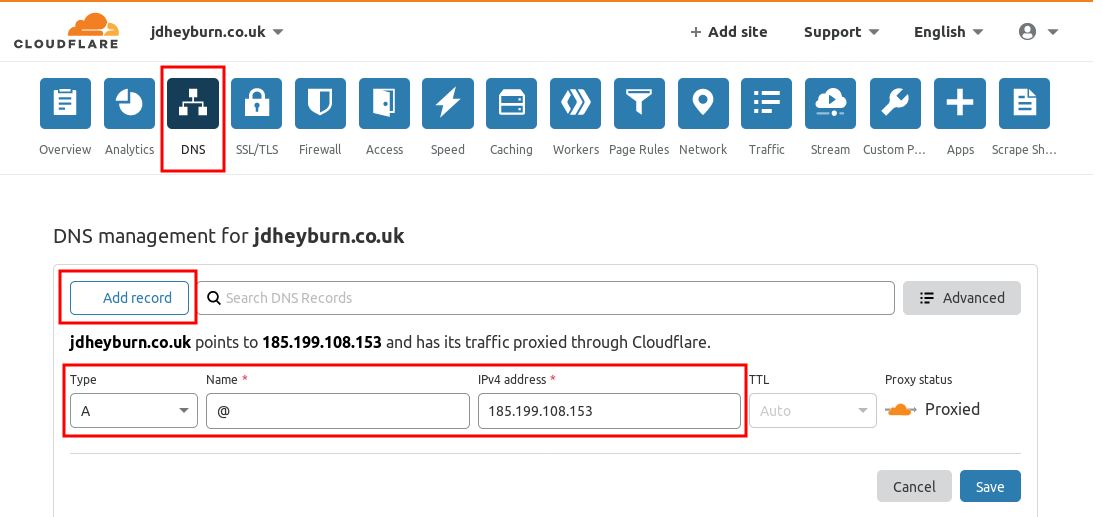
Add in the GitHub IP addresses one by one
Once done - your records will look something like this:
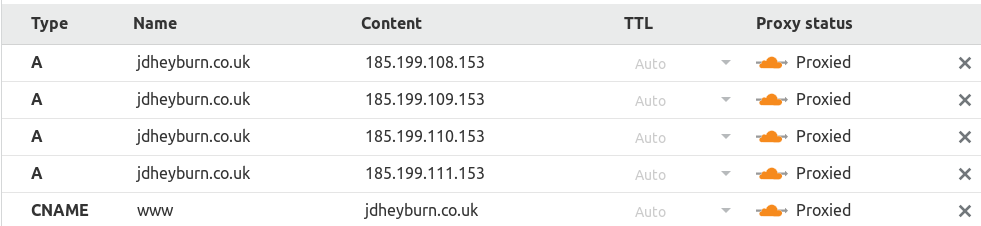
You’ll notice an additional CNAME record at the bottom for www. This will redirect any requests made to www.jdheyburn.co.uk to jdheyburn.co.uk. This could be something you’d want to replicate too if you wish.
One thing to note down before we move on is to capture the Cloudflare DNS Nameservers that have been assigned to our domain. You can find these on the same DNS management page we are on, but by just scrolling down we can see these nameservers.
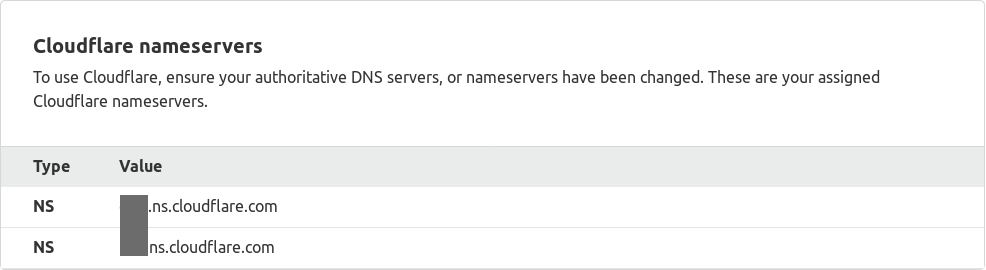
Make a note of these nameservers for your domain
Direct Namecheap to Cloudflare
Earlier in this post, I mentioned that a newly created Namecheap domain will default to their own DNS nameservers. We want to change this to Cloudflares DNS nameservers from which we configured our DNS records.
Navigate to the Namecheap management page for your domain and enter the Cloudflare nameservers once you have selected Custom DNS.
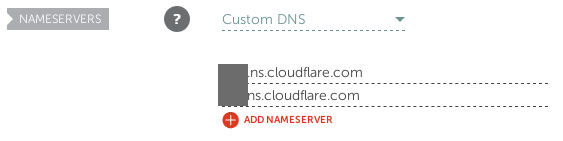
Add in your Cloudflare domains from previously
Once this is done you may need to wait a while for the DNS updates to propagate throughout the world. While we’re waiting for that, there’s one final piece of the puzzle which can keep us busy.
GitHub Pages Configuration
The last place to configure is GitHub Pages. Currently it is hosting at our .github.io domain, but we need to instruct it to redirect to our custom domain. There are two methods for doing this:
- Configure the repository settings
- Use a
CNAMEfile in your repository
Configure the repository settings
This is the quicker of the two solutions, so I advise to follow this step to understand if you have everything in place correctly. Once done then you can lock-in your changes with step 2 above.
For this step, you need to navigate to the settings pages for your .github.io repo containing your rendered code.
https://github.com/<USERNAME>/<USERNAME>.github.io/settings
Now scroll down, keep going until you hit the GitHub Pages heading. Here you will see a form for entering a custom domain; do the honours and enter it in like below.
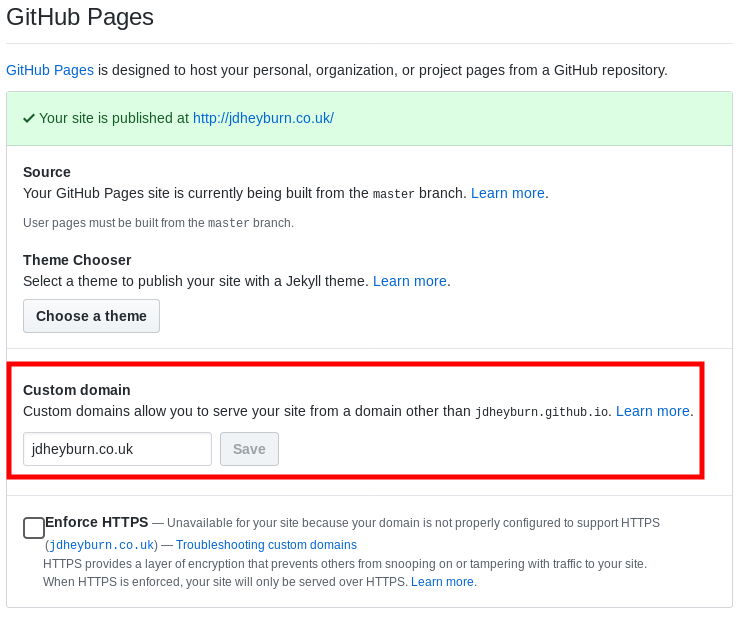
Ignore my already published domain…
Now again wait for DNS to propagate across the world. When GitHub is happy with the changes then you will see the green banner similar to the one in the screenshot above. This means everything is being served up! Why not give it a try ourselves? Head to your domain now and see if everything is working!
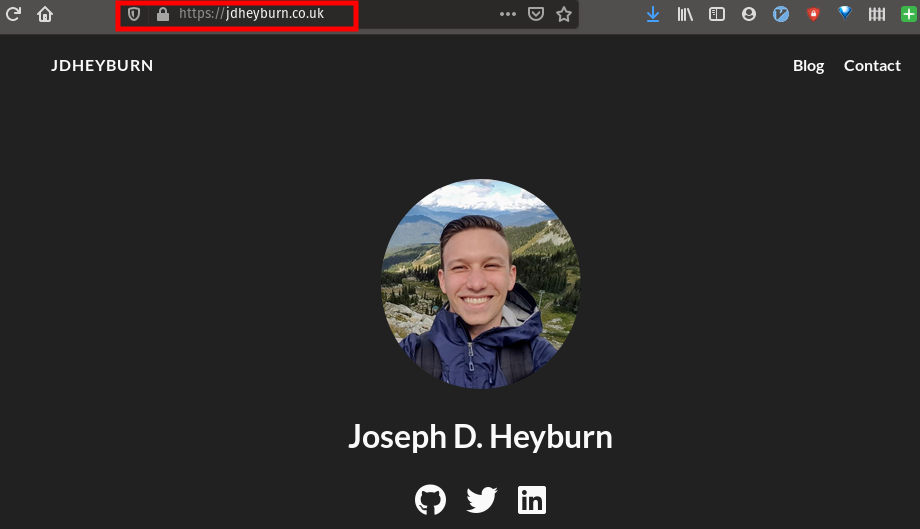
You should end up with something like this!
Solidying our changes with a CNAME file
We can use the above method to quickly try using GitHub repository settings to see if everything is working, however I’m a big fan of setting changes in code (Infrastructure-as-code anyone?). GitHub supports another method which is to use a file named CNAME in our generated .github.io repo that contains the domain name we wish to use.
In my case, I would have the following…
# CNAME
jdheyburn.co.uk
This then tells a repo that is enabled for GitHub Pages to use the domain in this file as our custom domain, effectively producing the steps in the previous section. Neato.
The change to implement this is fairly easy. I have to admit I picked it up from somewhere but I don’t have the source to reference it to.
So back in your blog-source repo, you want to execute the below, replacing the template with your domain.
echo "<DOMAIN-NAME>" > CNAME
Building into our deploy script
Once that is done, you will need to modify your deploy.sh script to copy over the file into your generated Hugo site, because Hugo won’t do it for you! Don’t have the deploy script or need a refresher? Head back to the previous post.
You will want to copy it after Hugo has done its thing, take a look at the Gist below - line 9 is your friend.
What this is doing is taking the CNAME file that already exists in our blog-source repo and moving it to the generated public/ directory which Hugo created for us. It is then this public/ directory that gets committed to the GitHub Pages repo.
Then that’s it! Take a look at my finished repo and you’ll see where CNAME fits in.
Bonus: TLD Redirection
Let me tell you a story. Your website is up and operational. You’re super proud of it, and you give yourself a round of applause 👏
But you don’t want to be the only person looking at it, you want the whole world to! You tell your parents, your significant other, the dog off the street - they all remember the name of your website, but was it at .com or .<insert snazzy TLD here>?
Of course, you domain isn’t at .com, that’s boring as hell! You just forked out $50 on a .dev TLD, and no one will see it!
Luckily there is a way…
You can buy additional domains at different TLDs and have them redirect to your one-domain-to-rule-them-all with little to no hassle! There is the cost of purchasing the domain and renewing it year after year, but with that being ~£10 or so per year - I’d call that a good insurance policy to ensure people land at your website!
In my case, I purchased jdheyburn.com and had it redirect to jdheyburn.co.uk - why not give it a try: https://jdheyburn.com
The steps are already defined in this post. For a breakdown of what they are:
- Purchase a domain
- Create a new website in Cloudflare
- Create a DNS A record to redirect to your correct domain
- Configure Namecheap to use Cloudflare’s nameservers
Steps 1 and 2 are pretty easy to perform yourselves - so for this exercise I’ll join in at step 3.
Cloudflare Domain Redirection
Assuming that you’ve completed steps 1 and 2, we’ll need to configure the redirection - but we don’t do this via inserting a DNS record like we did previously, Cloudflare has a feature that handles that for us called Page Rules.
On your Cloudflare website landing page, navigate to Page Rules in the toolbar at the top and then Create Page Rule.

In the next screen we’re going to define the rule. Cloudflare have documentation on Page Rules, and even more specifically on redirection.
From this screen you will want something that appears as below.
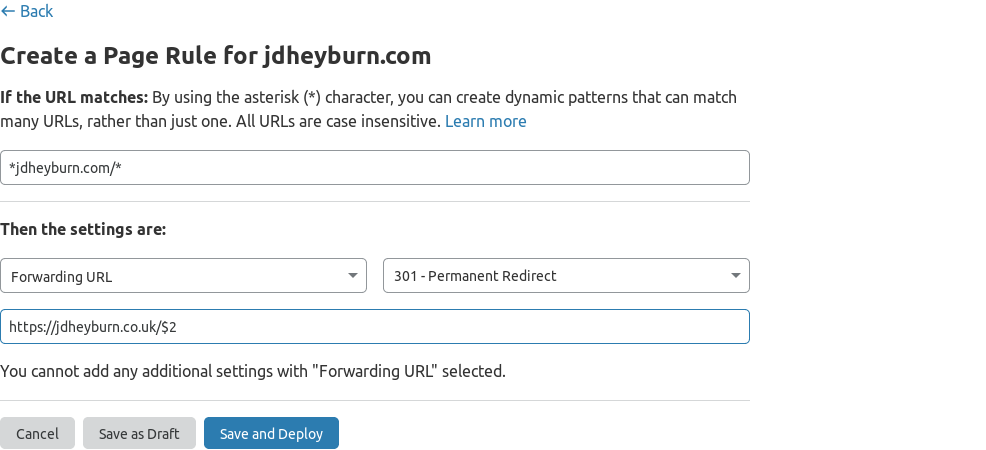
Let’s break down what’s happening here:
- We define a pattern of
*jdheyburn.com/*, indicating that the rule is active should a URL be queried to Cloudflare
- This pattern will match any request at this domain
- Next comes the rule action, which is:
- Set this URL as a forwarding URL - to reply back to the client with
301 Permanent Redirectstatus code - With the forwarded URL being
https://jdheyburn.co.uk/$2
The /$2 at the end of the rule is crucial here. This will carry across any URL path parameters or query parameters to the redirected URL. In fact $2 refers to anything that matches the second asterisk (*) in the rule pattern (*jdheyburn.com/*). So https://jdheyburn.com/contact will redirect to https://jdheyburn.co.uk/contact.
Having the forwarded URL set to the
https://scheme will ensure that your users will receive your website encrypted, safe from man-in-the-middle attacks.
Lastly, click on Save and Deploy to finalise your changes; you’ll have a view such as below.

That’s all you need - once again you will have to wait for DNS replication to trickle down. You can repeat this over again for other domains you may have.
Conclusion
That it for this part, we covered quite a lot of things:
- Purchasing a custom domain
- Applying a CDN cache layer
- HTTPS redirection
- Redirect multiple domains to one location
Next up I’ll document the various deployment methods I have used for the website.