How I use Obsidian to journal
I write about how I use Obsidian to journal each day, week, month, and quarter - while showing how its done for you to try it out yourself.
Edits
- 2025-03-26
- Periodic Notes are now grouped in directories by their year (and if applicable, month)
- See blog post: Reorganising Obsidian Journal Notes
- 2025-01-26
- Updated moment locale from
gbtoen-gb - Sundays were incorrectly being templated as the first day of the week, instead of last
- Updated moment locale from
tl;dr
- I use Obsidian for journalling
- You can view the templates I use for creating my daily, weekly, monthly, and quarterly notes
- See Deep dive into note templates on how these templates work
Introduction to Obsidian
I’ve been using Obsidian for over 2 years now as my primary note-taking tool. Previously I was using Notion but then I got frustrated with the clunkiness of it (of which I am sure it has improved since then) and also required Internet connectivity to run - none of the files were local. Before that, I’d been keeping a physical notebook which wasn’t actually of much use for recalling information from time gone by.
Obsidian is just one application used in personal knowledge management (PKM) and is a tool for thought (TfT). It is not open-source, however, it is built by a very small, independent team of developers who are passionate about privacy, and user feedback, and who have promised to never accept VC investment to remain independent.
Since kepano became CEO of Obsidian, they have been highlighting what sets Obsidian apart from other PKM tools. Ensuring that it is local-first means that you can use Obsidian without your data being stored anywhere. The files are in markdown format, which is the de-facto standard for documentation - no proprietary file formats are used here. With these main points, if Obsidian were to cease to exist, you could pick your files up and move them to another app. These make Obsidian work blazingly quick - no loading screens or sluggish navigating; everything loads immediately.
Obsidian’s functionality is propelled by the amazing community which has written several plugins that provide it the flexibility to be used for many use cases. Including databases, Kanban boards, project management… there are over 1,000 to choose from.
The application itself is free, but if you want to synchronise notes between different desktops or even the mobile app, they offer a Sync feature for a cost. You could also achieve file sync using a third party, but given that it is a small independent team working on the app, I’m happy to pay for Sync as a means of supporting them too. There are also options for one time payments to help assist them too (I am a Supporter!).
While I don’t see myself necessarily as a power user (at least, my notes are somewhat all-over-the-shop and unlinked), I wanted to write up how I’ve been using it for journalling over the last 2 years. I hope this then becomes a series of my journey through PKM, and to share additional blog posts which I hope inspire others.
Why journal?
Everyone has their reasons for journalling; some people use it to track thoughts, emotions, etc. For myself though as I started approaching my late twenties I felt that life was passing by very quickly - unsure of what I had accomplished or even done on a particular day, and what the general theme of a week or month was to me. I use journalling as a reference back to see how far I have progressed whether in my career or my personal life.
Obsidian has made this extremely easy for me to do with its Daily Notes feature. These are simply notes that are specific to one day only and can be created from a template so that you don’t need to populate them in the boilerplate.
In this post, I’ll walk through the setup that I use for daily journalling, which then bubbles up to weekly, monthly, and then quarterly notes. You can see some sample screenshots below.
Daily note
Weekly note
Monthly note
Quarterly note
This is achieved with these community plugins:
- Calendar
- Provides a calendar widget in the right pane of Obsidian
- Clicking on a day or week takes you to its respective note
- I find it’s an easy way to generate historical daily and weekly notes
- Dataview
- Enables querying of properties from notes and displaying them into another
- Periodic Notes
- Quickly create daily, weekly, monthly, quarterly, and yearly notes
- Configurable to choose the name format of the notes, which template to use, and where to place the notes
- Templater
- Creates files from a template
- Allows you to dynamically generate the content of notes from logic
Setting up the workflow
In this section I’ll run through the templates, plugins, and configuration you need to replicate the same workflow in the folder that you have open in Obsidian (known as a vault).
Template files
I use templates extensively for dynamically generating notes, especially on notes that are created every day.
templates/DailySummary.md
templates/WeeklySummary.md
templates/MonthlySummary.md
templates/QuarterlySummary.md
See the links below for the templates needed for journalling.
I run through the sections of each of these templates later on.
Plugins and configuration
Now that we have the template files, we can configure the plugins. Make sure you install them first if you’re following along as a guide. As a reminder the plugins you’ll need are:
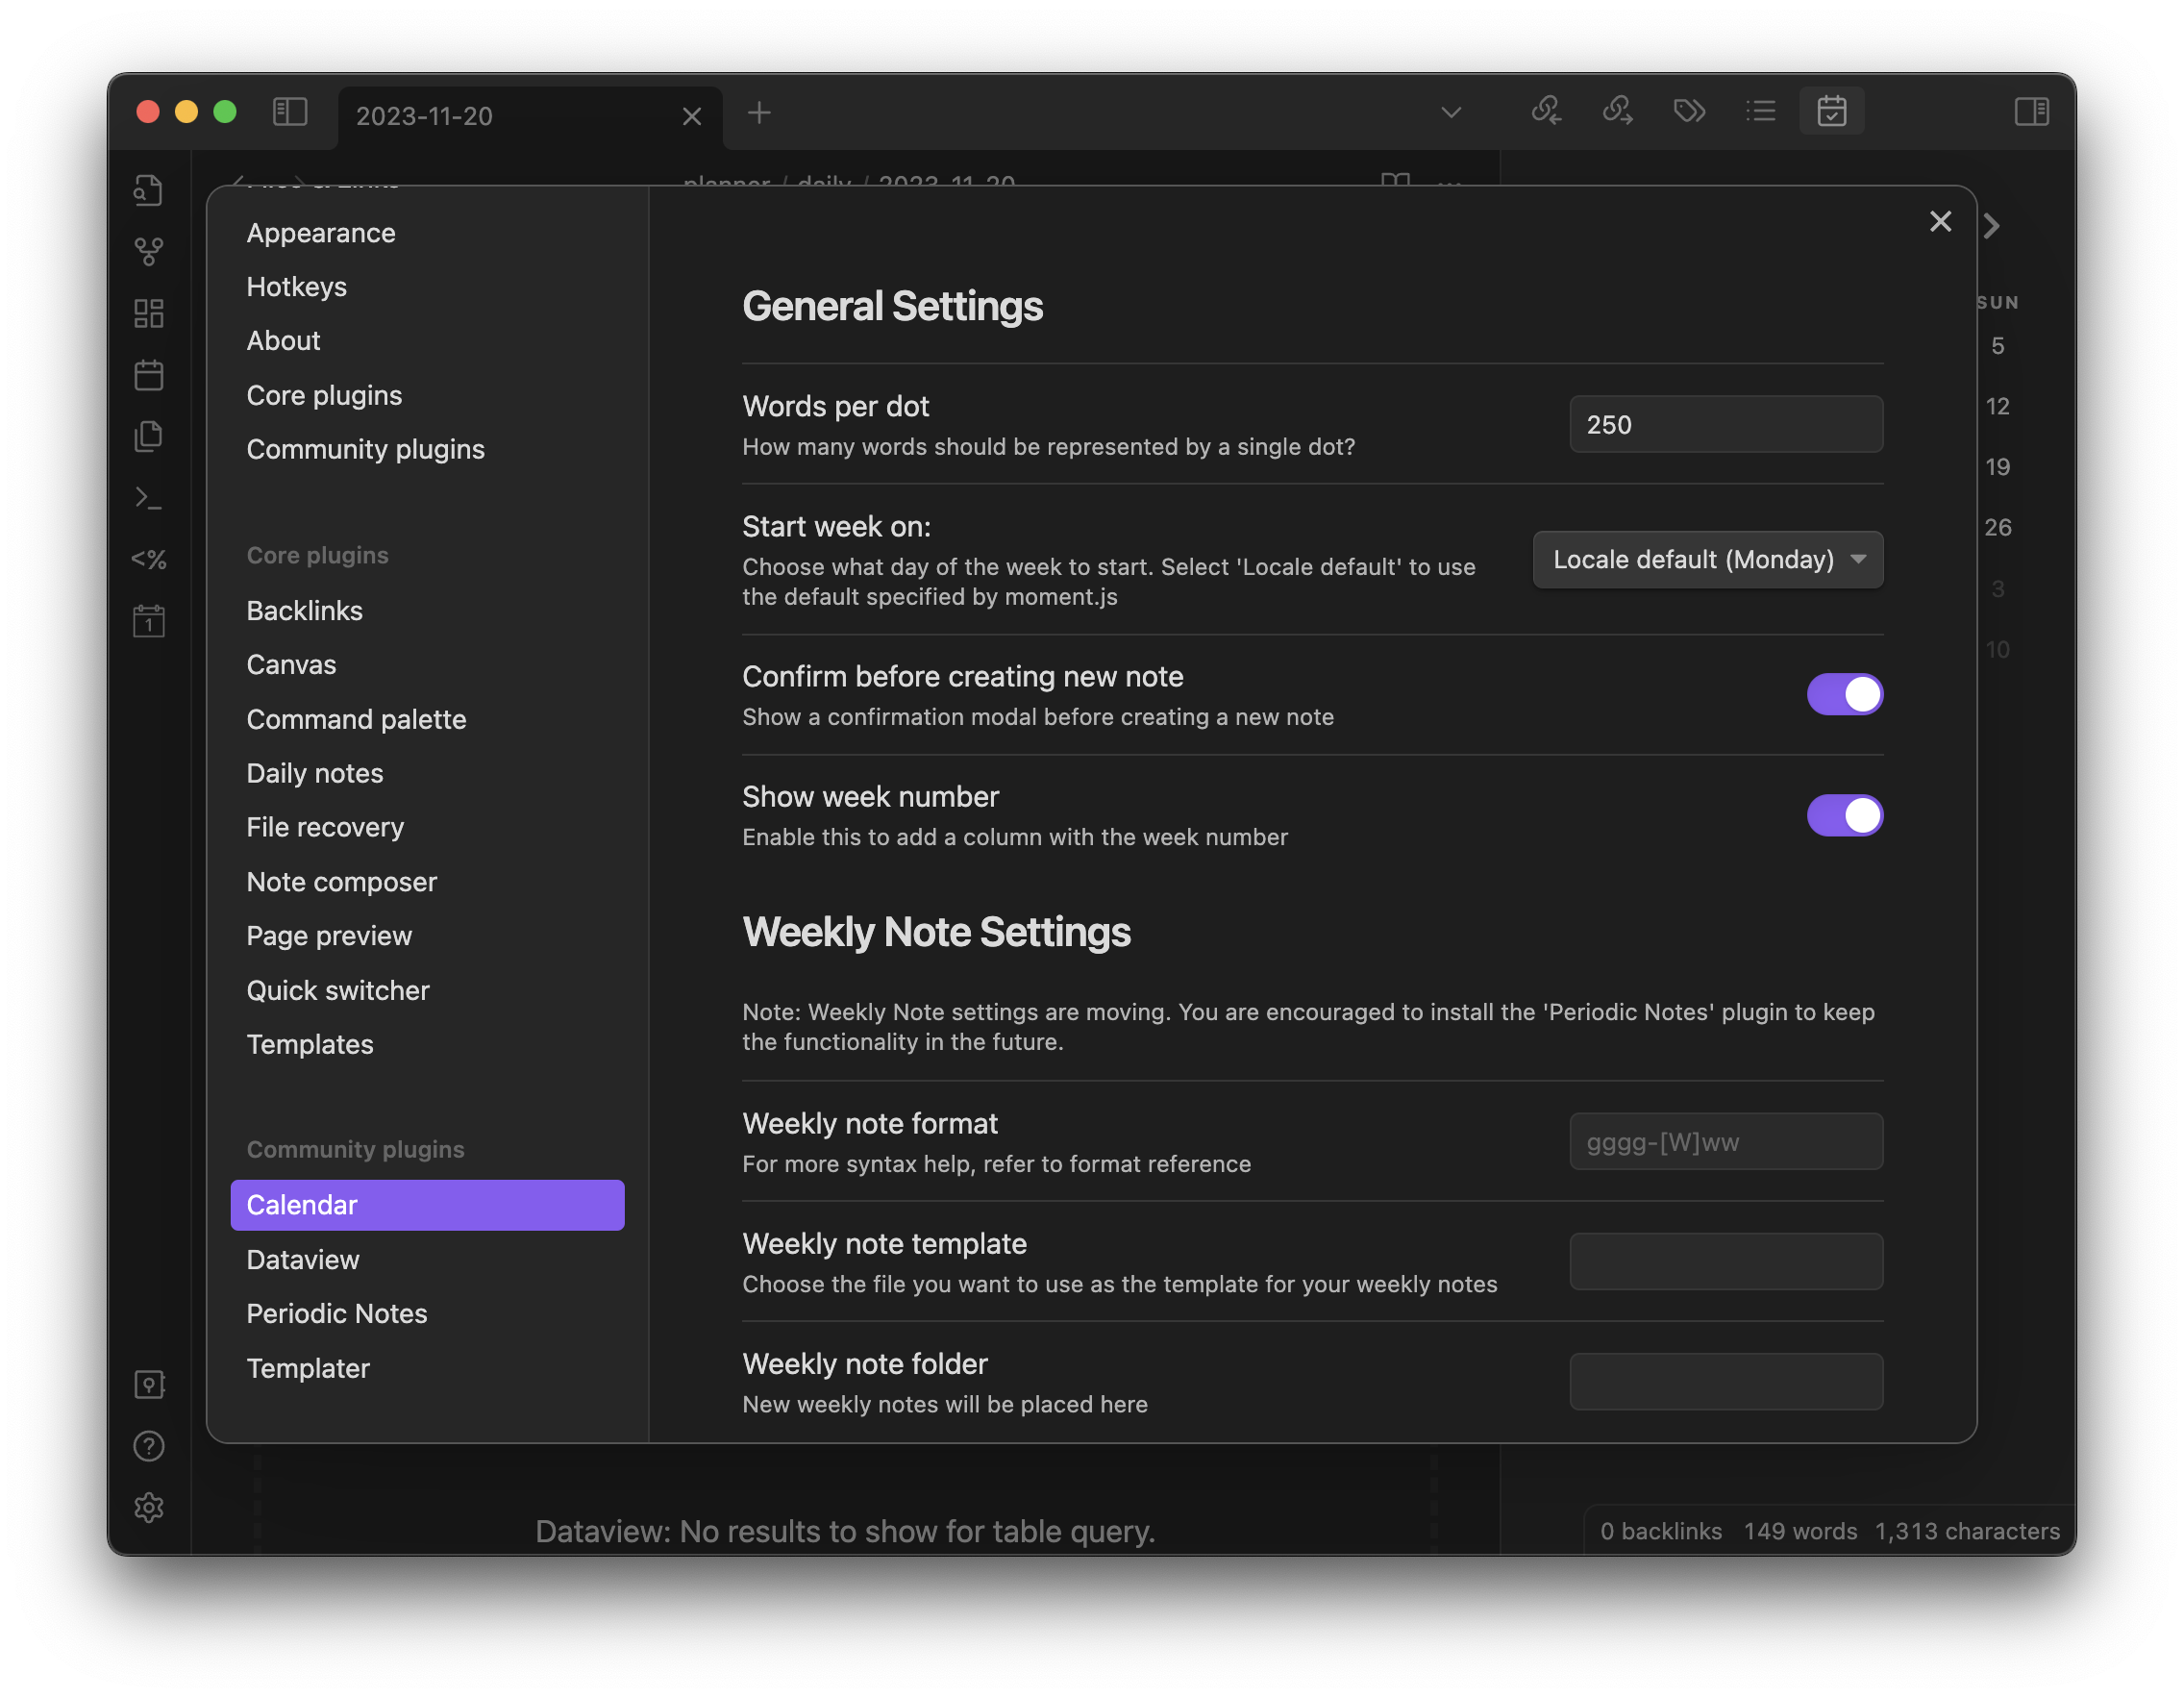
Calendar
For this I enable Show week number to let me click on week numbers to create notes from them in the widget.
I like to enable Confirm before creating a new note so that I don’t accidentally create notes I didn’t mean to when clicking in the widget.
Dataview
After installation, there’s no additional config needed for Dataview.
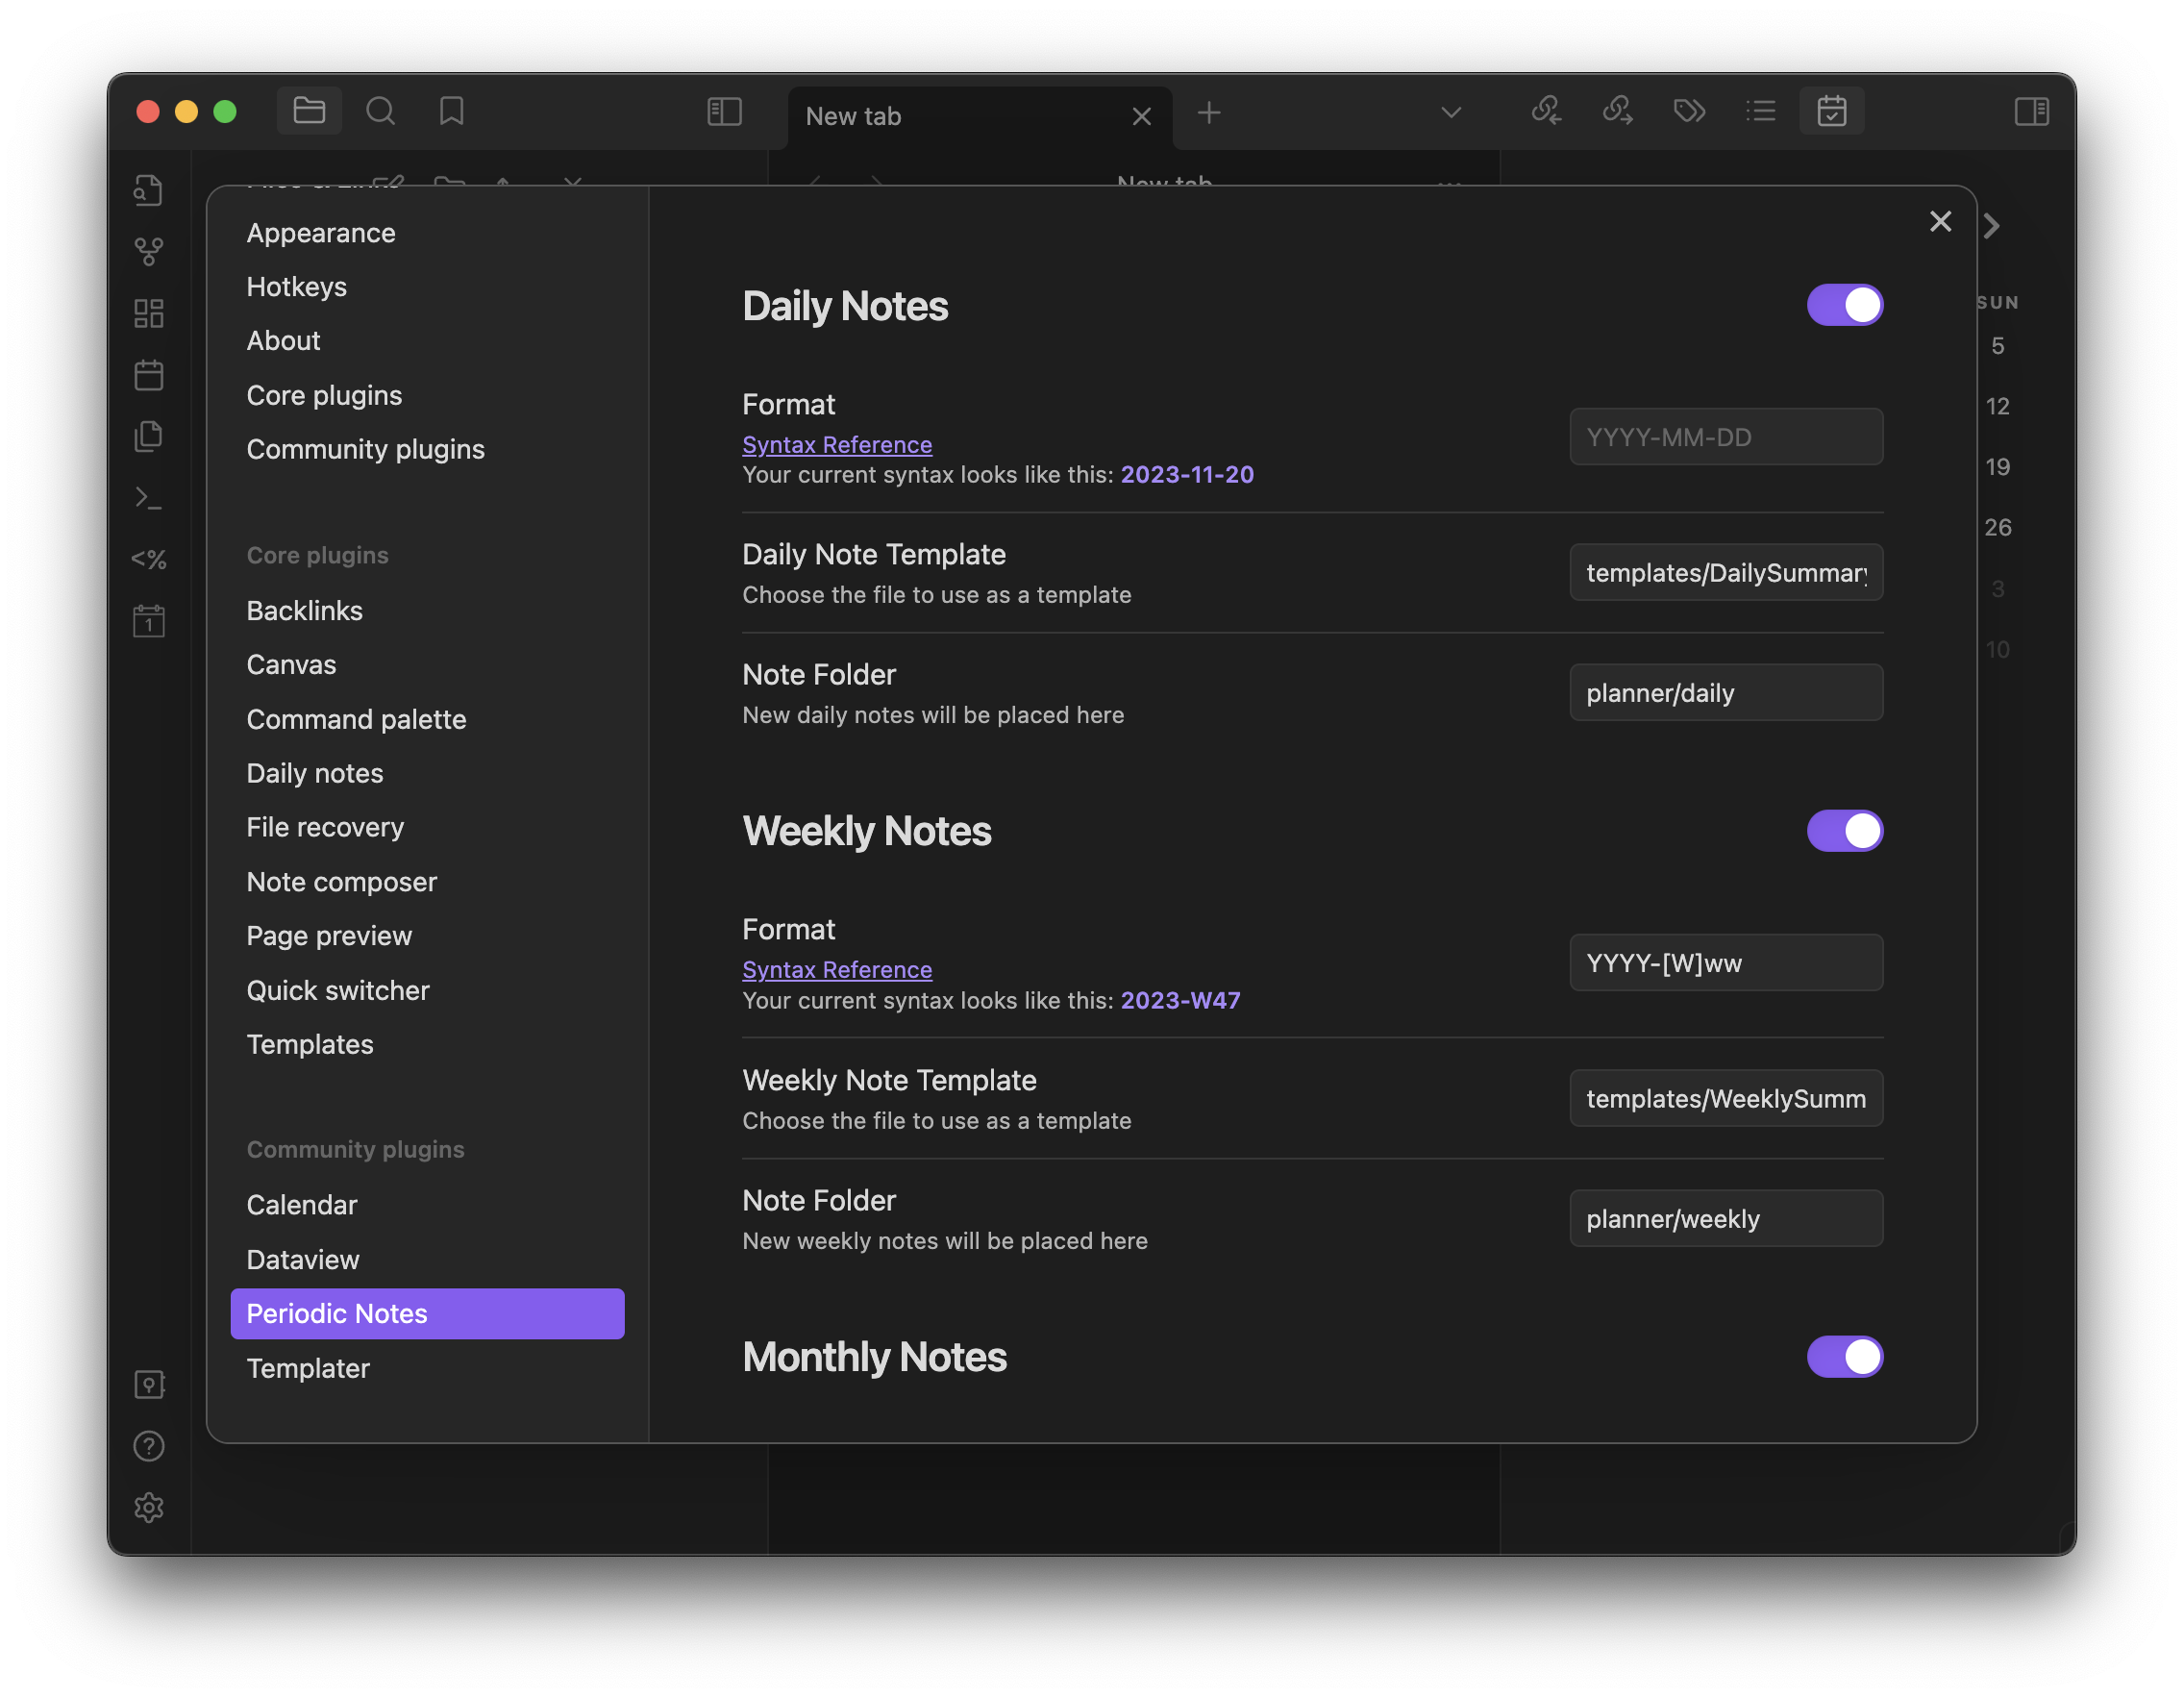
Periodic Notes
I enable all toggles with the exception of Quarterly Notes and Yearly Notes, since I don’t have these templated just yet.
The config for each note is as follows:
- Daily Notes
- Format:
YYYY-MM-DD(the default)- Creates files in the format
2023-11-20, which is theISO 8601 standard - A benefit of this format is that alphabetical order is the same as chronological
- So as daily notes are created, they are already in order
- Creates files in the format
- Daily Note Template:
templates/DailySummary.md - Note Folder:
planner/daily
- Format:
- Weekly Notes
- Format:
YYYY-[W]ww- Creates files in the format
2023-W46, also ISO 8601 compliant
- Creates files in the format
- Weekly Note Template:
templates/WeeklySummary.md - Note Folder:
planner/weekly
- Format:
- Monthly Notes
- Format:
YYYY-MM-[M]- Creates notes in the format
2023-11-M
- Creates notes in the format
- Monthly Note Template:
templates/MonthlySummary.md - Note Folder:
planner/monthly
- Format:
- Quarterly Notes
- Format:
YYYY-[Q]Q- e.g.
2023-Q4
- e.g.
- Quarterly Note Template:
templates/QuarterlySummary.md - Note Folder:
planner/quarterly
- Format:
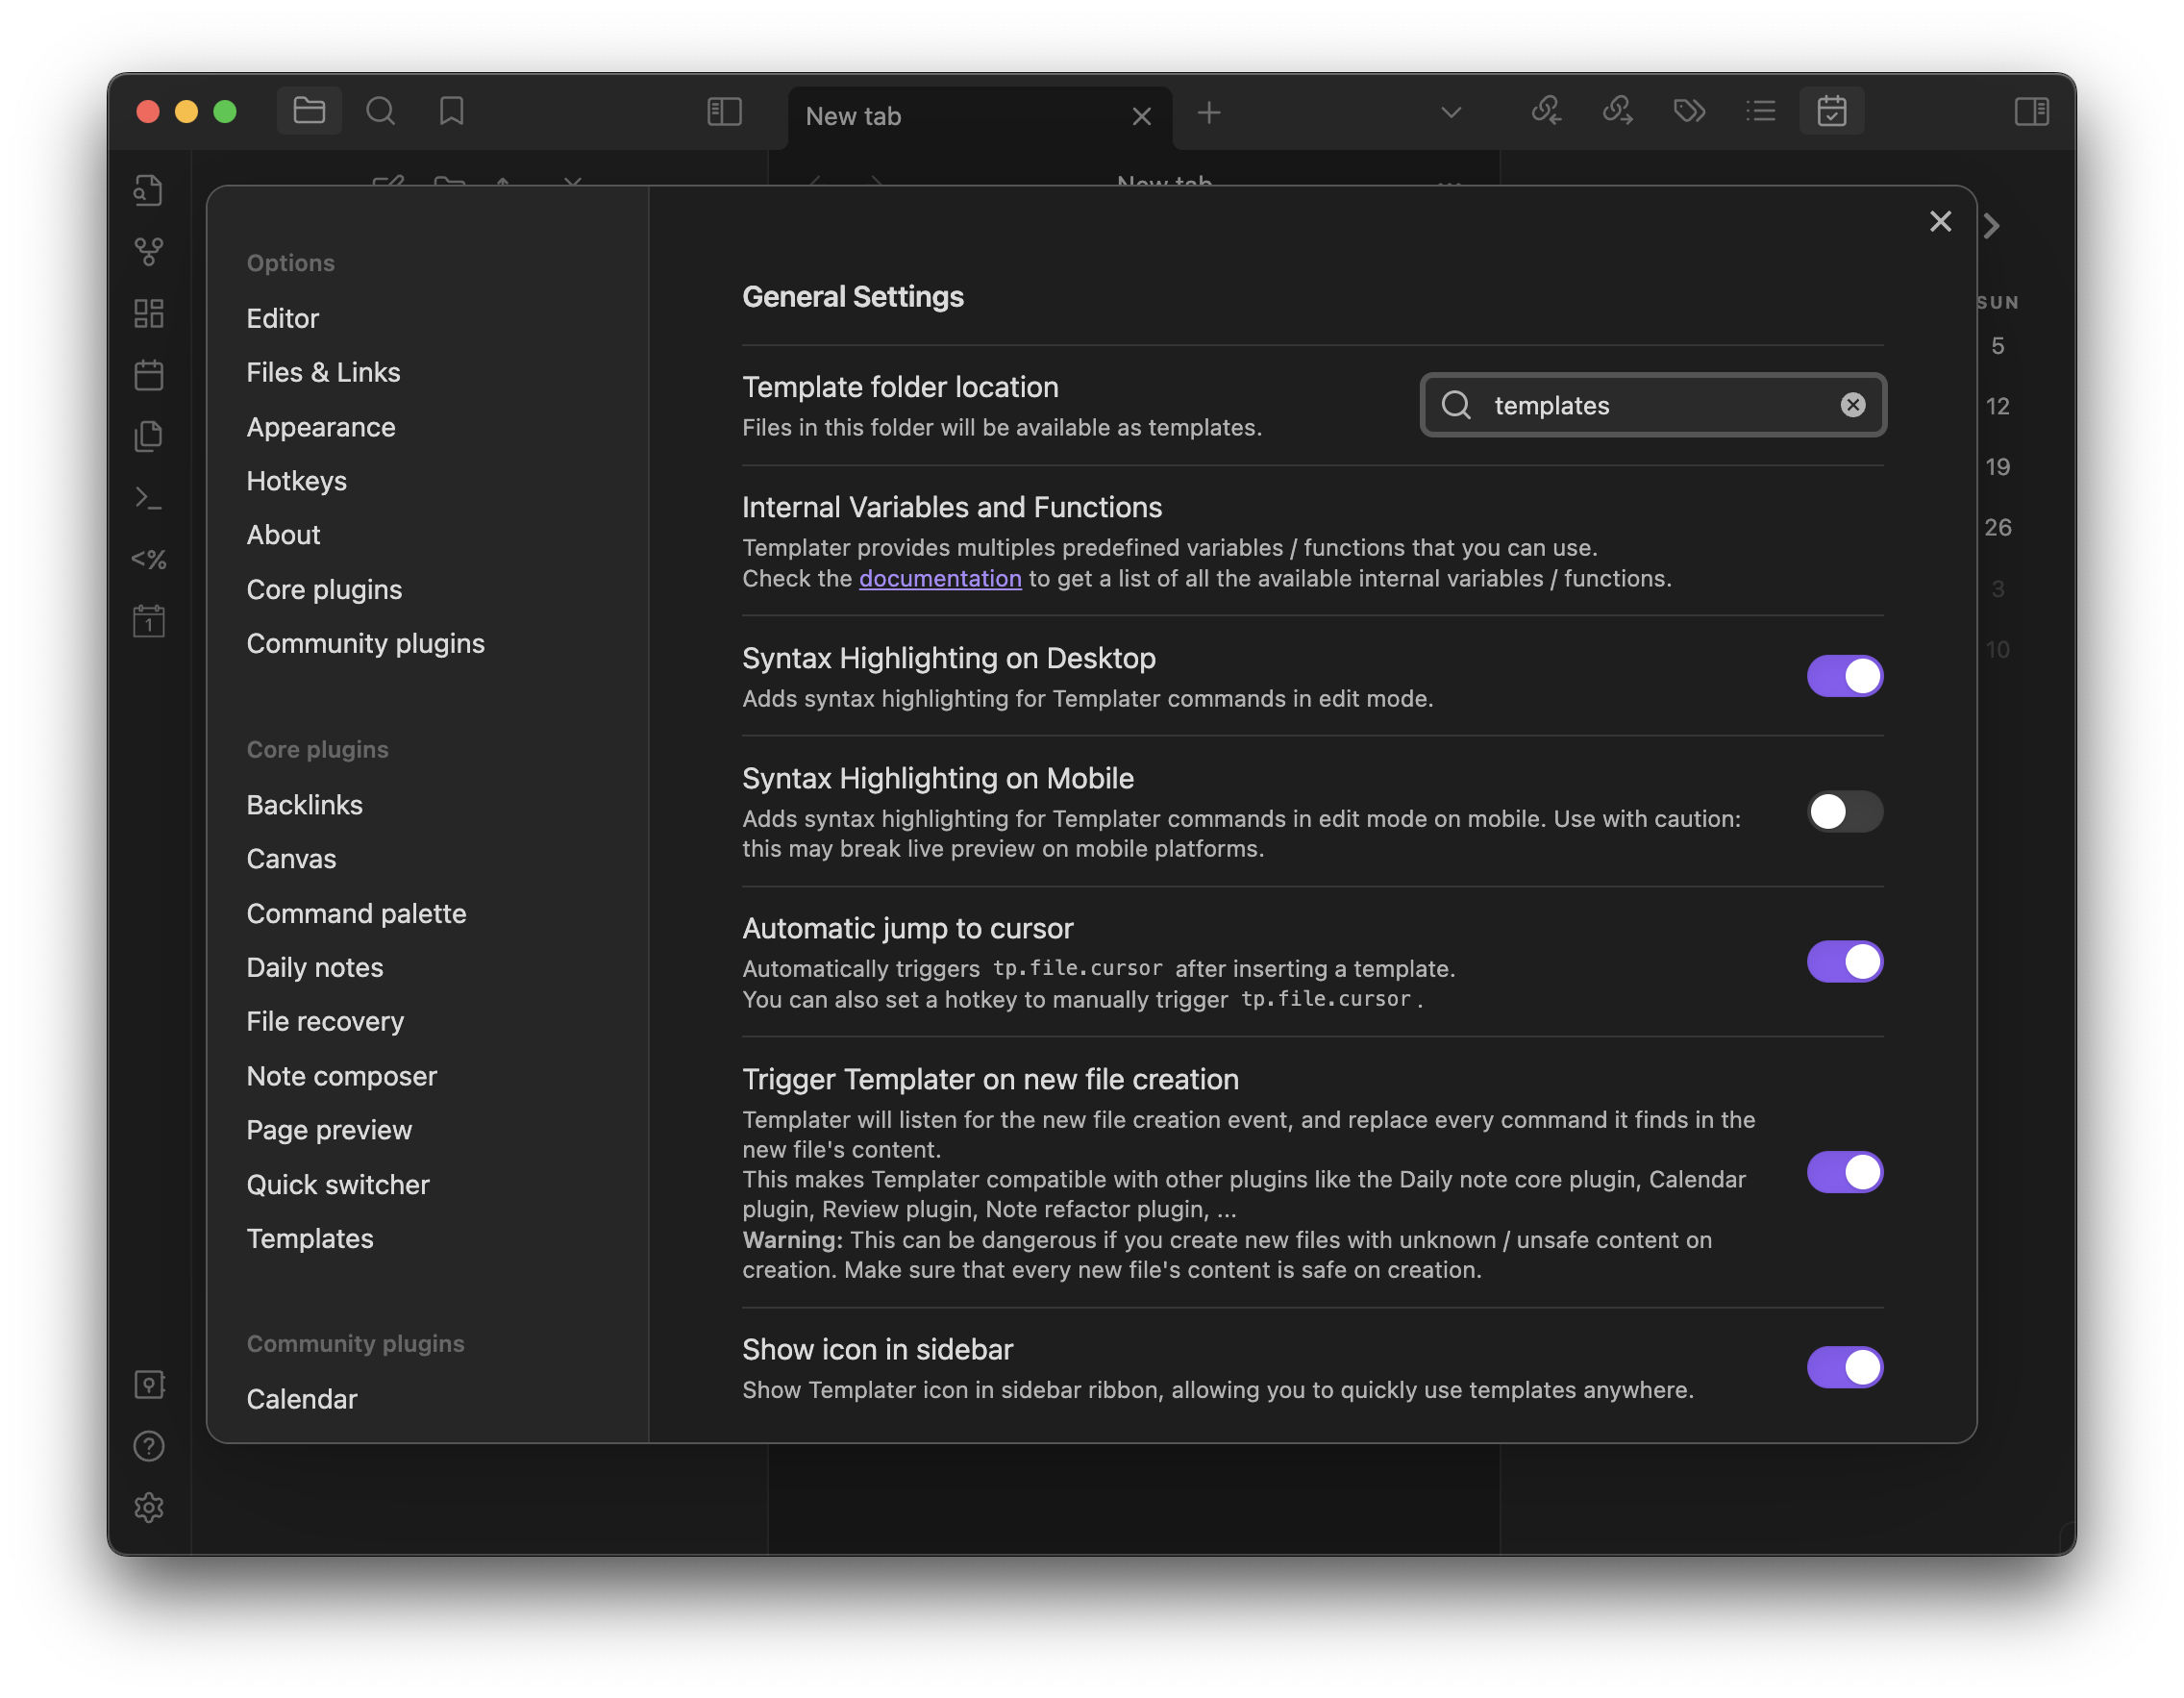
Templater
Other than setting the Template folder location to templates, there is no other config needed.
Connecting everything together
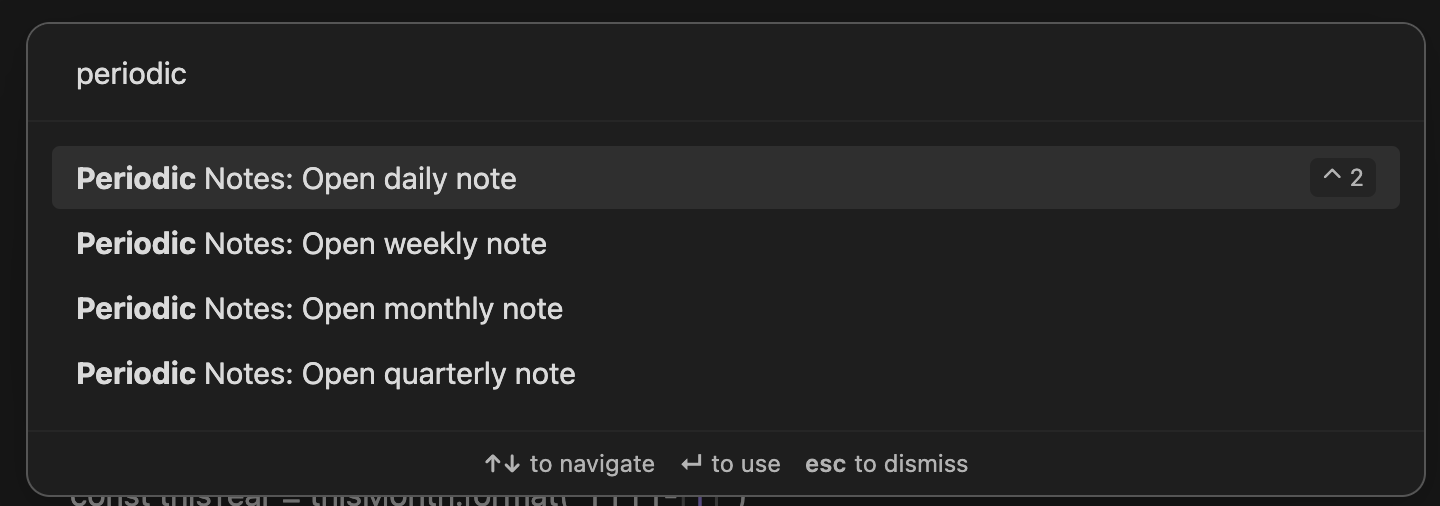
If everything is set up correctly, you should be able to click on a day or week in the Calendar widget and it should generate a note for you. Another way to create these is via the command palette, which can be access through the hotkey Cmd+P or Ctrl+P - this is how I create monthly notes.
Deep dive into note templates
Daily
The daily note is generated from this template, and all daily notes are stored in planner/daily.
Here’s a walkthrough on what’s happening in each section.
Properties
Properties define the metadata of the note, which can be used to query your notes to retrieve data back using Dataview. You define it in your notes via YAML front matter, which is YAML values wrapped around lines of ---.
--- # Front matter starts here
key: value
--- # Front matter ends here

Normal markdown text from here
Templater is used to populate the property values in the front matter, so let’s look at the local variables used in the daily note template.
<%*
moment.locale("en-gb")
const thisDay = window.moment(new Date(tp.file.title));
const previousDay = thisDay.clone().subtract(1, 'days');
const previousDayFmt = previousDay.format("YYYY-MM-DD")
const lastYearDay = thisDay.clone().subtract(1, 'years');
const nextDay = thisDay.clone().add(1, 'days');
const nextDayFmt = nextDay.format("YYYY-MM-DD")
const thisWeek = thisDay.format("YYYY-[W]ww")
const thisMonth = thisDay.format("YYYY-MM-[M]")
const thisDayLong = thisDay.format("dddd Do MMMM YYYY")
const thisYear = thisDay.format("YYYY-[Y]")
-%>
Reviewing each one of these:
thisDay- Creates a moment.js object for the date that this daily note represents
- Remember that daily notes are created in the format
YYYY-MM-DD(2023-11-20), which is already the format for theDateconstructor - By using the file name as the source of truth, it allows me to create daily notes from the Calendar widget just by clicking on the dates
previousDayandpreviousDayFmt- Calculate the day previous to this one, and then format it in to
YYYY-MM-DD - Used for navigation
- Calculate the day previous to this one, and then format it in to
nextDayandnextDayFmt- Similar to above, but for the succeeding day
lastYearDay- Calculate the same day last year
- Used to query the journal entry from last year
thisWeek,thisMonth,thisYear- The week/month/year that this day is in
thisDayLong- A long format of this date (i.e.
Monday 20th November 2023)
- A long format of this date (i.e.
You’ll notice that I have to clone thisDay, because add() and subtract() are mutating.
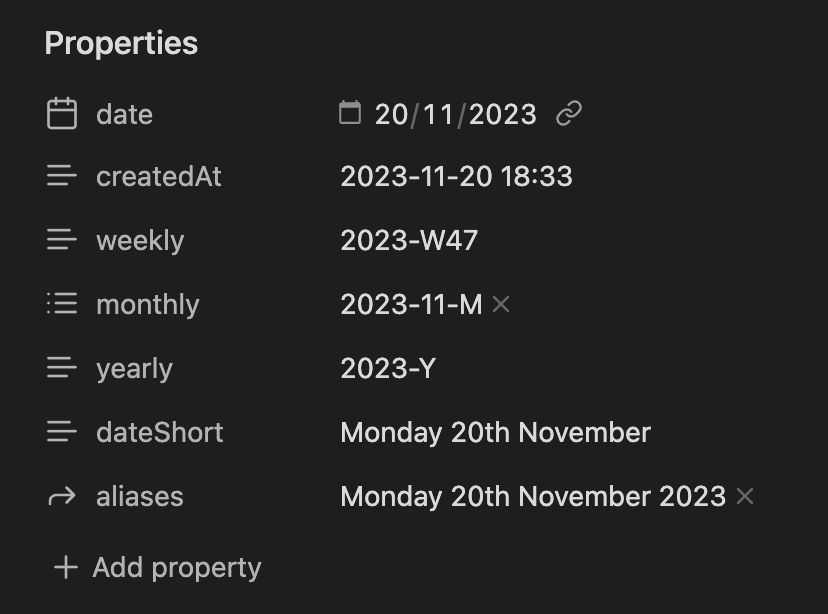
These variables then get placed into the YAML front matter for the note. You’ll notice that there is date and createdAt which is a standard across any note in my vault and represent the date and time the note was created.
Additionally there is a dateShort property which is the date of the note, but formatted in a nicer manner for when the note is recalled.
---
date: <% tp.date.now("YYYY-MM-DD") %>
createdAt: <% tp.file.creation_date() %>
weekly: <% thisWeek %>
monthly:
  - <% thisMonth %>
yearly: <% thisYear %>
dateShort: <% thisDay.format("dddd Do MMMM") %>
aliases:
  - <% thisDayLong %>
---
After templating it looks like:
---
date: 2023-11-20
createdAt: 2023-11-20 18:33
weekly: 2023-W47
monthly:
  - 2023-11-M
yearly: 2023-Y
dateShort: Monday 20th November
aliases:
  - Monday 20th November 2023
---
Since Obsidian has first-class support for properties, it creates a nice interface.
Navigation
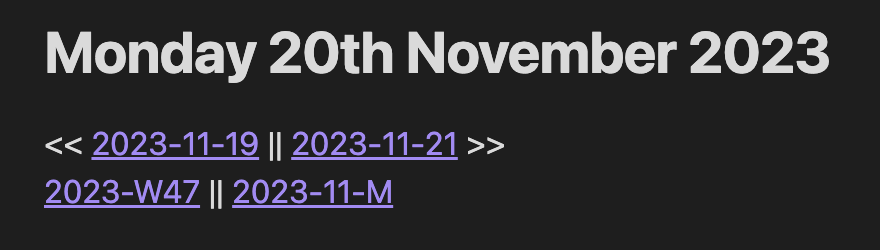
# <% thisDayLong %>
<< [[planner/daily/<% previousDayFmt %>|<% previousDayFmt %>]] || [[planner/daily/<% nextDayFmt %>|<% nextDayFmt %>]] >>
[[<% thisWeek %>]]  || [[<% thisMonth %>]]
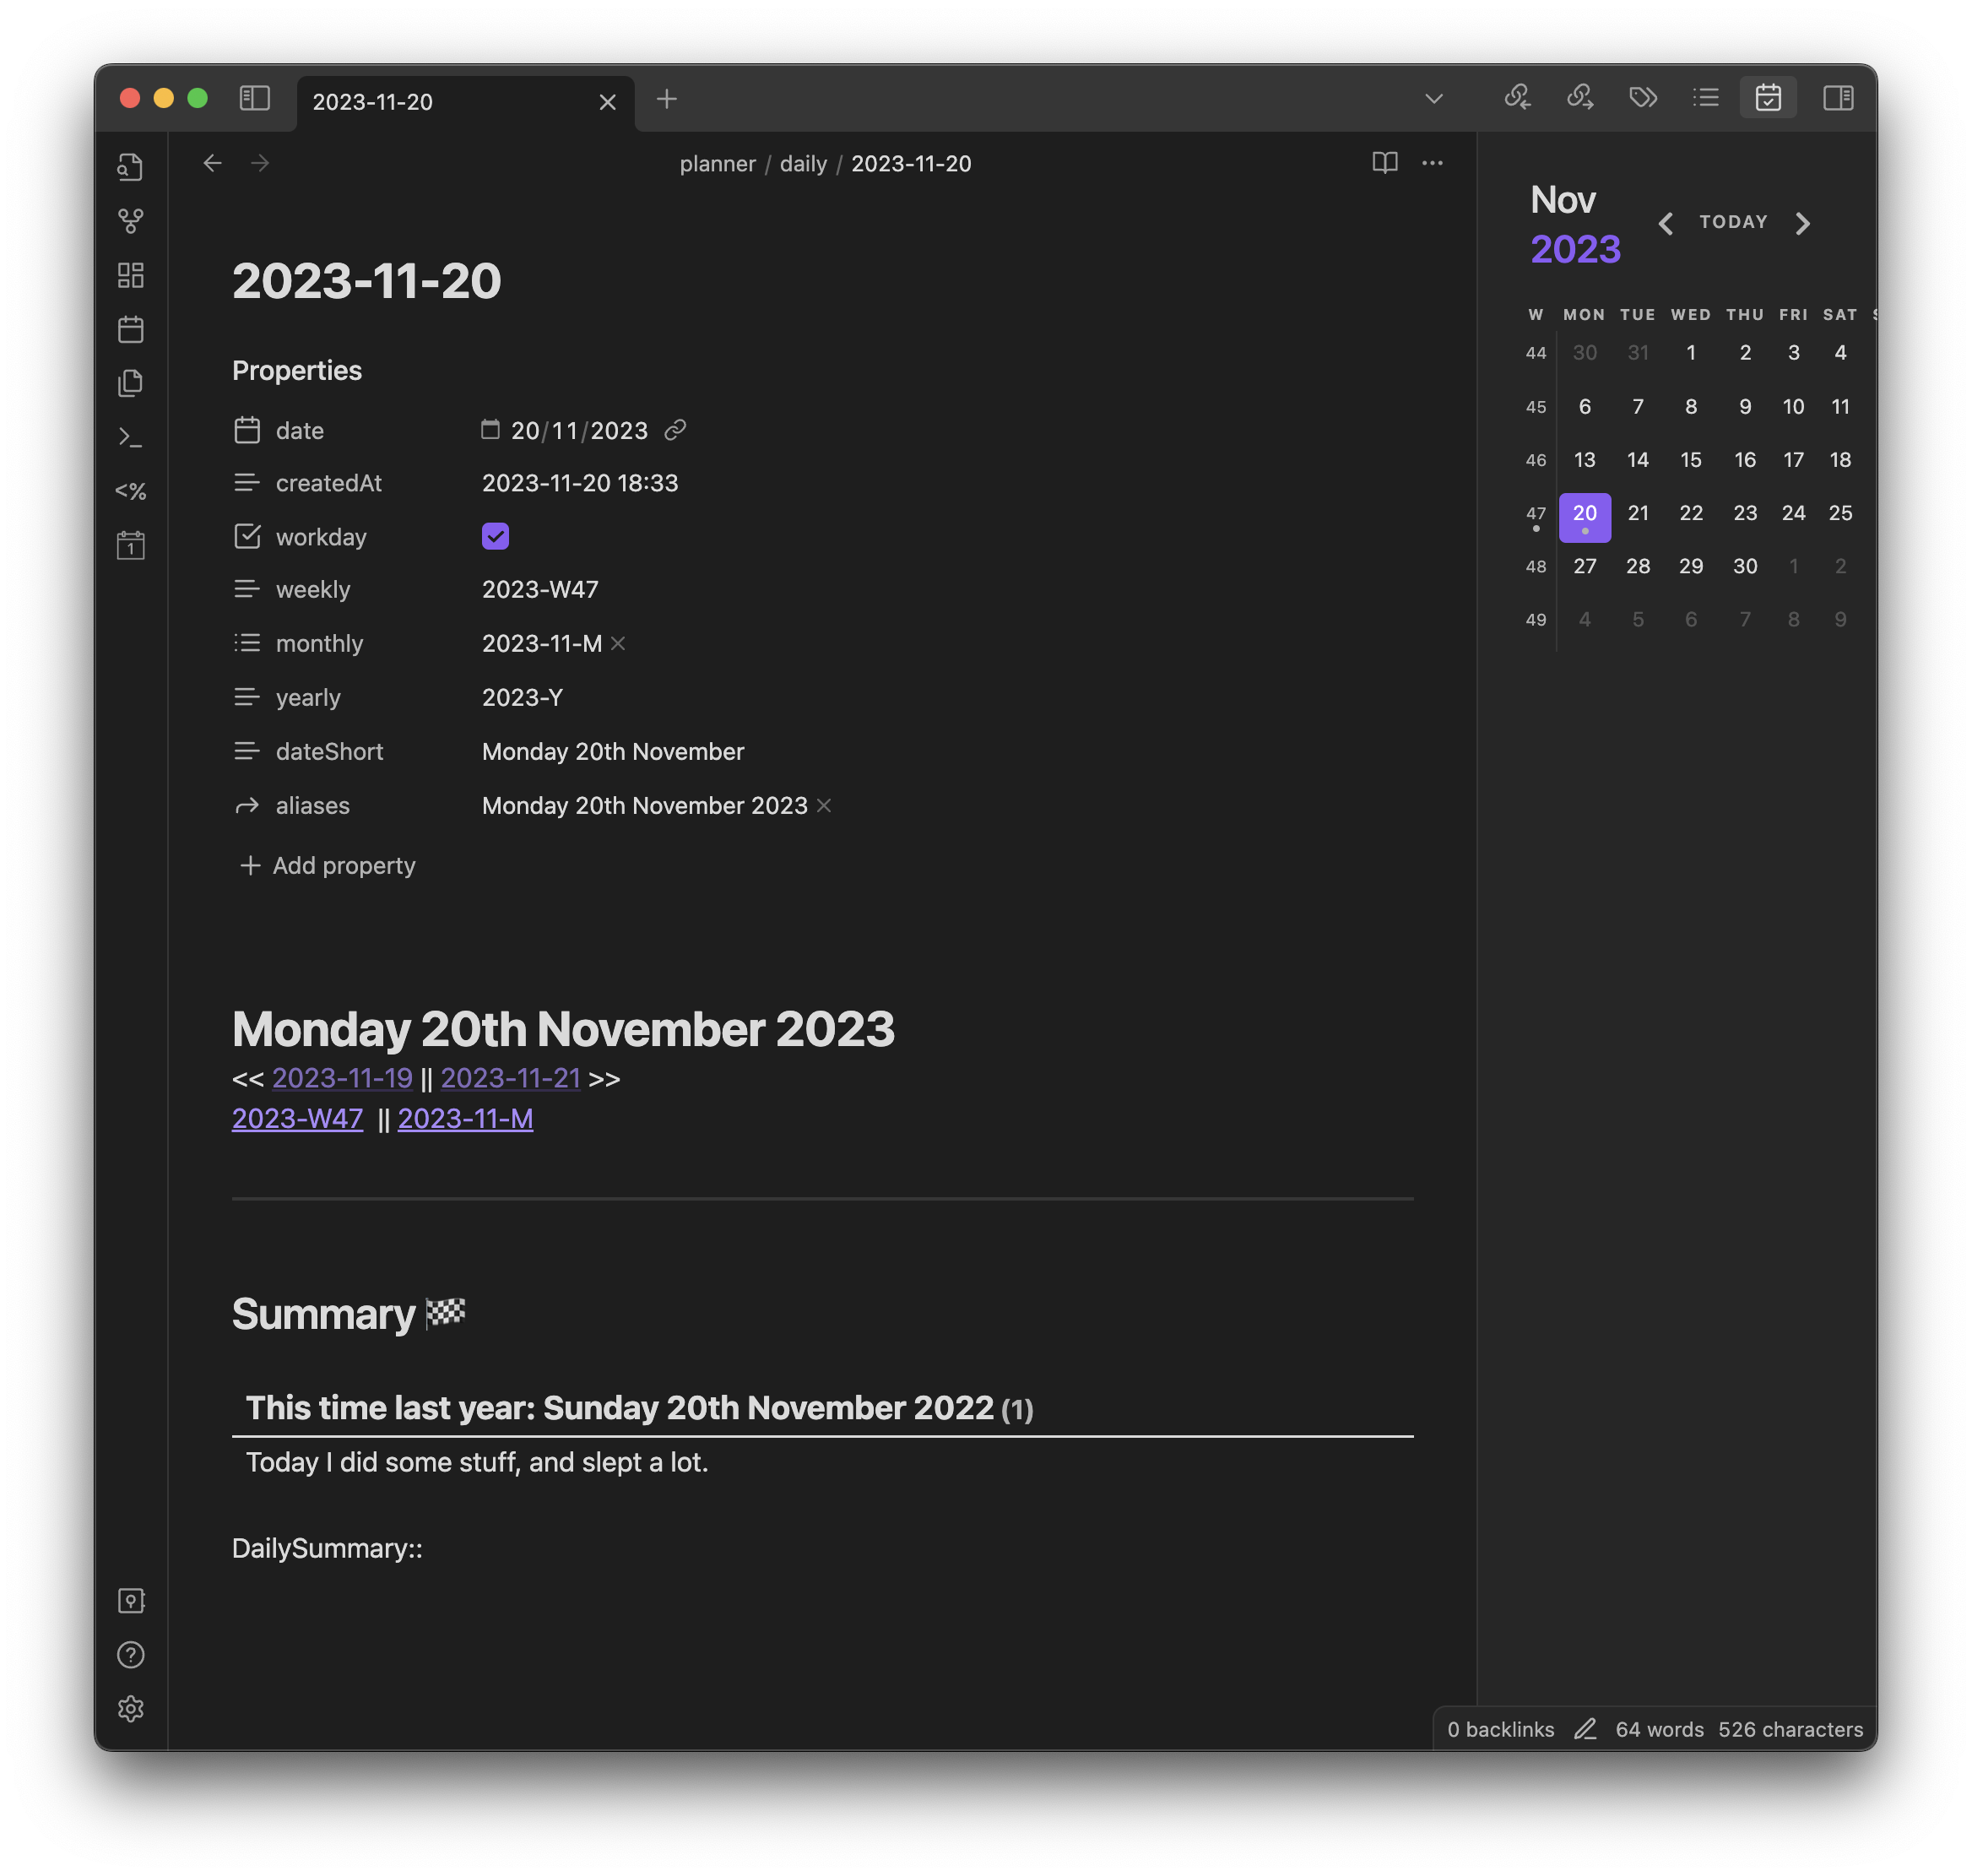
This is the main title for the note I’m working in. There are also links to other notes related to this day, such as the adjacent days (although I primarily use the hotkeys Ctrl+1 and Ctrl+3 to navigate previous and next days respectively), along with a link to the weekly and monthly notes for this day.
# Monday 20th November 2023
<< [[planner/daily/2023-11-19|2023-11-19]] || [[planner/daily/2023-11-21|2023-11-21]] >>
[[2023-W47]]  || [[2023-11-M]]
This visualises as:
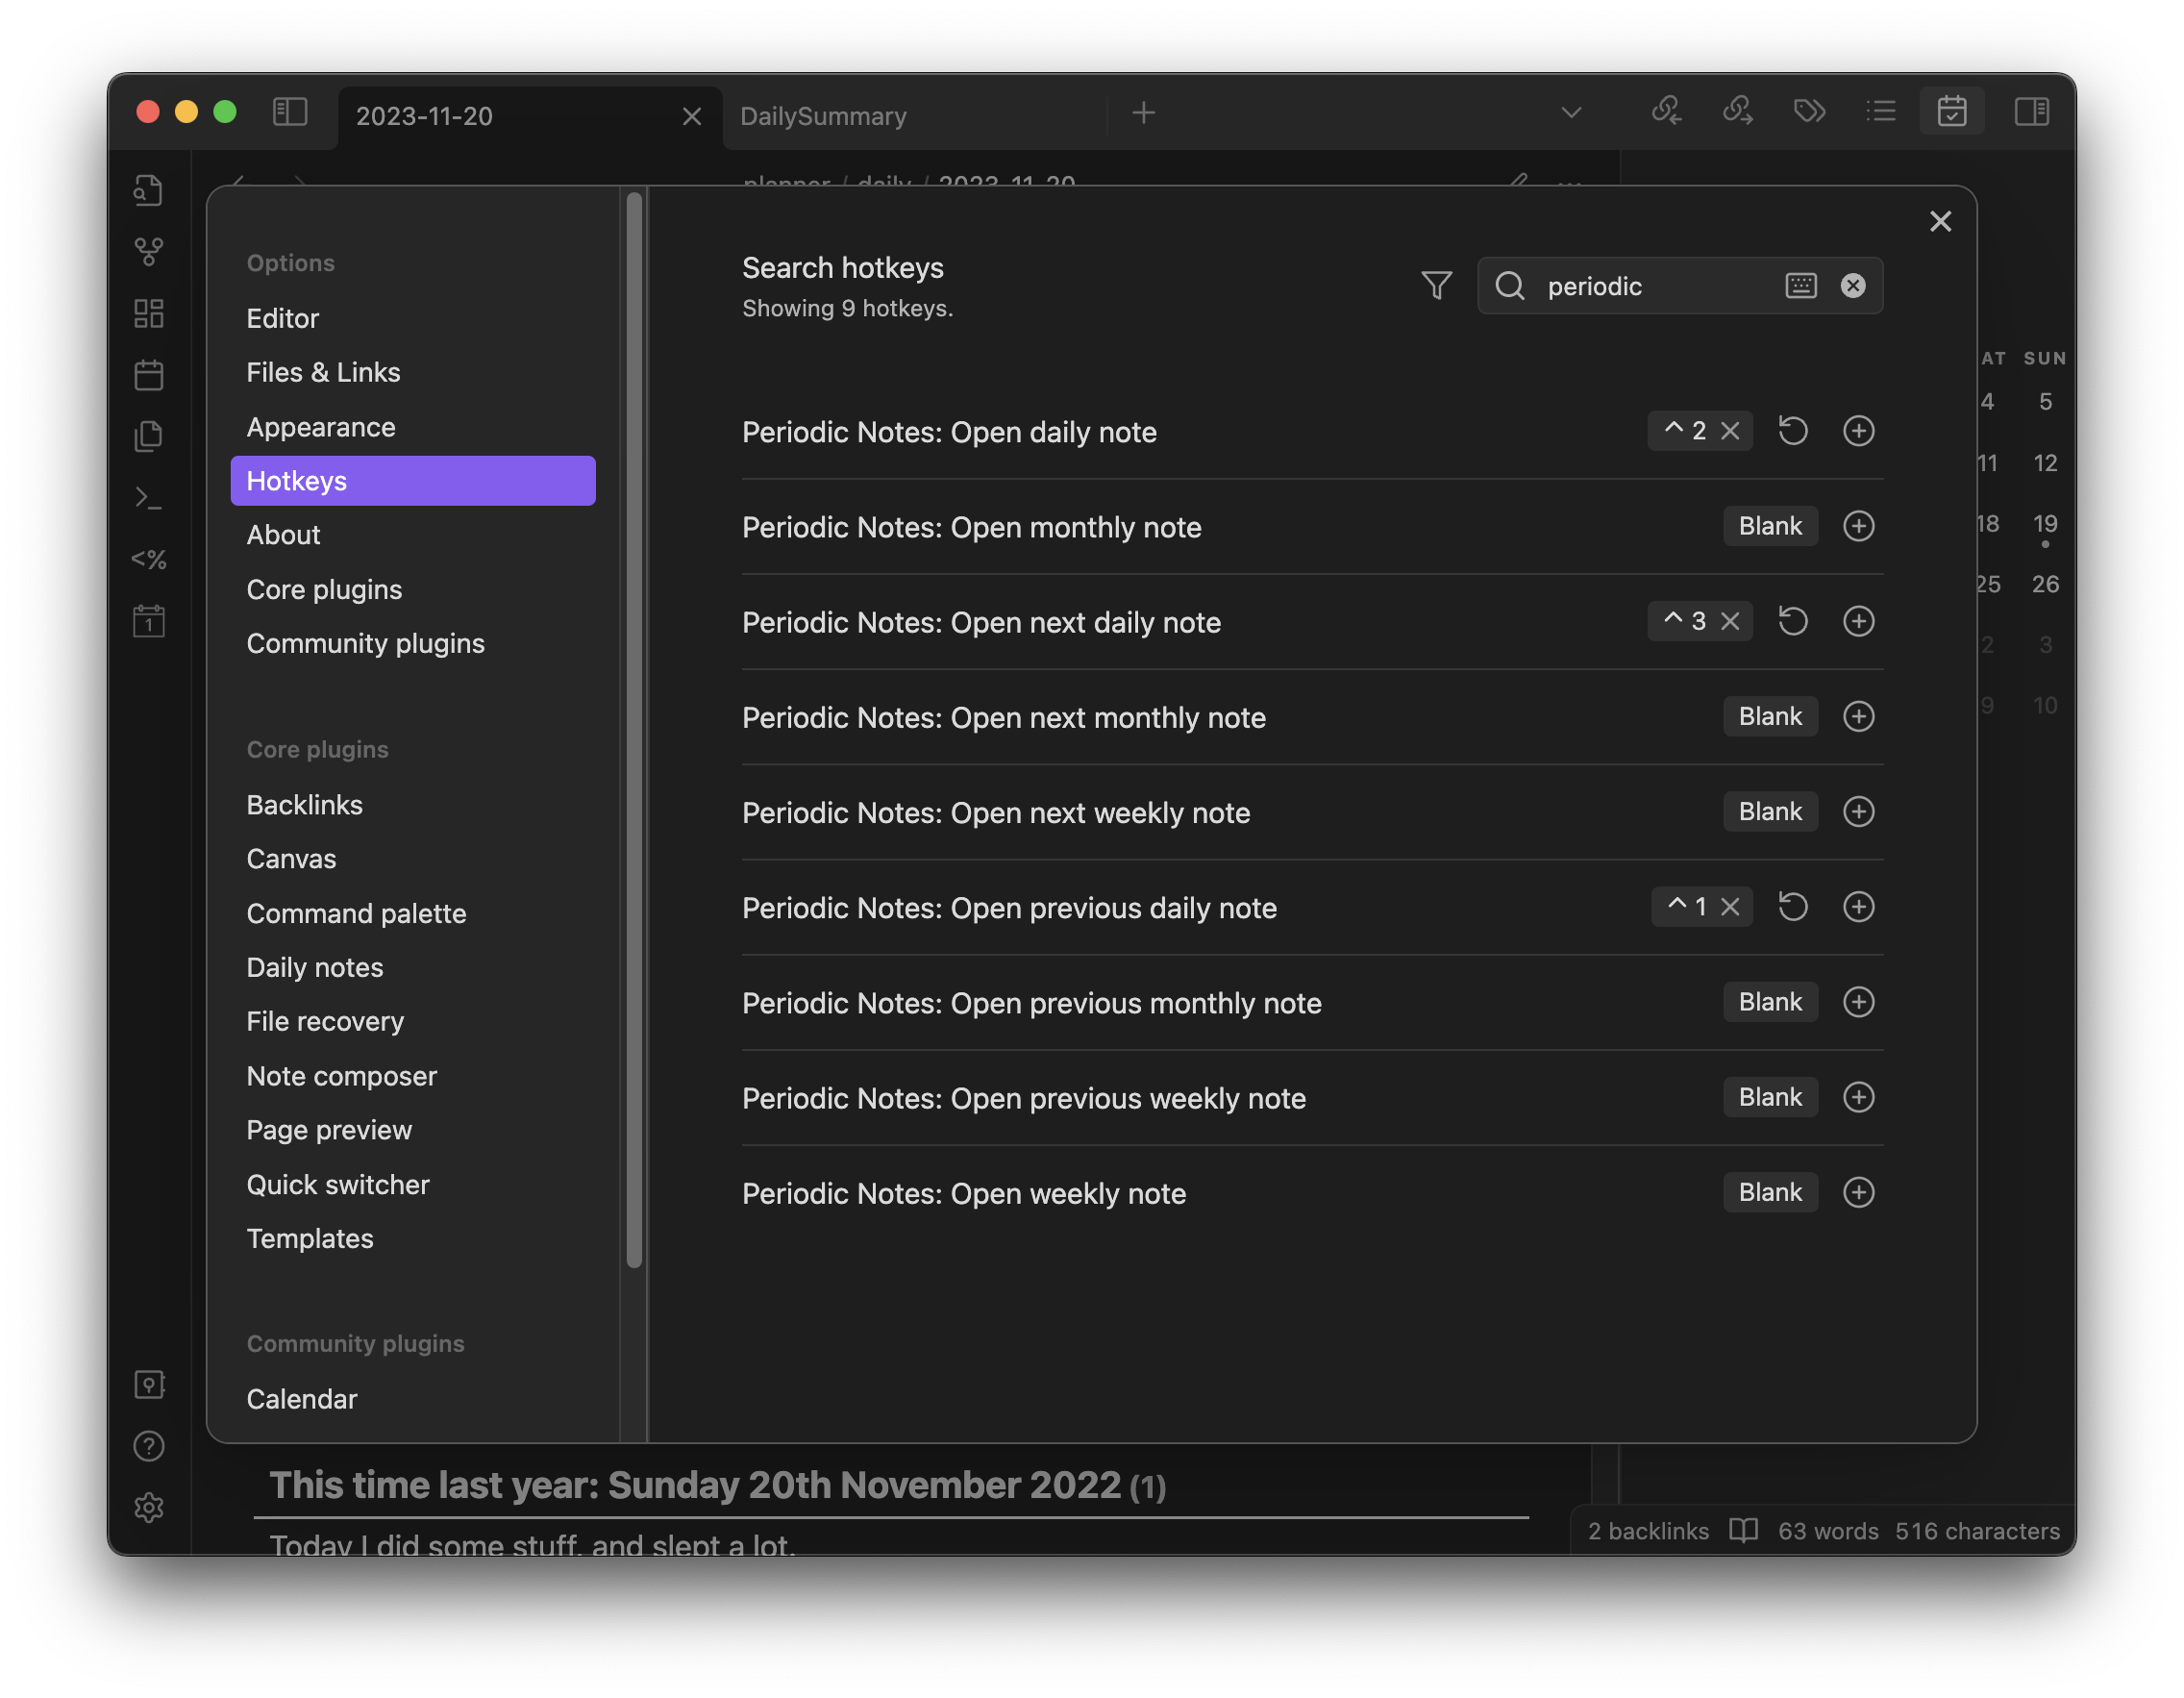
See below for the hotkeys I have set up for navigating daily notes. Even if I don’t have hotkeys for them, I can still access the command palette at the hotkey Ctrl+P, or Cmd+P or macOS.
Summary
## Summary 🏁

```dataview
TABLE WITHOUT ID DailySummary as "This time last year: <% lastYearDay.format("dddd Do MMMM YYYY") %>"
FROM "planner/daily"
WHERE file.name = "<% lastYearDay.format("YYYY-MM-DD") %>"
```

DailySummary::
After DailySummary:: is where I write the day’s journal entry. Before that though, I have a Dataview query which retrieves the journal entry for the same day, but the year before. I like retrieving the journal entry for the year before to frame time somewhat.
After templating, it looks like this:
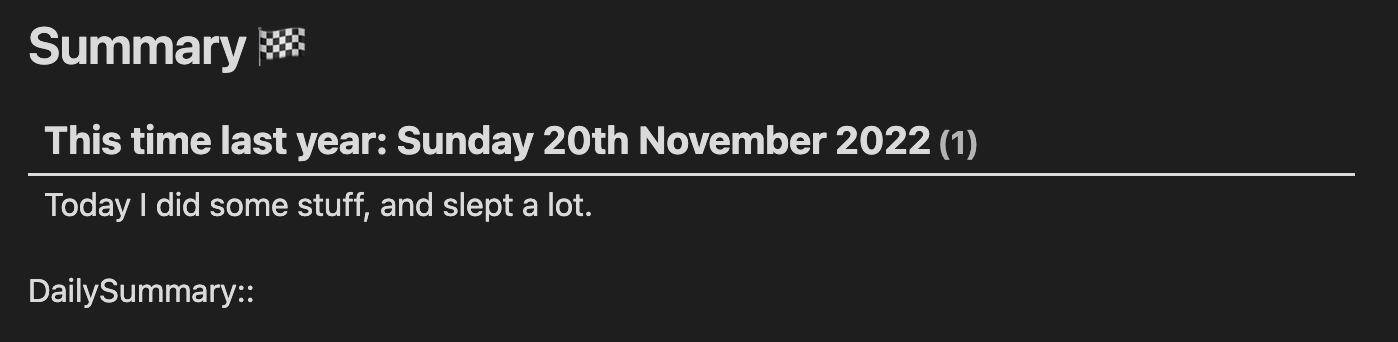
## Summary 🏁

```dataview
TABLE WITHOUT ID DailySummary as "This time last year: Sunday 20th November 2022"
FROM "planner/daily"
WHERE file.name = "2022-11-20"
```

DailySummary::
And here it is when rendered.
A bit about Dataview and querying
Dataview is one of the most popular plugins for Obsidian, and there’s good reason for it. It opens up a whole world of dynamically presenting the files in your vault in a database-like manner. You can query for files themselves, or their metadata.
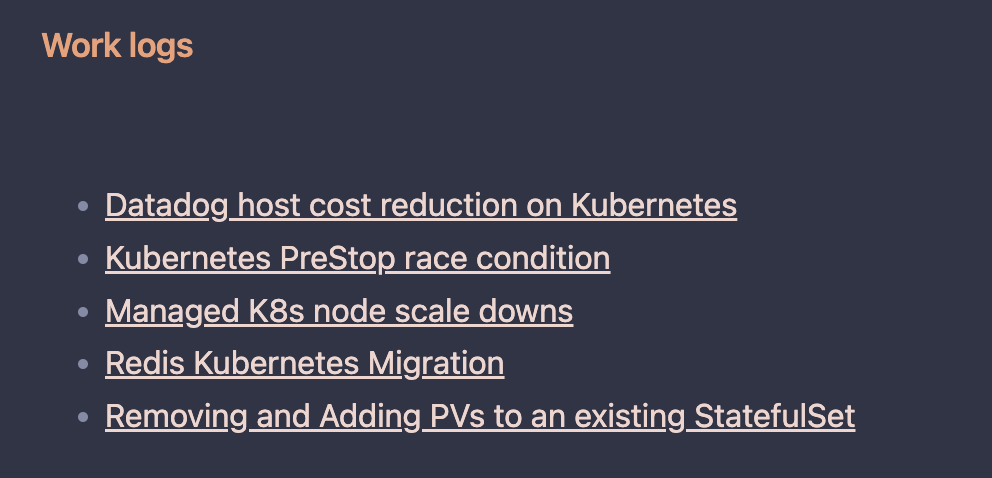
For example, the Dataview query below will retrieve all notes that are tagged with #kubernetes and #worklog.
```dataview
LIST
FROM #kubernetes AND #worklog
SORT file.name
```
This then is visualised as:
So how do you add metadata? Dataview allows for a couple of methods ; including YAML front matter (aka Properties), or in-line in the file via a key name appended by two colons - e.g. NewProperty::.
I would definitely recommend to check the docs for Dataview, I’ll be covering it in more detail in this post for my particular use-case.
Weekly
The weekly note is used to summarise what happened during a week. In order for me to recall each day, I use a Dataview query to retrieve the DailySummary for each day in that week.
I use this template for my weekly notes, which produces the below.
Properties
These local variables are define in the template:
<%*
moment.locale("en-gb")
const thisWeek = window.moment(tp.file.title, "YYYY-&W WW");
const previousWeek = thisWeek.clone().subtract(1, 'weeks')
const nextWeek = thisWeek.clone().add(1, 'weeks')
const theseMonths = [...new Set([1,2,3,4,5,6,7].map(d=>moment(`${tp.file.title}-${d}`, "YYYY-W-E").format("YYYY-MM-[M]")))]
const thisYear = thisWeek.format("YYYY-[Y]")
-%>
thisWeek- Creates a moment.js object for the week that this note is for
- We’re parsing the file title (which is in the format
2023-W47) to create the object - Similarly to the daily note, this allows me to create weekly notes from the Calendar widget by clicking on the week number
previousWeekandnextWeek- Calculate the weeks that are adjacent to this one
- Used for navigation
theseMonths- Calculates the months that this week traverses
- It loops over days of the week (i.e. first day in the week), creates a new moment object, then formats it in the month format
thisYear- The year that this week is in
These variables are then used in the YAML front matter below. There is some extra logic to print out monthly into an array.
---
date: <% tp.date.now("YYYY-MM-DD") %>
createdAt: <% tp.file.creation_date() %>
monthly: <%* theseMonths.forEach(month => tR += `\n - ${month}`) %>
yearly: <% thisYear %>
---
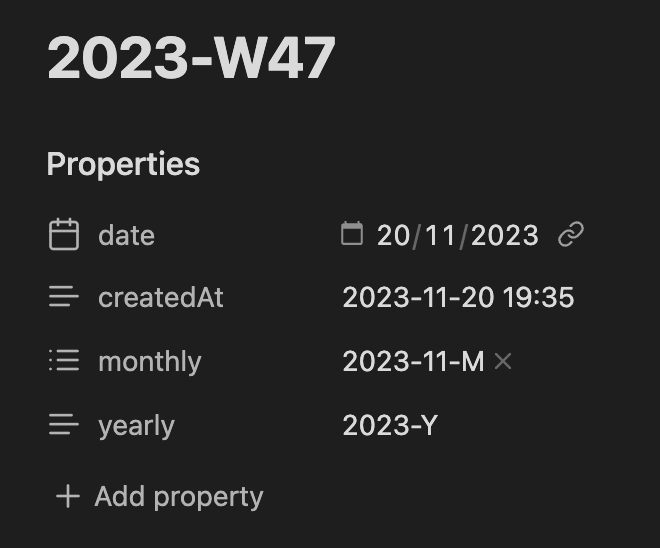
After templating, it looks like this:
---
date: 2023-11-20
createdAt: 2023-11-20 19:35
monthly:
 - 2023-11-M
yearly: 2023-Y
---
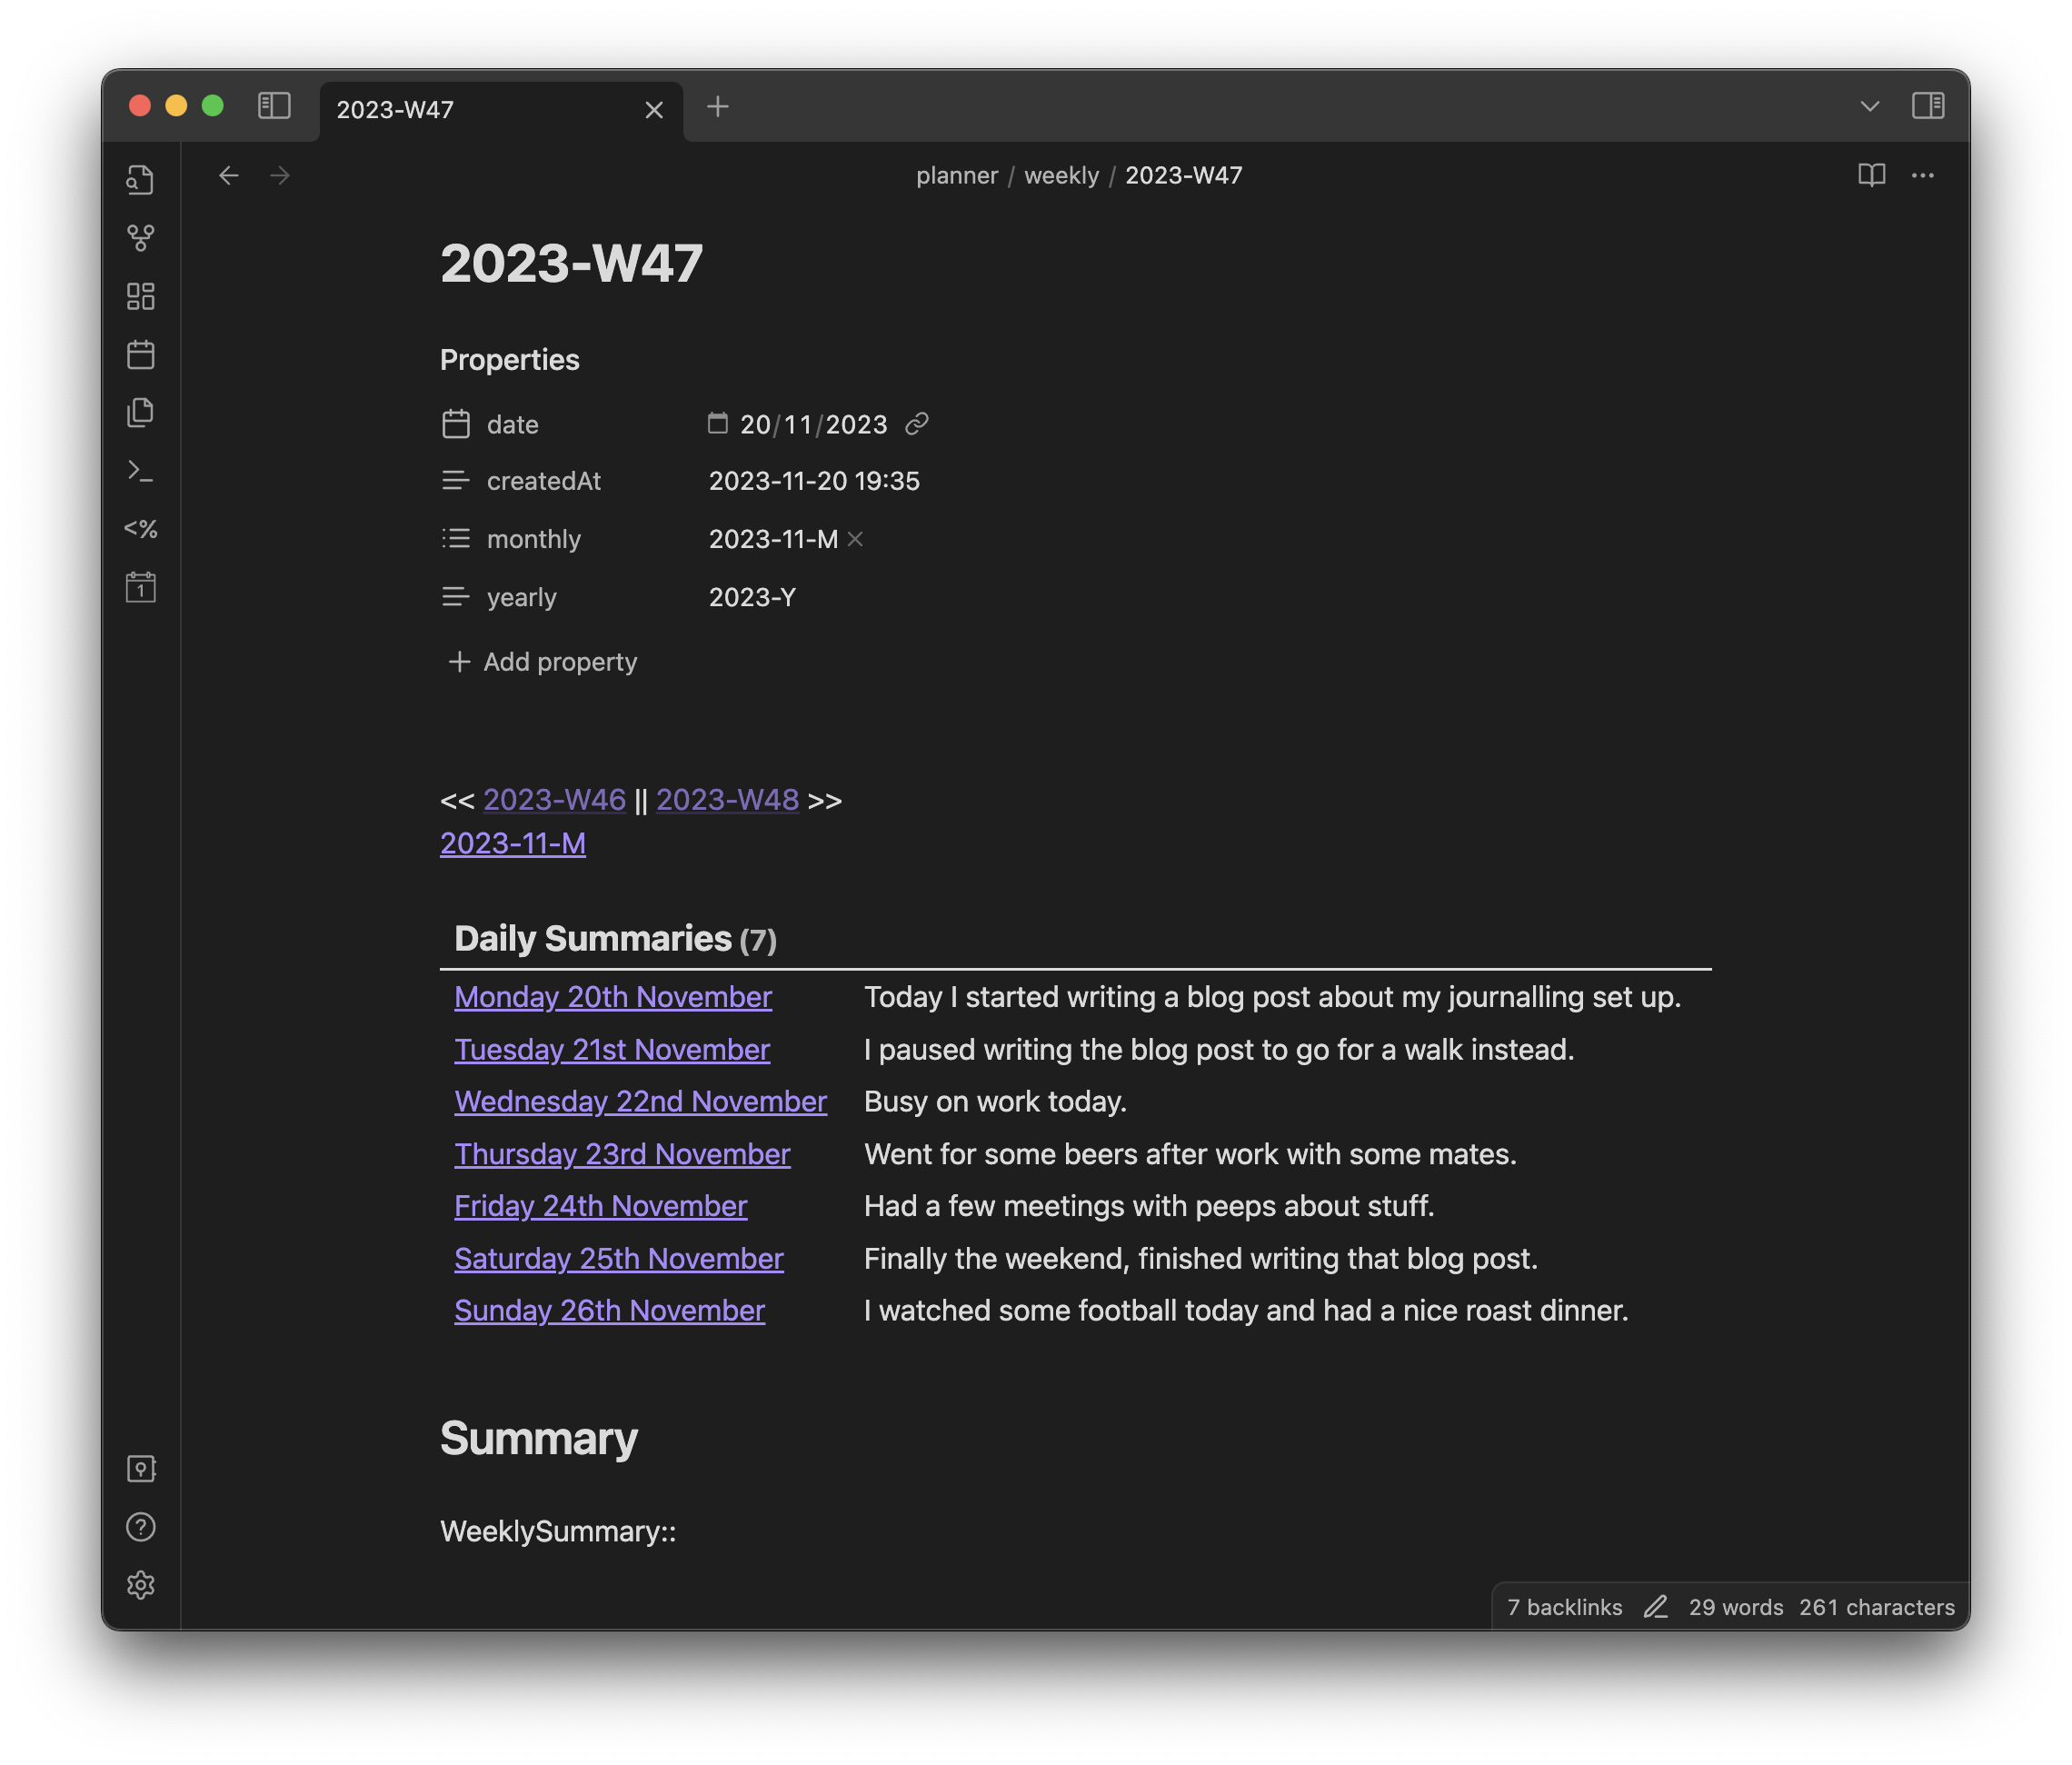
Visualised as:
Navigation
<< [[<% previousWeek.format("YYYY-[W]ww") %>]] || [[<% nextWeek.format("YYYY-[W]ww") %>]] >><%* theseMonths.forEach(month => tR += `\n[[${month}]]`) %>
I can navigate to adjacent weekly notes, and the monthly notes for this week from this panel. After templating it looks like:
<< [[2023-W46]] || [[2023-W48]] >>
[[2023-11-M]]
Then is visualised as:

Summary
```dataview
TABLE WITHOUT ID ("[["+file.name+"|"+dateShort+"]]") as "Daily Summaries", DailySummary as " "
FROM "planner/daily"
WHERE weekly = this.file.name
SORT file.name ASC
```
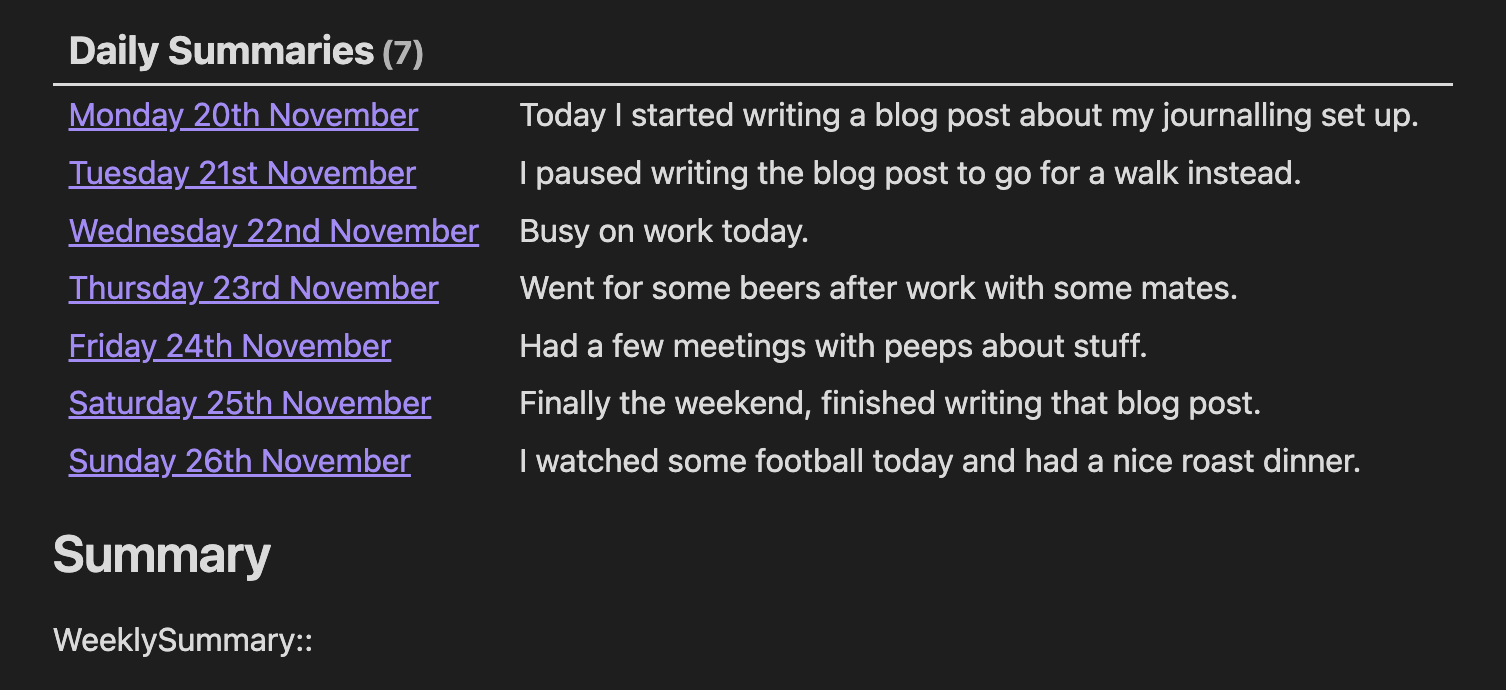
## Summary
WeeklySummary::
WeeklySummary:: is where the summary of that week is entered. Above that is a Dataview query for retrieving all the daily entries for the days within that week. This renders the view below:
Let’s now break down what the query is doing, skipping over the first line for now.
FROM "planner/daily"- limits searching for files in this directory, which is where my daily notes get placed
WHERE weekly = this.file.name- filters the results to only match files where the
weeklyproperty is equal to the name of the file where the query is executed from - remember that this is executing from my weekly note, which is named
2023-W47 - this will then only return daily notes for the given week
- filters the results to only match files where the
SORT file.name ASC- arrange the files in alphabetical order
- given we named the files in the ISO8601 date format, these are inherently ordered chronologically
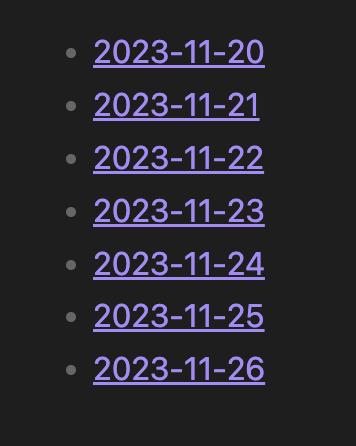
If we were to do a basic LIST output, with the query below…
```dataview
LIST
FROM "planner/daily"
WHERE weekly = this.file.name
SORT file.name ASC
```
Then it would print out a list of all the files with the given property.
While this tells us what days were in the week, we can use the TABLE query to display metadata of the queried files in an easy to view format. So reviewing the first line of our original query again:
TABLE WITHOUT ID ("[["+file.name+"|"+dateShort+"]]") as "Daily Summaries", DailySummary as " "
TABLE WITHOUT ID- defines this as a TABLE query
WITHOUT IDwill hide the name of the file, i.e.2023-11-13- We want to hide it because we want to use the human friendly format instead
Now we define the name of the columns for the table.
("[["+file.name+"|"+dateShort+"]]") as "Daily Summaries" will create a column named Daily Summaries, with the text being a hyperlink to the file of that daily note, with the display text being the human friendly text.
DailySummary as " " creates a column with an empty name, using the file property DailySummary as the values. Given that we’re setting an in-line property in the daily notes at DailySummary::, the Dataview query is able to display back the values.
Once we’ve written the weekly summary, that bubbles up to the monthly note.
Monthly
The monthly note consolidates all the weekly notes into here so that I can write a summary, and is created from this template.
Properties and navigation
<%*
moment.locale("en-gb")
const thisMonth = window.moment(tp.file.title, "YYYY-MM-&M ");
const thisQuarter = thisMonth.format("YYYY-[Q]Q")
const previousMonth = thisMonth.clone().subtract(1, 'months')
const nextMonth = thisMonth.clone().add(1, 'months')
const thisYear = thisMonth.format("YYYY-[Y]")
-%>
thisMonth- Creates a moment object for the month that this note is for
- Similar to daily and weekly, we are parsing the title of the note to create the object
thisQuarter- The quarter that this month is in
previousMonthandnextMonth- Adjacent months to this one
- Used for navigation
thisYear- The year that this month is in
These variables get used in the template for the YAML front matter, and navigation.
---
date: <% tp.date.now("YYYY-MM-DD") %>
createdAt: <% tp.file.creation_date() %>
quarterly: <% thisQuarter %>
yearly: <% thisYear %>
---

<< [[<% previousMonth.format("YYYY-MM-[M]") %>]] || [[<% nextMonth.format("YYYY-MM-[M]") %>]] >>
[[<% thisQuarter %>]]
[[<% thisYear %>]]
After templating, it looks like this:
---
date: 2023-11-20
createdAt: 2023-11-20 19:36
quarterly: 2023-Q4
yearly: 2023-Y
---
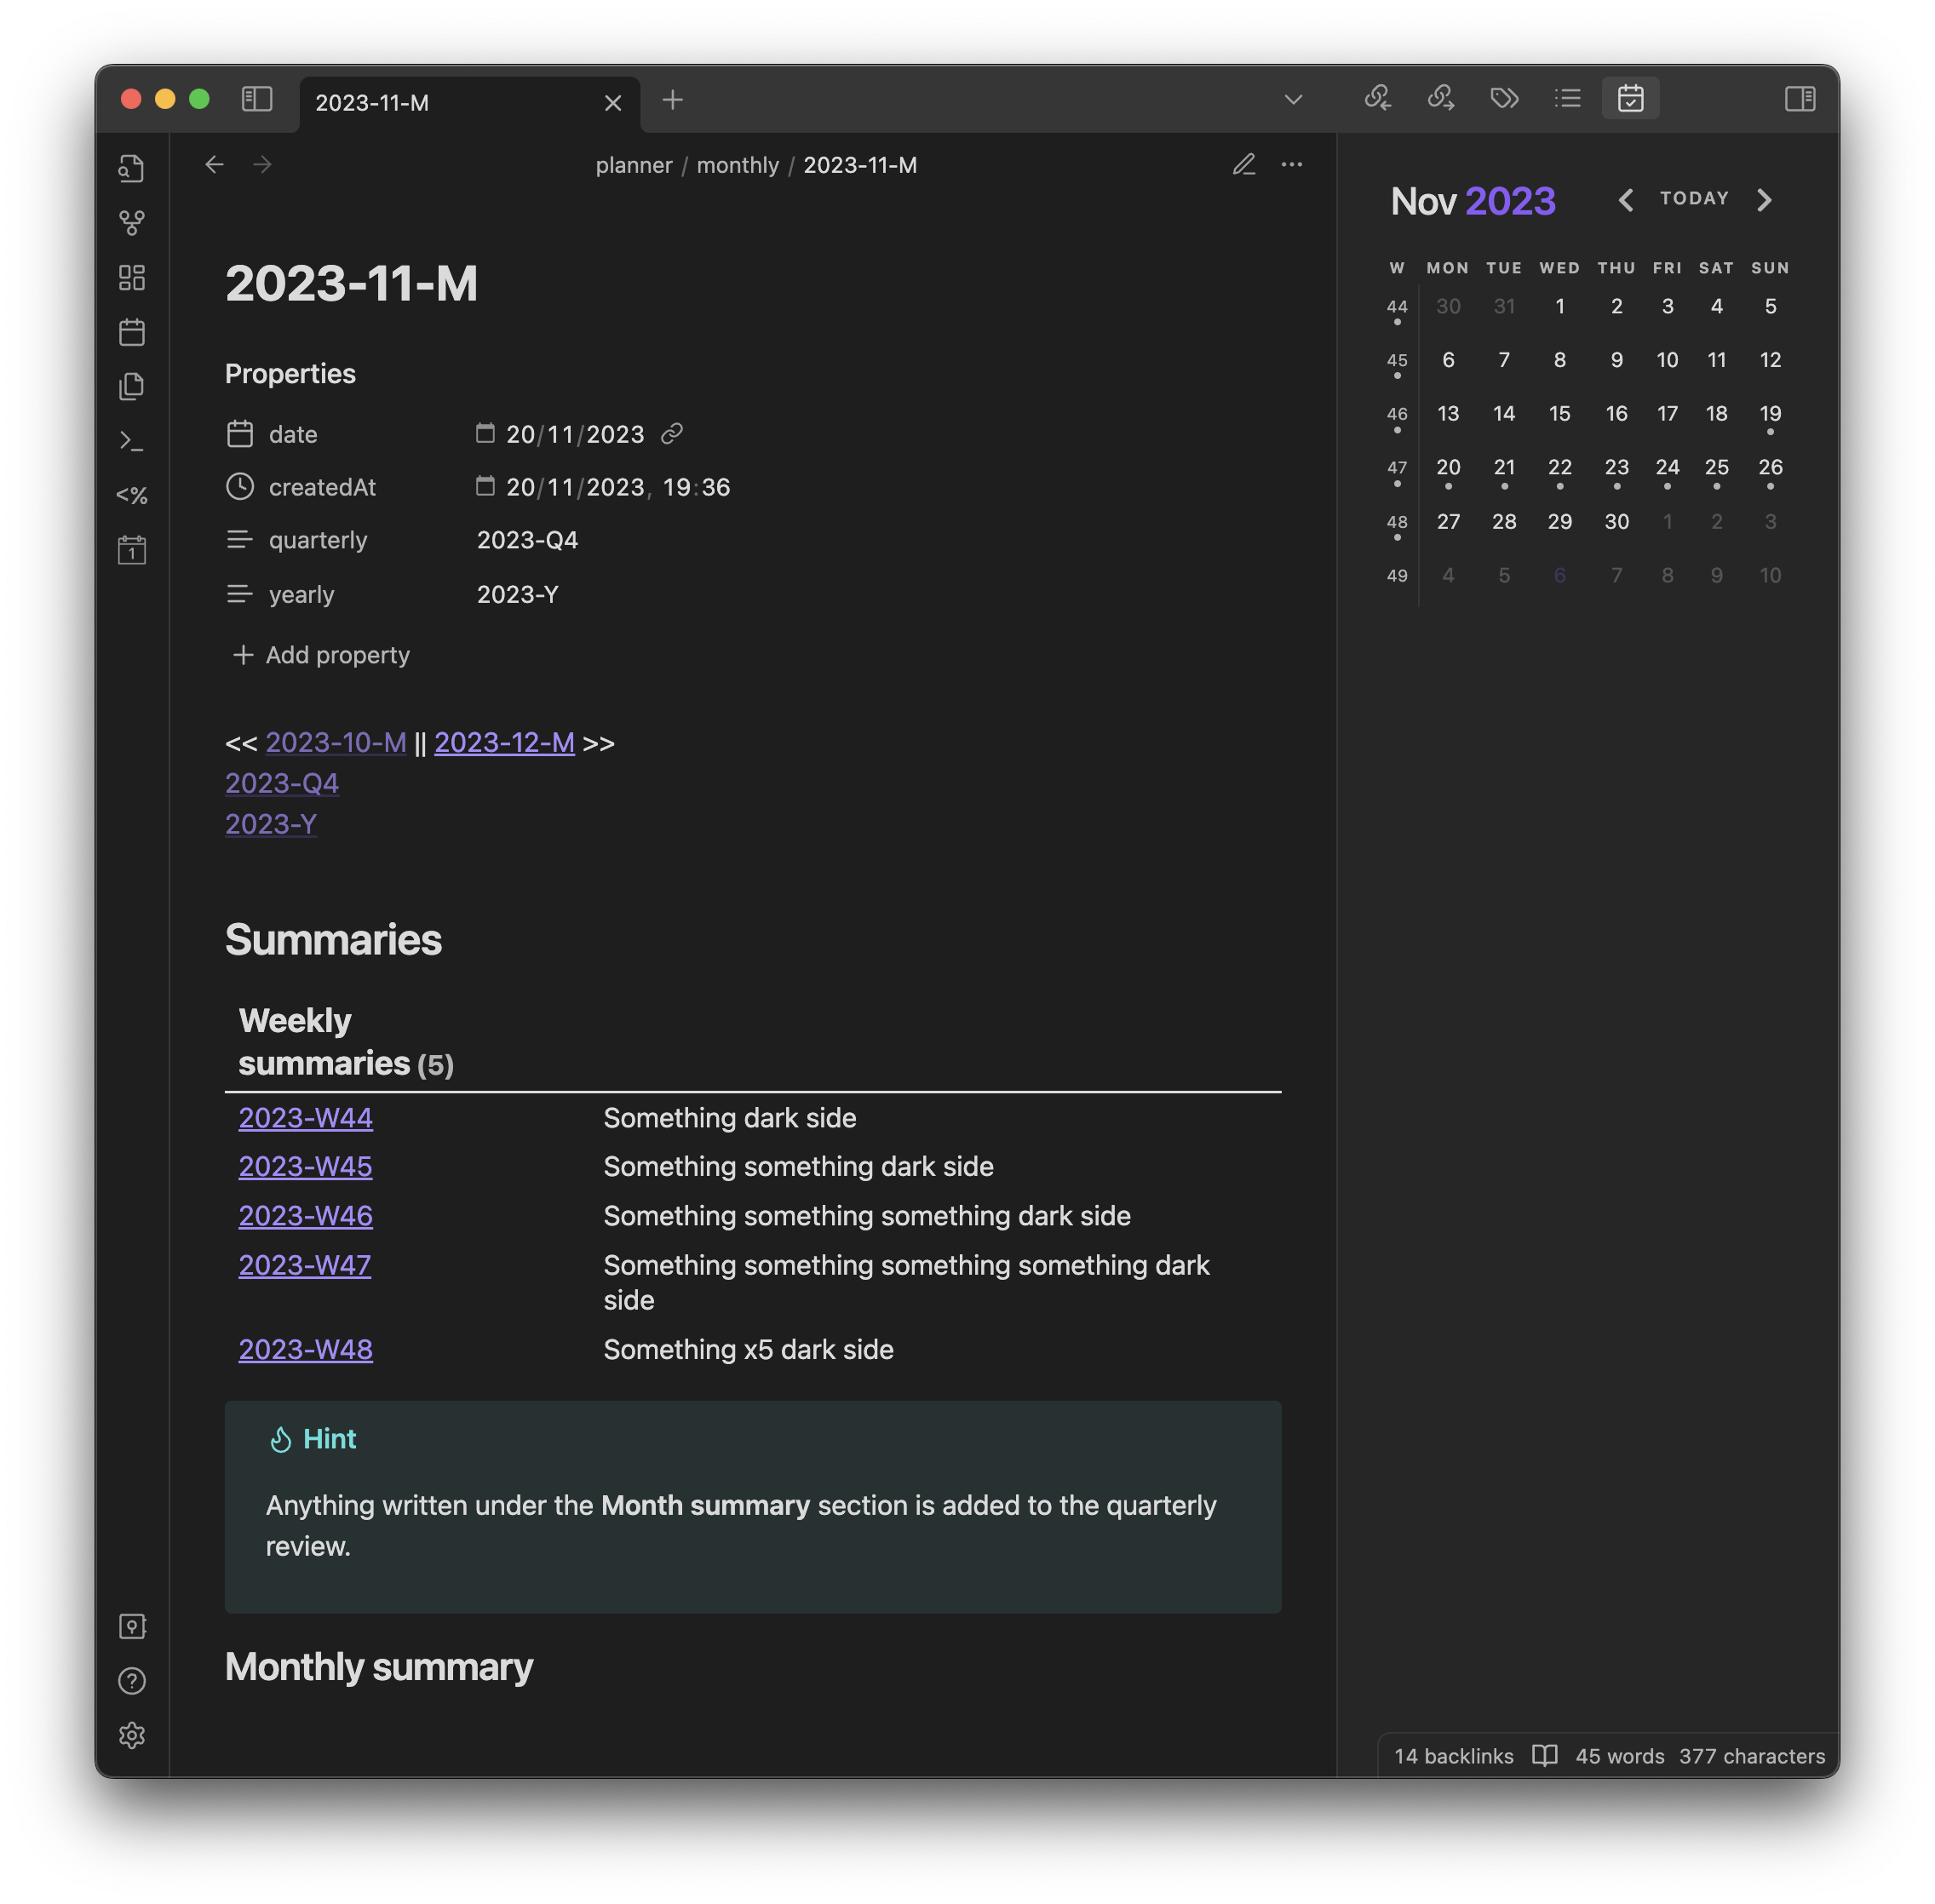
<< [[2023-10-M]] || [[2023-12-M]] >>
[[2023-Q4]]
[[2023-Y]]
And this is how both of them are rendered:

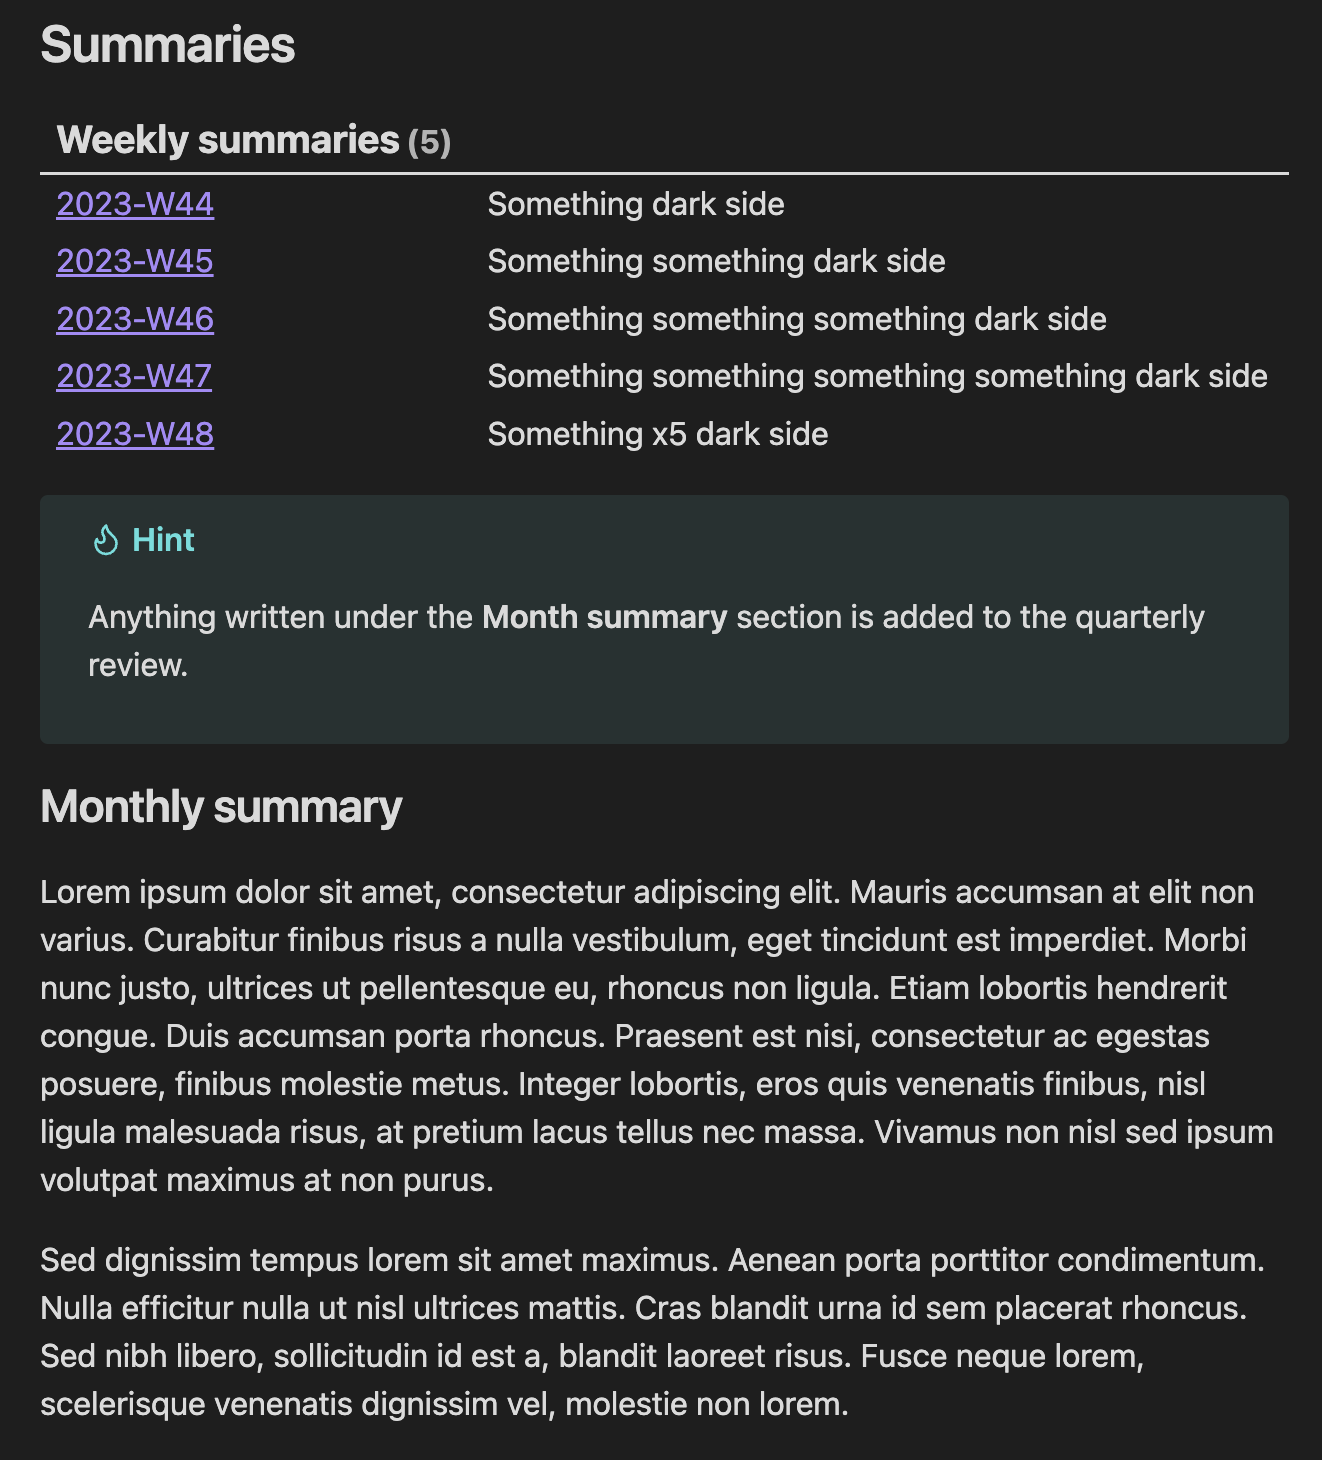
Summary
## Summaries
```dataview
Table without id ("[["+file.name+"]]") as "Weekly summaries", WeeklySummary as " "
FROM "planner/weekly"
WHERE contains(monthly, this.file.name)
SORT file.name ASC
```
This Dataview query retrieves all the weekly summaries for the weeks in this month. It’s similar to the query used in weekly notes to retrieve daily summaries, with the exception that the WHERE clause is modified to handle monthly, given it’s an array.
Below that I have a heading for where the monthly summary would go.
> [!hint]
> Anything written under the **Month summary** section is added to the quarterly review.

### Monthly summary
I tend to write a longer prose for the month summary, and so that wouldn’t fit in nicely in a Dataview query. Instead I embed the contents of the heading in the quarterly note, which I’ll talk about in that section. I include a callout which helps remind me of that set up.
When rendered, it looks like this:
Quarterly
I’ve not really built up a habit of writing a summary for quarterly notes, but I do collate the summaries of all months in a quarter into its note. These are located in planner/quarterly in the format yyyy-[Q]n.md, i.e. 2024-Q1.md.
Properties
<%*
moment.locale("en-gb")
const thisQuarter = window.moment(tp.file.title, "YYYY-&Q Q");
const theseMonths = [...new Set([0,1,2].map(m=>thisQuarter.startOf("quarter").clone().add(m, "months")))]
const thisYear = thisQuarter.format("YYYY-[Y]")
-%>
thisQuarter- Creates a moment object for the quarter that this note is for
- Similar to the other notes, it parses the title for this
theseMonths- Creates an array of moment objects for all the months in the quarter
thisYear- The year that this quarter is in
Out of these, only thisYear is used in the properties…
---
date: <% tp.date.now("YYYY-MM-DD") %>
createdAt: <% tp.file.creation_date() %>
yearly: <% thisYear %>
---
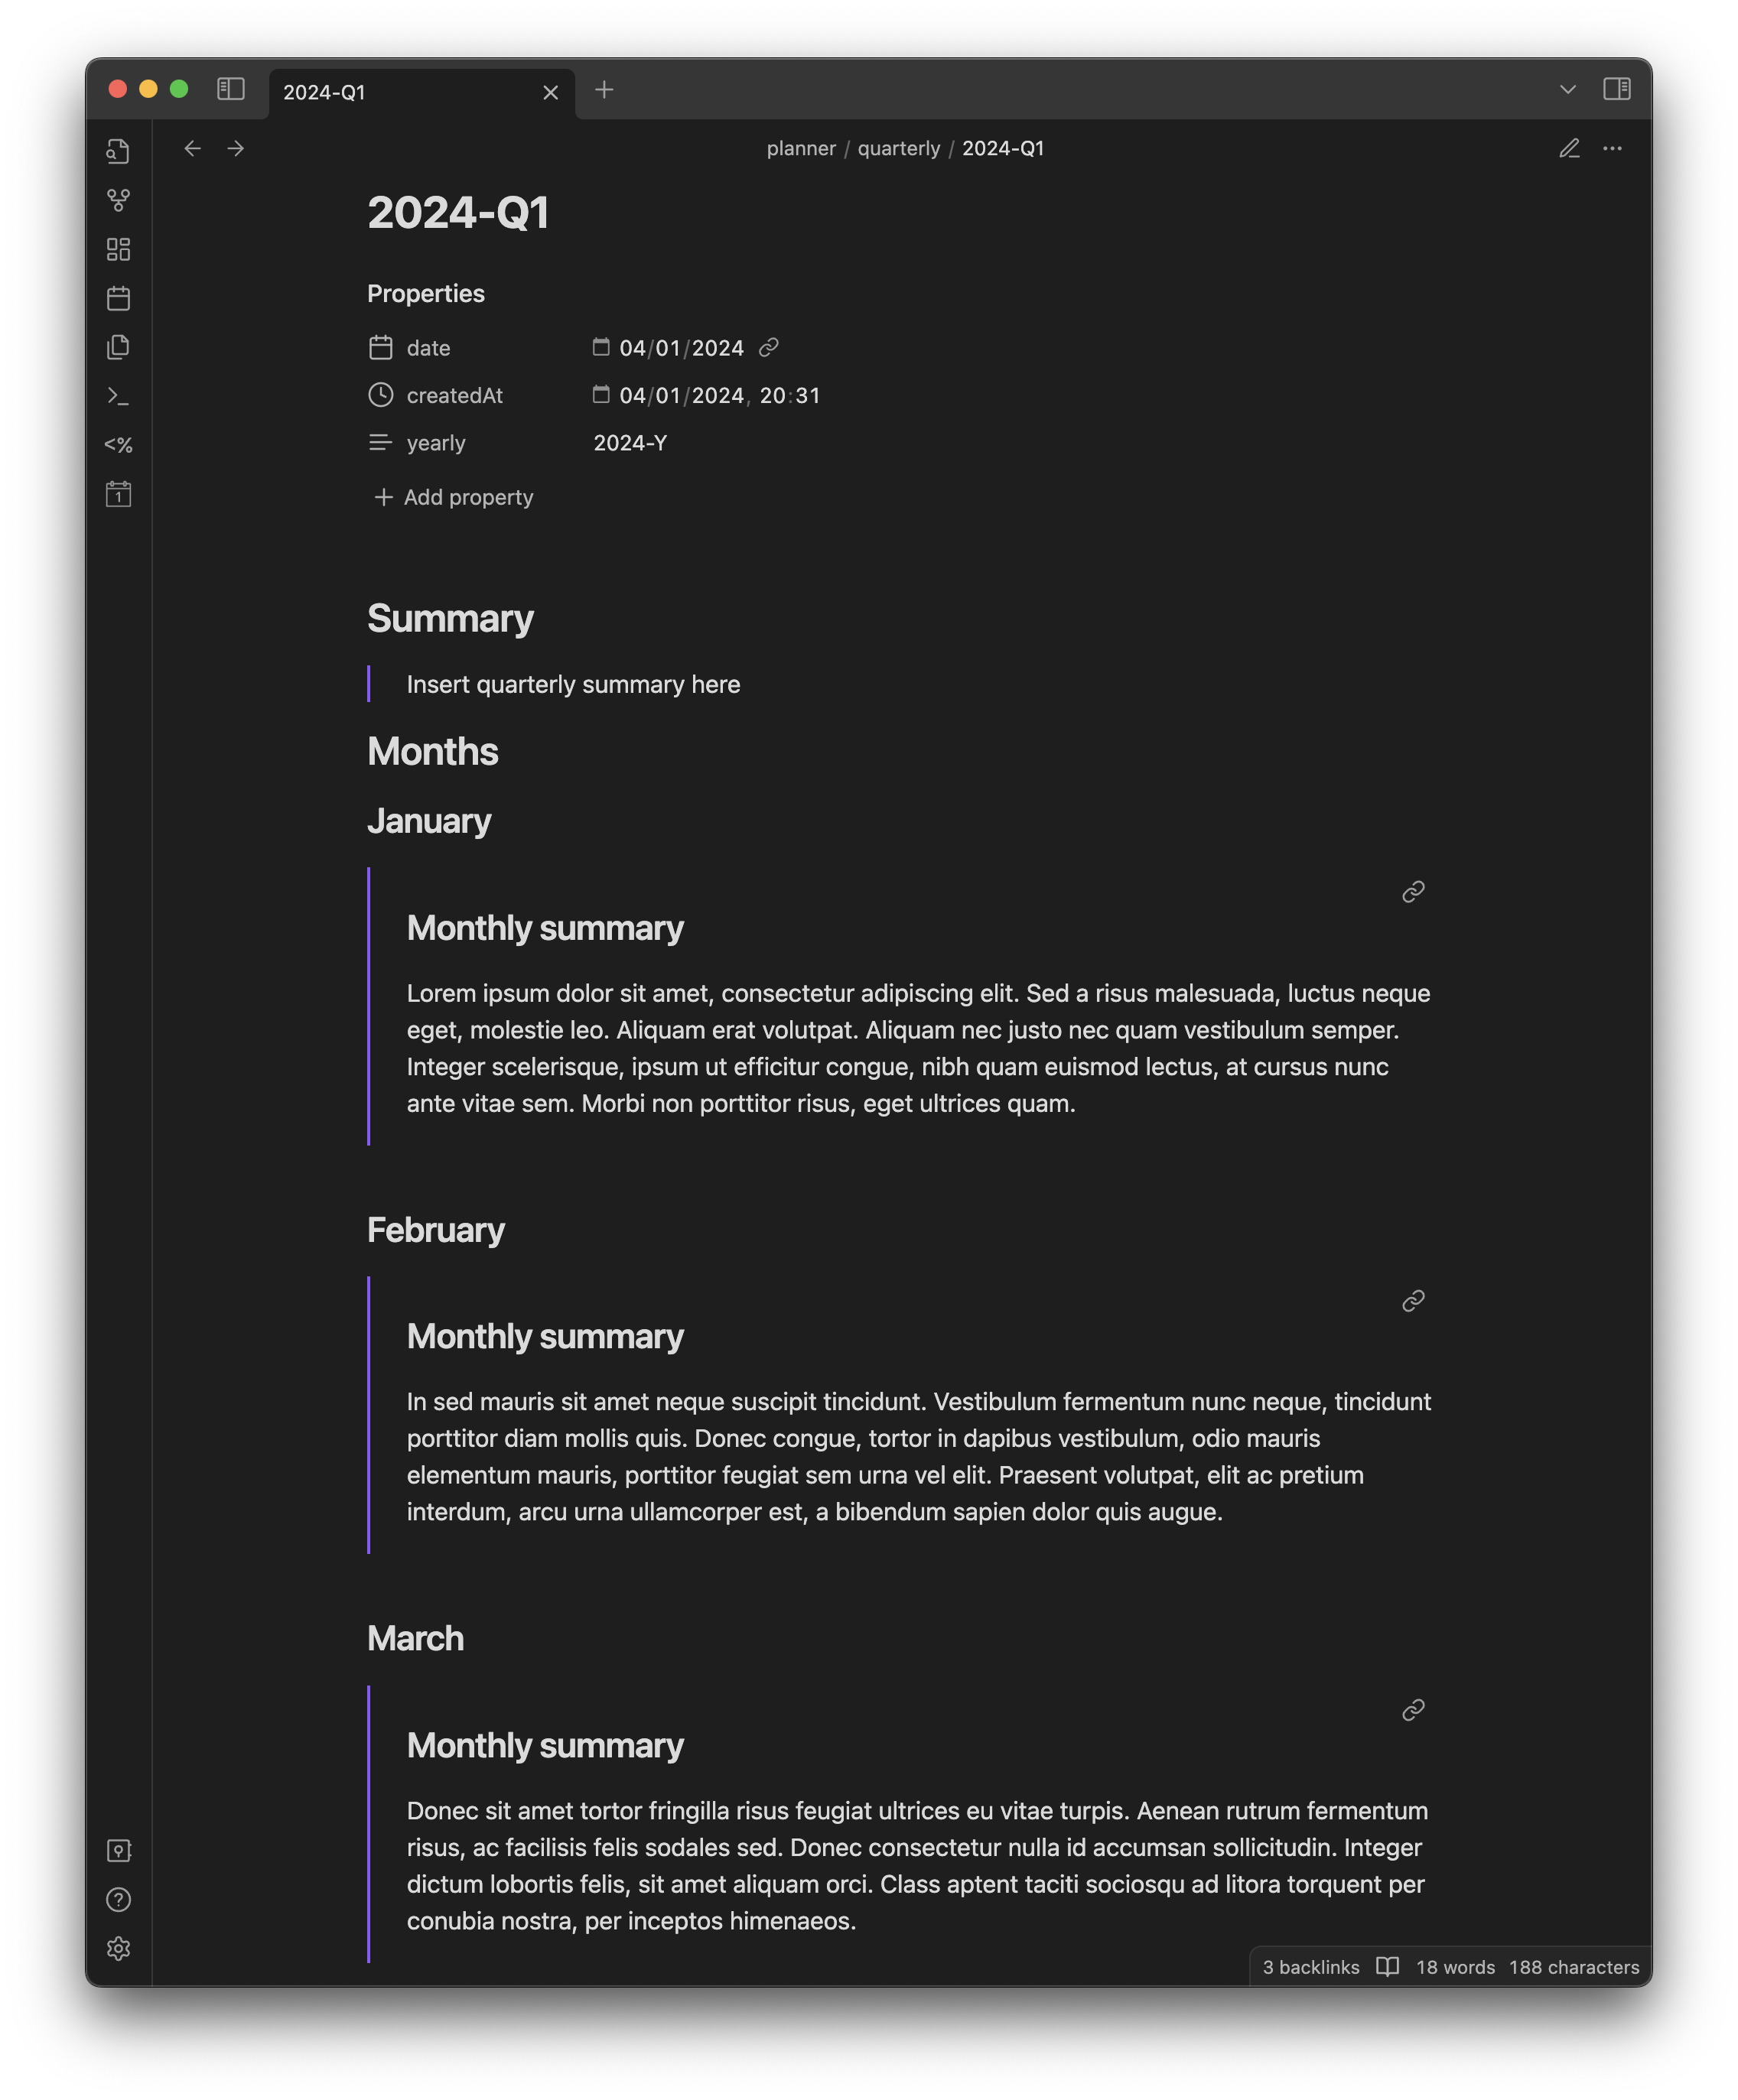
…and here it is after templating:
---
date: 2024-01-04
createdAt: 2024-01-04 20:31
yearly: 2024-Y
---
Summary
For bubbling up the monthly summaries into the quarter note, I embed the contents of each month’s ### Monthly summary heading into the note - which is done by linking to a header in a note, and then embedding it: ![[2024-01-M#Monthly summary]]. This is a core feature of Obsidian and doesn’t require the Dataview plugin.
The reason I chose embedded a note heading is because the monthly summary tends to be a longer prose, whereas the smaller units that make up a month typically are a few sentences and so can be easily captured by a Dataview property.
Taking a look at how the template works, it loops over each element in theseMonths and formats the markdown out for each month:
## Summary

> Insert quarterly summary here

## Months

<%* theseMonths.forEach(month => { %>### <% month.format("MMMM") %>
![[<% month.format("YYYY-MM-[M]") %>#Monthly summary]]

<%* }); %>
And this is how it looks after templating:
## Summary

> Insert quarterly summary here

## Months

### January
![[2024-01-M#Monthly summary]]

### February
![[2024-02-M#Monthly summary]]

### March
![[2024-03-M#Monthly summary]]
All of these monthly summaries can be rather long, so the quarterly summary is written at the top.
Conclusion
This post ended up way more in-depth then I anticipated, and so it was written over several weeks, which might’ve caused some inconsistencies in my screenshots, so apologies for that!
You might be asking where the yearly note gets created (i.e. 2024-Y) - and the truth is that these are not templated yet. I create these ad-hoc whenever I start to write my year review. Even for these, I tend to read through the monthly summaries (given their longer prose) to build together how I think the year went.
However the main purpose of this post is to share my flow for journalling, and what tools I use to help achieve that. I do have some improvements I wish to make such as moving notes away from their respective flat directories. i.e.:
- Daily notes move from
planner/dailyto be grouped by year and month:planner/daily/YYYY/MM - Weekly notes move from
planner/weeklytoplanner/weekly/YYYY - Monthly notes move from
planner/monthlytoplanner/monthly/YYYY
UPDATE 2025-03-26
I wrote a follow-up blog post to group periodic notes into their respective year: Reorganising Obsidian Journal Notes
Hopefully I’ve given enough of a walkthrough to allow you to come up with a flow of your own! In the future I’ll look to document additional functionalities I have in my daily notes such as task management.