How to automate zero downtime maintenance with AWS SSM & ALBs
Load balancers can help us to ensure we proactively remove instances from rotation when we automate maintenance against their targets
Welcome to the last post in this series where we’ve been exploring SSM Documents, so far we’ve covered:
- How Command Documents can help to execute commands on EC2 Instances
- Automating these Command Documents through Maintenance Windows
- Safely chaining Command Documents through Automation Documents, and aborting for any failures
This post will now look into how we can use Automation Documents to perform maintenance on EC2 instances without impacting user experience.
tl;dr
- With the introduction of load balancers to front your services, you can control which instances should be receiving traffic
- This enables you to proactively remove instances from rotation so that you can perform maintenance on the backends to minimalise user disruption
- SSM automation documents can enable us to execute pre-maintenance steps such as removing an instance from a load balancer, as well as adding them back after
- See the document produced in this post highlighting this, and where I explain how it works, and how to deploy it using Terraform
Prerequisites
If you’re just joining in from this post then I recommend reading through the previous posts to gain an understanding of how we got here; or if you know what you’re looking for the tl;dr provides a summary.
As always, the code for this post can be found on GitHub.
A basic understanding and knowledge of Application Load Balancers (ALB), and its components (e.g. target groups) is required.
Introducing load balancers
Load balancers are a key component in software architecture that distribute traffic and requests across backend services in a variety of algorithms, such as:
- Round-robin
- every backend serves the same number of requests
- the most commonly used algorithm
- Weighted round-robin
- backends receive a fixed percentage of incoming requests
- useful if some backends are more beefy than others
- also used in canary deployments
- Least outstanding requests
- the backend which is currently processing the least number of requests is forwarded the request
There are multiple benefits to having a load balancer sit in front of your services:
- Protecting your infrastructure; user requests are proxied via the load balancer
- Distribute traffic and requests however you like
- Perform healthchecks on backends and don’t forward traffic to unhealthy nodes
- Drain and remove backends to permit for rolling upgrades
While there are several different software-based load balancers out there such as nginx and HAProxy, AWS has its own managed load balancer service known as an Elastic Load Balancer (ELB).
Adding web services to our demo environment
In order for us to get the benefit of load balancers to front the EC2 instances in the architecture this series left off from last time, we will need to have a service running on our instances.
Let’s simulate a real web service by running a simple Hello World application across each of the instances. We can utilise EC2s user data to start a basic service up for us by giving it a script to run on instance provision.
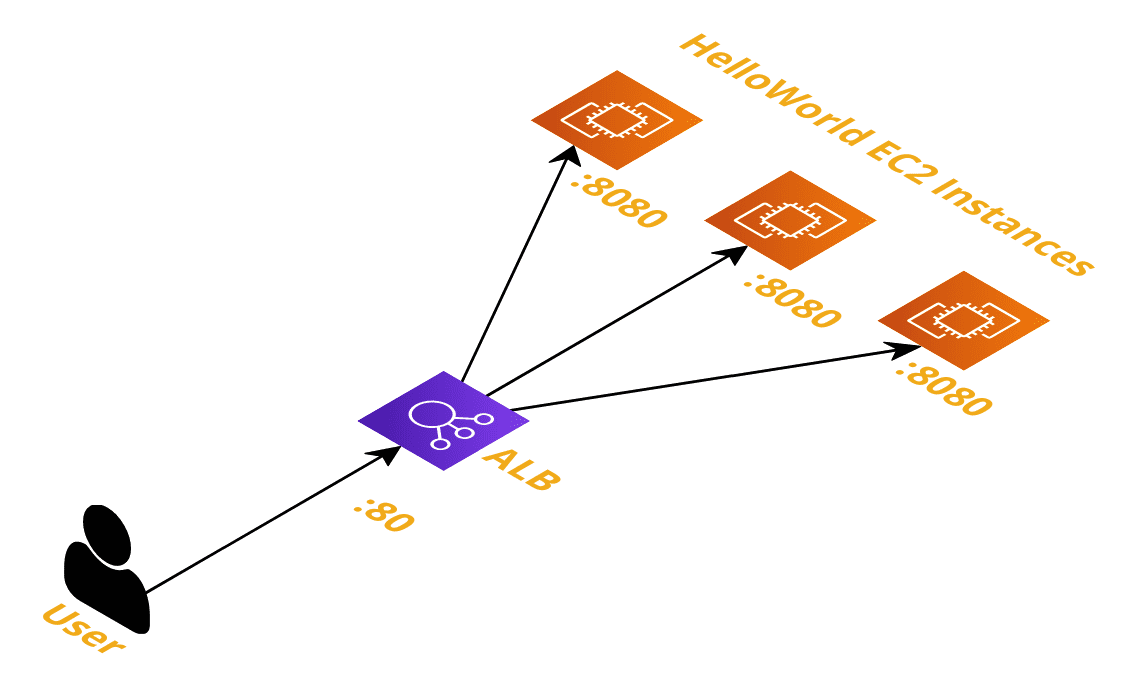
This is the architecture we’ll be building out in this section, with an ALB fronting our EC2 instances
Let’s use Go to create a web service for us since it is easy to get set up quickly - we’ll have the server return a simple Hello, World! message when a request hits it. Let’s also have it return the name of the instance that was hit - this will be used later.
#!/bin/bash
cat <<'EOF' > /home/ec2-user/main.go
package main

import (
        "fmt"
        "net/http"
        "os"
)

func main() {
        http.HandleFunc("/", HelloServer)
        http.ListenAndServe(":8080", nil)
}

func HelloServer(w http.ResponseWriter, r *http.Request) {
        hostname, _ := os.Hostname()
        fmt.Fprintf(w, "Hello, World! From %v\n", hostname)
}
EOF
yum install golang -y
(crontab -l 2>/dev/null; echo "@reboot nohup go run /home/ec2-user/main.go") | crontab -
export GOCACHE=/tmp/go-cache
nohup go run /home/ec2-user/main.go
So on instance creation this will:
- Create a new file called
main.goand populate it with the lines between theEOFdelimiters - Install Go
- Create a crontab entry to run the service on subsequent boots
- Run the Go application in the background immediately
While user data is for useful provisioning services, I don’t advise storing the source code of your application in there like I’ve done - this is just a hacky way to get something up and running.
We’ve been using Terraform to provision our nodes. So we need to save this script in a file (scripts/hello_world_user_data.sh), and then pass it into the user_data attribute of our EC2 module.
module "hello_world_ec2" {
  source         = "terraform-aws-modules/ec2-instance/aws"
  version        = "~> 2.0"

  # ... removed for brevity

  user_data = file("scripts/hello_world_user_data.sh")
}
Terraform will recreate any EC2 nodes with a change in user_data contents, so when you invoke terraform apply all instances will be recreated.
N.B. the AMI I picked up for my EC2 instances has an issue with SSM Agent. Ensure you execute the
AWS-UpdateSSMAgentacross your instances after they have provisioned, or you can use an SSM Association document to do that for you as shown here.
After they have all successfully deployed, you should be able to curl the public IP address of each instance from your machine to verify your setup is correct. If you are getting timeouts then make sure your instances have a security group rule permitting traffic from your IP address through port 8080.
$ curl http://54.229.209.60:8080
Hello, World! From ip-172-31-39-169.eu-west-1.compute.internal

$ curl http://3.250.160.209:8080
Hello, World! From ip-172-31-21-197.eu-west-1.compute.internal

$ curl http://34.254.238.146:8080
Hello, World! From ip-172-31-8-52.eu-west-1.compute.internal
Fronting instances with a load balancer
Now that we have a web service hosted on our instances, let’s now add a load balancer in front of it. This load balancer will now become the point of entry for our application instead of hitting the EC2 instances directly.
For this I am using a Terraform ALB module for provisioning all the components in the load balancer, and expanding on them is beyond the scope of this post.
You can navigate to the AWS ALB documentation to find out about the underlying components the module creates for us.
Security groups
Before we can provision the load balancer, we need to specify the security group (SG) and the rules that should be applied to it. You can view this on GitHub.
Since our application is written to serve request on port 8080, we need to permit both the new aws_security_group.hello_world_alb SG and the existing aws_security_group.vm_base SG to communicate between each other.
resource "aws_security_group" "hello_world_alb" {
  name   = "HelloWorldALB"
  vpc_id = data.aws_vpc.default.id
}

resource "aws_security_group_rule" "alb_egress_ec2" {
  security_group_id        = aws_security_group.hello_world_alb.id
  type                     = "egress"
  from_port                = 8080
  to_port                  = 8080
  protocol                 = "tcp"
  source_security_group_id = aws_security_group.vm_base.id
}

resource "aws_security_group_rule" "ec2_ingress_alb" {
  security_group_id        = aws_security_group.vm_base.id
  type                     = "ingress"
  from_port                = 8080
  to_port                  = 8080
  protocol                 = "tcp"
  source_security_group_id = aws_security_group.hello_world_alb.id
}
Now we need to open up the ALB to allow traffic to hit it. In our case it will just be us hitting it, but this will change depending on who the consumer of the service is. If it is to serve traffic from the Internet then cidr_blocks would be ["0.0.0.0/0"].
The ALB will be hosting the traffic on insecure HTTP (port 80).
resource "aws_security_group_rule" "alb_ingress_user" {
  security_group_id = aws_security_group.hello_world_alb.id
  type              = "ingress"
  from_port         = 80
  to_port           = 80
  protocol          = "tcp"
  cidr_blocks       = [local.ip_address]
}
ALB module
The module documentation will tell us how we need to structure it. Our requirements dictate we need the following:
- Receive traffic on port 80
- Forward traffic to backend targets on port 8080
- Include health checks to ensure we do not forward requests to unhealthy instances
Translate these requirements into the context of the module and we have something like this:
module "hello_world_alb" {
  source  = "terraform-aws-modules/alb/aws"
  version = "~> 5.0"

  name = "HelloWorldALB"

  load_balancer_type = "application"

  vpc_id          = data.aws_vpc.default.id
  subnets         = tolist(data.aws_subnet_ids.all.ids)
  security_groups = [aws_security_group.hello_world_alb.id]

  target_groups = [
    {
      name_prefix      = "pref-"
      backend_protocol = "HTTP"
      backend_port     = 8080
      target_type      = "instance"
      health_check = {
        enabled             = true
        healthy_threshold   = 2
        unhealthy_threshold = 2
        interval            = 6
      }
    }
  ]

  http_tcp_listeners = [
    {
      port               = 80
      protocol           = "HTTP"
      target_group_index = 0
    }
  ]
}
In order to keep this post simple I am not fronting services over HTTPS (secure HTTP) - I would strongly advise against doing this for non-test scenarios.
Another step we will need is to hook up our EC2 instances with the target group created.
resource "aws_lb_target_group_attachment" "hello_world_tg_att" {
  count            = length(module.hello_world_ec2.id)
  target_group_arn = module.hello_world_alb.target_group_arns[0]
  target_id        = element(module.hello_world_ec2.id, count.index)
  port             = 8080
}
There’s some clever Terraform going on here. All we’re doing is looping over each of the created EC2 instances in the module and adding it to the target group, to receive traffic on port 8080.
Hitting the load balancer
Whereas earlier when we were testing the services by hitting the EC2 instances directly, we’ll now be hitting the ALB instead. You can grab the ALB DNS name from the console.
$ curl http://HelloWorldALB-128172928.eu-west-1.elb.amazonaws.com:80
Hello, World! From ip-172-31-31-223.eu-west-1.compute.internal
Nice - and we can see from here what instance we’ve hit in the backend, since we included the hostname in the response.
If we now hit the ALB one more time, we will get a different instance respond.
$ curl http://HelloWorldALB-128172928.eu-west-1.elb.amazonaws.com:80
Hello, World! From ip-172-31-0-10.eu-west-1.compute.internal
This is the load balancer rotating between the backends available to it. We can see the rotation by repeatedly hitting the endpoint.
$ while true; do curl http://HelloWorldALB-128172928.eu-west-1.elb.amazonaws.com:80 ; sleep 0.5; done
Hello, World! From ip-172-31-31-223.eu-west-1.compute.internal
Hello, World! From ip-172-31-43-11.eu-west-1.compute.internal
Hello, World! From ip-172-31-0-10.eu-west-1.compute.internal
Hello, World! From ip-172-31-31-223.eu-west-1.compute.internal
Hello, World! From ip-172-31-0-10.eu-west-1.compute.internal
Hello, World! From ip-172-31-43-11.eu-west-1.compute.internal
Hello, World! From ip-172-31-43-11.eu-west-1.compute.internal
So what does all this have to do with our maintenance document?
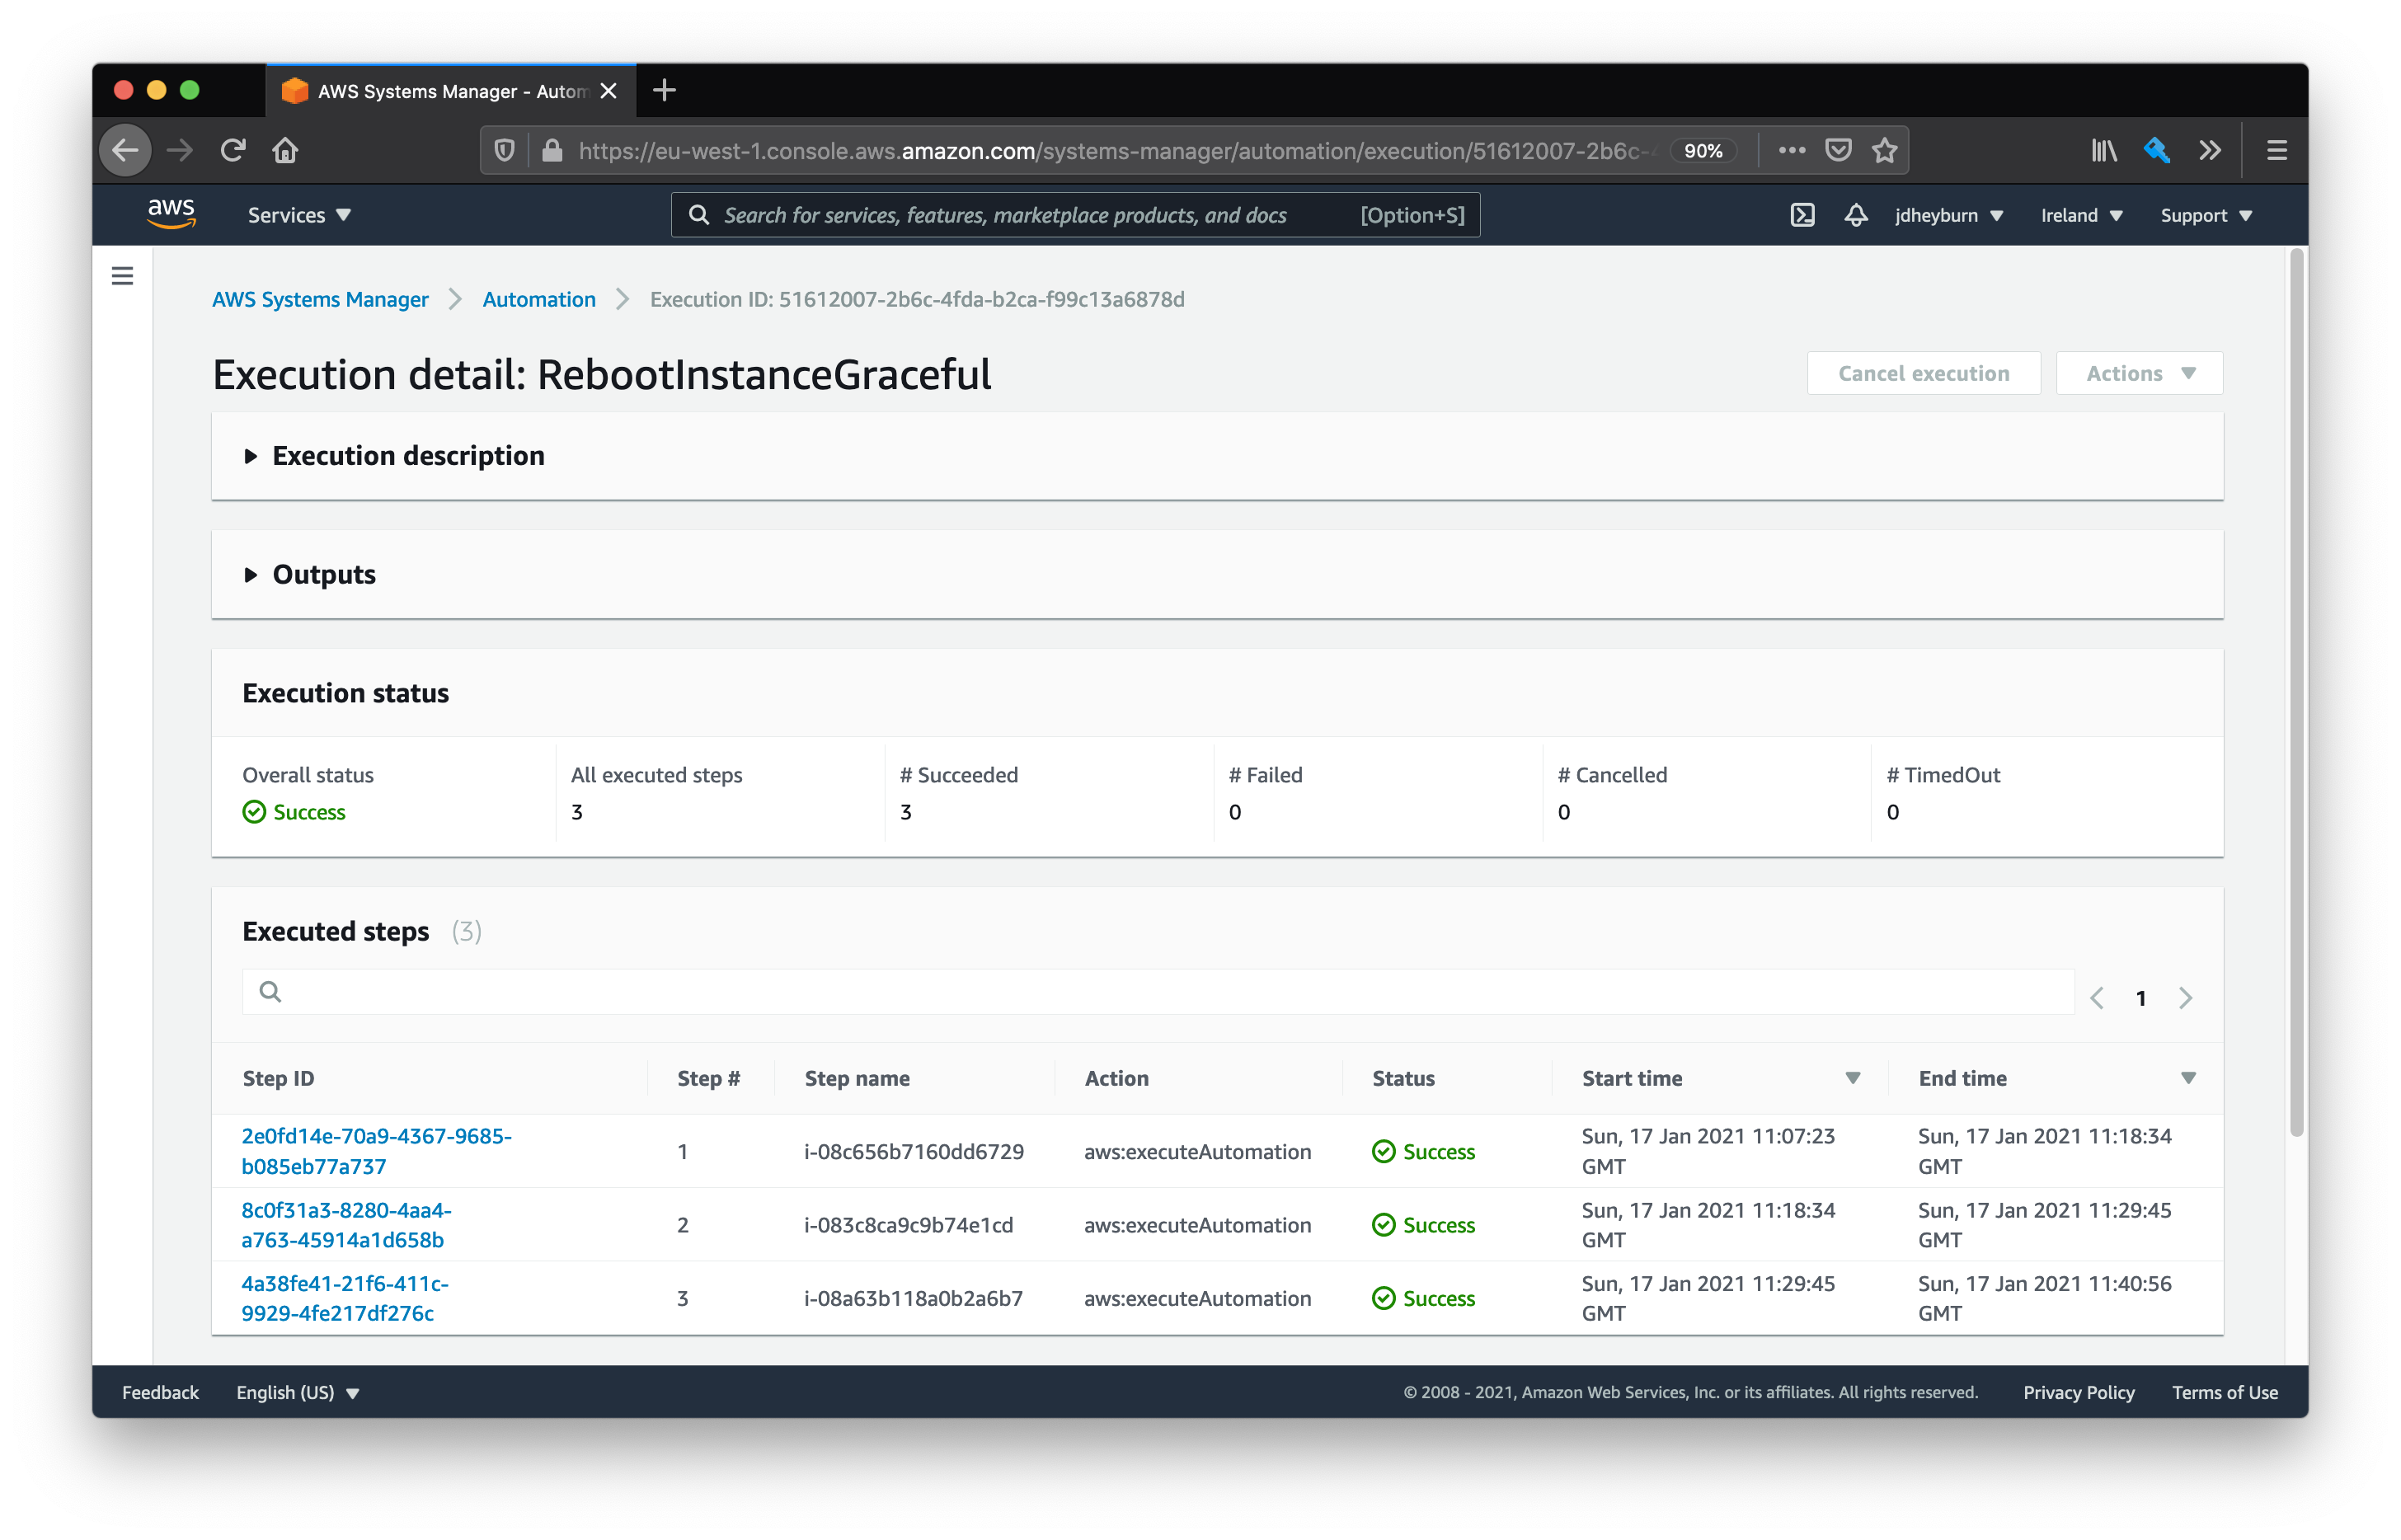
Now that we have a load balancer fronting our services, let’s review executing our automation document from the last post and the problem it brings.
If an instance were to be rebooted during the AWS-RunPatchBaseline stage of the automation document, then there is a chance that a request would have been forwarded to that instance before the health checks against it have failed.
To simulate this, let’s create a new automation document which simulates a reboot. We’ll just take our existing patching document and replace the patch step with a reboot command, following the AWS guidelines to do this. I’ve also modified the health check to check to see if the new service came up okay - this may differ for your environment.
You can view the document on GitHub.
---
schemaVersion: "0.3"
description: Executes a reboot on the instance followed by a healthcheck
parameters:
  InstanceIds:
    type: StringList
    description: The instance to target
mainSteps:
  - name: InvokeReboot
    action: aws:runCommand
    inputs:
      DocumentName: AWS-RunShellScript
      InstanceIds: "{{ InstanceIds }}"
      OutputS3BucketName: ${output_s3_bucket_name}
      OutputS3KeyPrefix: ${output_s3_key_prefix}
      Parameters:
        commands: |
          flag_location=/home/ec2-user/REBOOT_STARTED
          if [ ! -f $flag_location ]; then
            echo "Creating flag file at $flag_location"
            touch $flag_location
            echo "Reboot initiated"
            exit 194
          fi
          echo "Reboot finished, removing flag file at $flag_location"
          rm $flag_location
  - name: ExecuteHealthcheck
    action: aws:runCommand
    inputs:
      DocumentName: AWS-RunShellScript
      InstanceIds: "{{ InstanceIds }}"
      OutputS3BucketName: ${output_s3_bucket_name}
      OutputS3KeyPrefix: ${output_s3_key_prefix}
      Parameters:
        commands: |
          sleep 60
          if ! curl http://localhost:8080/; then
            exit 1
          fi
Then the Terraform code to create this document will look like this:
resource "aws_ssm_document" "reboot_with_healthcheck" {
  name            = "RebootWithHealthcheck"
  document_type   = "Automation"
  document_format = "YAML"

  content = templatefile(
    "documents/reboot_with_healthcheck_template.yml",
    {
      output_s3_bucket_name    = aws_s3_bucket.script_bucket.id,
      output_s3_key_prefix     = "ssm_output/",
    }
  )
}
Testing for failure
After this has been applied in our environment let’s get our test set up. In a terminal window from your machine have this script running in the background to simulate load.
$ while true;
do
  resp=$(curl http://HelloWorldALB-128172928.eu-west-1.elb.amazonaws.com:80 2>/dev/null)
  if echo $resp | grep -q html; then
    error=$(echo $resp | grep -oPm1 "(?<=<title>)[^<]+")
    echo "Error - $error"
  else
    echo $resp;
  fi
  sleep 0.5
done
Then we need to invoke the new reboot document against an instance (see here for how we achieved this last time). Once it is running let’s monitor the output of the command in your terminal.
Hello, World! From ip-172-31-18-158.eu-west-1.compute.internal
Hello, World! From ip-172-31-14-19.eu-west-1.compute.internal
Hello, World! From ip-172-31-18-158.eu-west-1.compute.internal
Error - 502 Bad Gateway
Error - 502 Bad Gateway
Hello, World! From ip-172-31-14-19.eu-west-1.compute.internal
Hello, World! From ip-172-31-18-158.eu-west-1.compute.internal
Error - 502 Bad Gateway
Hello, World! From ip-172-31-14-19.eu-west-1.compute.internal
Hello, World! From ip-172-31-18-158.eu-west-1.compute.internal
Hello, World! From ip-172-31-14-19.eu-west-1.compute.internal
Error - 502 Bad Gateway
Hello, World! From ip-172-31-18-158.eu-west-1.compute.internal
Error - 502 Bad Gateway
Hello, World! From ip-172-31-14-19.eu-west-1.compute.internal
Hello, World! From ip-172-31-14-19.eu-west-1.compute.internal
Hello, World! From ip-172-31-18-158.eu-west-1.compute.internal
Hello, World! From ip-172-31-18-158.eu-west-1.compute.internal
Not good! 😧
These error messages are coming from the load balancer, indicating that the underlying backend wasn’t able to complete the request. This is happening when the instance gets rebooted as specified in our document.
The load balancer hasn’t had enough time to determine whether the instance is unhealthy or not - as dictated from our health check policy (2 failed checks with 6 seconds between them) - and so still forwards traffic to it even though it cannot respond.
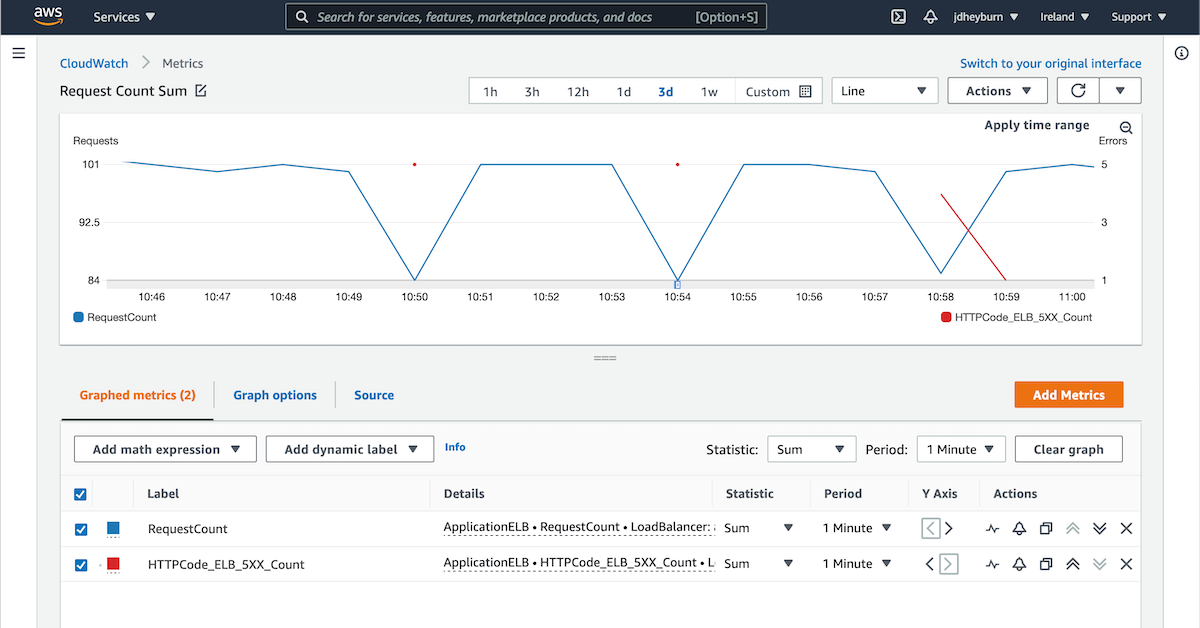
We can actually view this disruption in CloudWatch Metrics too. ALBs expose metrics for us which we can monitor against, including:
- RequestCount
- Informs us how many incoming requests the ALB is receiving
- HTTPCode_ELB_5XX_Count
- How many HTTP 5XX error codes are being returned by the ALB
We can chart them together for visualisation.

HTTPCode_ELB_5XX_Count only reports on failures - if the metric is missing data points then no errors occurred at that time
While we are the only users hitting this, had this been a production box hit by 1,000s of users, each one of them would experience an issue with your application, and equals lost customers! 😡
What we need is a means of removing the node from the load balancer rotation so that we can safely perform maintenance on it.
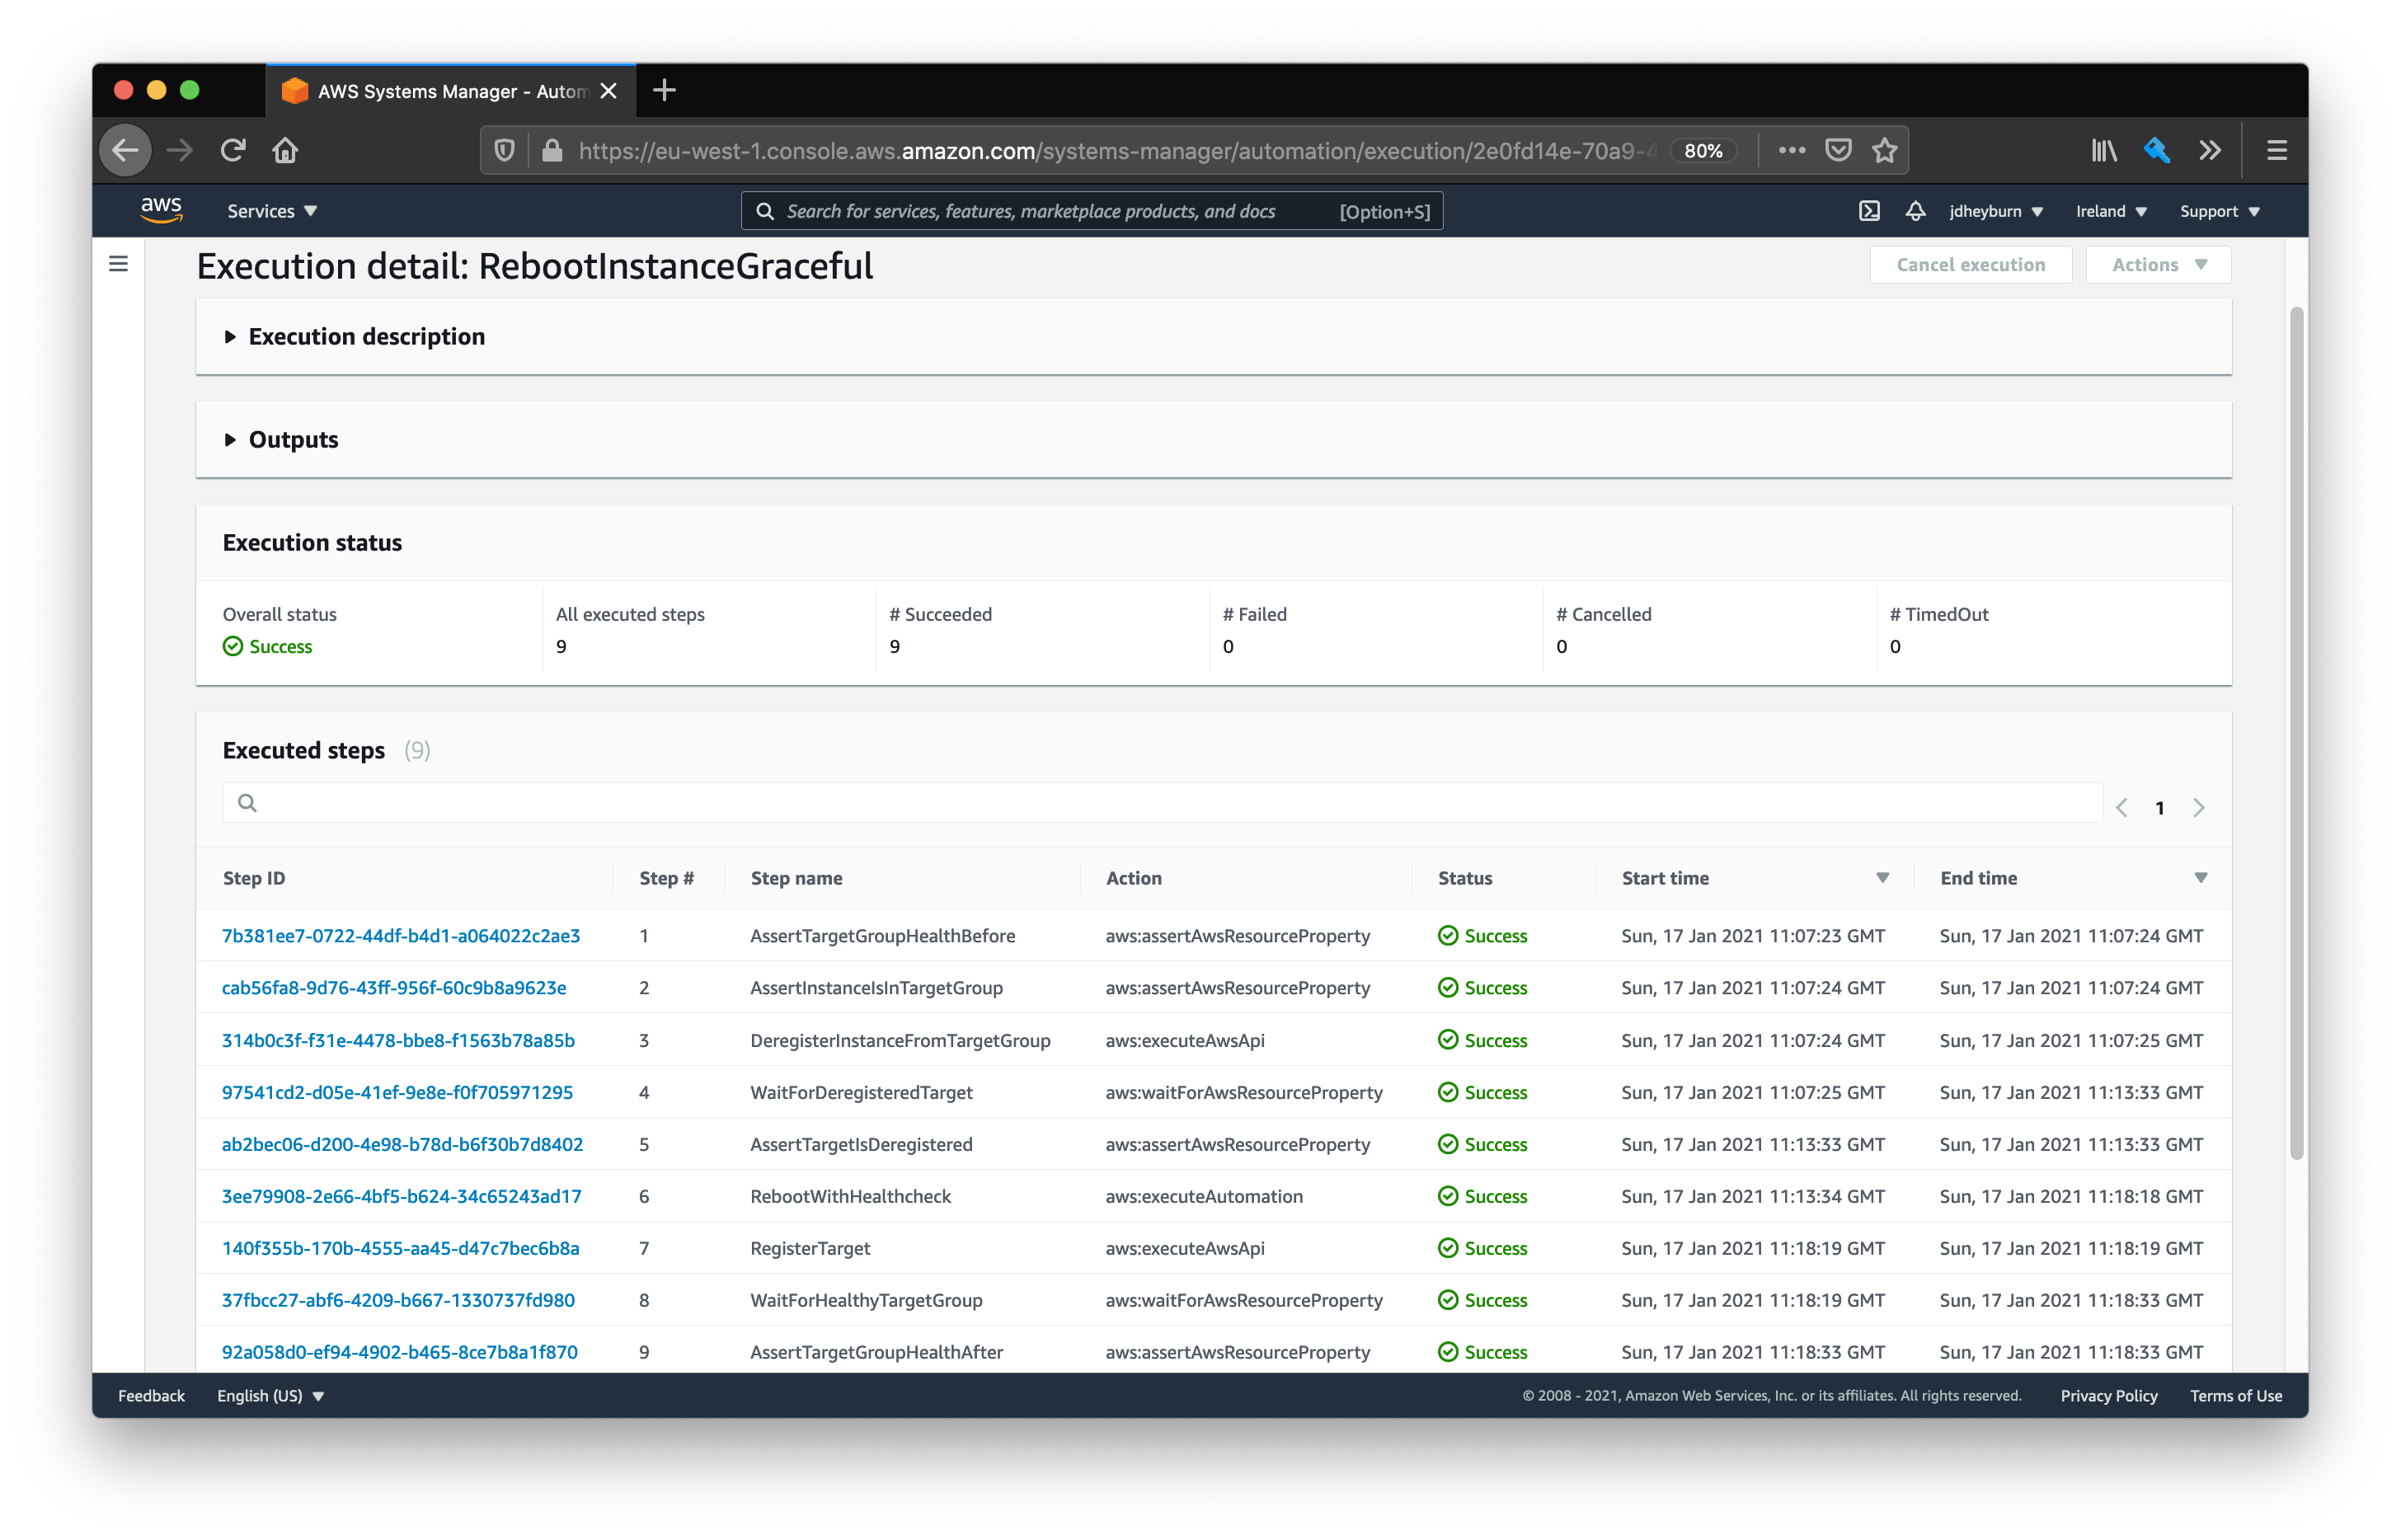
Removing instances from load balancer rotation
Load balancer target groups have an API endpoint that allow you to drain connections from backends - where the load balancer stops any new requests being forwarded to that backend, and allows existing requests to complete. This can be done via - you guessed it - Automation Documents!
Graceful load balancer document
You can see the document in its entirety here. The steps that it performs are:
- Check that the target group is healthy
- We want to ensure we’re not fuelling a dumpster fire
- Check that the instance we’re targeting is in the target group we’re modifying
- Otherwise what’s the point? :upside_down:
- Remove the instance from the target group and wait for it to be removed
- Execute our maintenance document
- Register the instance back and wait for it to be added back
Document metadata
As this is an automation document, the schemaVersion should be 0.3. We’re using two parameters here to run the document:
TargetGroupArn- the ARN of the target group we are making modifications tooInstanceId- the instance that is undergoing maintenance
schemaVersion: "0.3"
description: Gracefully reboot instance with healthchecks
parameters:
  InstanceId:
    type: String
    description: The instance to target
  TargetGroupArn:
    type: String
    description: The target group ARN for the instance
Sanity checks
The first two steps of the document are sanity checking the target group to ensure preconditions are met before we introduce change. We’re using the aws:assertAwsResourceProperty action to allow us to query against the AWS ELBv2 API (Elastic Load Balancer v2) and verify a response is what we expect it to be.
You can see all the API endpoints available for ELBv2 at this location.
The response of the DescribeTargetHealth endpoint returns an object that is structured like this.
{
  "TargetHealthDescriptions": [
    {
      "Target": {
        "Id": "i-083c8ca9c9b74e1cd",
        "Port": 8080
      },
      "HealthCheckPort": "8080",
      "TargetHealth": {
        "State": "healthy"
      }
    },
    {
      "Target": {
        "Id": "i-08a63b118a0b2a6b7",
        "Port": 8080
      },
      "HealthCheckPort": "8080",
      "TargetHealth": {
        "State": "healthy"
      }
    },
    {
      "Target": {
        "Id": "i-08c656b7160dd6729",
        "Port": 8080
      },
      "HealthCheckPort": "8080",
      "TargetHealth": {
        "State": "healthy"
      }
    }
  ]
}
This represents all the backends that are configured against the target group. The property selector $.TargetHealthDescriptions..TargetHealth.State specified in the document will check against all state fields to see if they are healthy. If any of them aren’t then the document will be aborted. As mentioned before, this check is performed to ensure we’re not causing more problems for ourselves if any of the nodes are unhealthy.
- name: AssertTargetGroupHealthBefore
  description: Assert the target group is healthy before we bounce Tomcat
  action: aws:assertAwsResourceProperty
  inputs:
    Service: elbv2
    Api: DescribeTargetHealth
    PropertySelector: $.TargetHealthDescriptions..TargetHealth.State
    DesiredValues:
      - healthy
    TargetGroupArn: "{{ TargetGroupArn }}"
  maxAttempts: 3
  timeoutSeconds: 60
In the next sanity check we’re ensuring that the instance is definitely in the target group we want to remove it from. This is a slightly different query to the last step where we’re specifically requesting for state health on that one instance.
- name: AssertInstanceIsInTargetGroup
  description: Assert the instance is a healthy target of the target group
  action: aws:assertAwsResourceProperty
  inputs:
    Service: elbv2
    Api: DescribeTargetHealth
    PropertySelector: $.TargetHealthDescriptions[0].TargetHealth.State
    DesiredValues:
      - healthy
    TargetGroupArn: "{{ TargetGroupArn }}"
    Targets:
      - Id: "{{ InstanceId }}"
  maxAttempts: 3
  timeoutSeconds: 60
Remove the instance from rotation
Now our preconditions have been met we can remove the instance using the aws:executeAwsApi action. This action is similar to aws:assertAwsResourceProperty in that it calls an AWS API endpoint, but we’re not checking the response of it - in fact the DeregisterTargets endpoint doesn’t return anything for us to check against.
- name: DeregisterInstanceFromTargetGroup
    description: Proactively remove the instance from the target group
    action: aws:executeAwsApi
    inputs:
      Service: elbv2
      Api: DeregisterTargets
      TargetGroupArn: "{{ TargetGroupArn }}"
      Targets:
        - Id: "{{ InstanceId }}"
Once we’ve done that we need to verify the instance has definitely been removed. Remember that the target group allows for existing connections to complete their requests when it is draining, so deregistering the instance doesn’t happen instantaneously - this is where the aws:waitForAwsResourceProperty helps us.
- name: WaitForDeregisteredTarget
  description: Wait for the instance to drain connections
  action: aws:waitForAwsResourceProperty
  inputs:
    Service: elbv2
    Api: DescribeTargetHealth
    PropertySelector: $.TargetHealthDescriptions[0].TargetHealth.State
    DesiredValues:
      - unused
    TargetGroupArn: "{{ TargetGroupArn }}"
    Targets:
      - Id: "{{ InstanceId }}"
  maxAttempts: 1
  timeoutSeconds: 600
- name: AssertTargetIsDeregistered
  description: Assert the instance is no longer a target
  action: aws:assertAwsResourceProperty
  inputs:
    Service: elbv2
    Api: DescribeTargetHealth
    PropertySelector: $.TargetHealthDescriptions[0].TargetHealth.State
    DesiredValues:
      - unused
    TargetGroupArn: "{{ TargetGroupArn }}"
    Targets:
      - Id: "{{ InstanceId }}"
Execute maintenance
At this point we’re 100% sure that the instance is now removed from the target group and is no longer receiving requests, so let’s go ahead and use aws:executeAutomation to invoke the maintenance document from earlier. Remember it takes in the InstanceIds as a parameter to execute on, so we’ll need to pass it there too.
We’re specifying an onFailure too, this tells the document should the step fail then move onto this step instead of the default action which is to abort the rest of the document.
step:RegisterTarget is actually the next step after this one, which adds the instance back to the target group. Since it performs health checks for us and won’t actually forward to an unhealthy instance, we’ll let the target group make the call if this instance can receive traffic or not.
- name: RebootWithHealthcheck
  description: Reboot the instance with a healthcheck afterward
  action: aws:executeAutomation
  inputs:
    DocumentName: RebootWithHealthcheck
    RuntimeParameters:
      InstanceIds:
        - "{{ InstanceId }}"
  maxAttempts: 1
  onFailure: step:RegisterTarget
Add instance back to target group
In a similar vein to DeregisterTargets, this action will register the instance back to the target group.
- name: RegisterTarget
  description: Add the instance back as a target
  action: aws:executeAwsApi
  inputs:
    Service: elbv2
    Api: RegisterTargets
    TargetGroupArn: "{{ TargetGroupArn }}"
    Targets:
      - Id: "{{ InstanceId }}"
Registering the instance happens instantaneously, but we will have to wait for the target group to perform initial health checks against the instance. Once we’ve asserted that it’s healthy, then the document is complete!
- name: WaitForHealthyTargetGroup
  description: Wait for the target group to become healthy again
  action: aws:waitForAwsResourceProperty
  inputs:
    Service: elbv2
    Api: DescribeTargetHealth
    PropertySelector: $.TargetHealthDescriptions..TargetHealth.State
    DesiredValues:
      - healthy
    TargetGroupArn: "{{ TargetGroupArn }}"
  maxAttempts: 1
- name: AssertTargetGroupHealthAfter
  description: Assert the target group is healthy after activity
  action: aws:assertAwsResourceProperty
  inputs:
    Service: elbv2
    Api: DescribeTargetHealth
    PropertySelector: $.TargetHealthDescriptions..TargetHealth.State
    DesiredValues:
      - healthy
    TargetGroupArn: "{{ TargetGroupArn }}"
  maxAttempts: 3
  timeoutSeconds: 60
  isEnd: true
Remember that this document only handles one instance at a time, it will typically be up to the caller (i.e. a maintenance window) to rate limit the execution of multiple instances one at a time. We explored this in the previous post.
Terraform additions and updates
The above document can be represented in Terraform to provision it.
resource "aws_ssm_document" "graceful_reboot_instance" {
  name            = "RebootInstanceGraceful"
  document_type   = "Automation"
  document_format = "YAML"

  content = templatefile(
    "documents/graceful_patch_instance.yml",
    {
      reboot_with_healthcheck_document_arn = aws_ssm_document.reboot_with_healthcheck.arn,
    }
  )
}
We’ll also need to update our maintenance window task to correctly reflect this new document, along with the new parameters it takes.
resource "aws_ssm_maintenance_window_task" "patch_with_healthcheck" {
  window_id        = aws_ssm_maintenance_window.patch_with_healthcheck.id
  task_type        = "AUTOMATION"
  task_arn         = aws_ssm_document.graceful_reboot_instance.arn
  priority         = 10
  service_role_arn = aws_iam_role.patch_mw_role.arn

  max_concurrency = "1"
  max_errors      = "0"

  targets {
    key    = "WindowTargetIds"
    values = [aws_ssm_maintenance_window_target.patch_with_healthcheck_target.id]
  }

  task_invocation_parameters {
    automation_parameters {
      document_version = "$LATEST"

      parameter {
        name = "InstanceId"
        values = ["{{ TARGET_ID }}"]
      }

      parameter {
        name = "TargetGroupArn"
        values = [module.hello_world_alb.target_group_arns[0]]
      }
    }
  }
}
And lastly, we’ll need to update the IAM role permissions for aws_iam_role.patch_mw_role.arn as it will be invoking more actions.
data "aws_iam_policy_document" "mw_role_additional" {
  statement {
    sid    = "AllowSSM"
    effect = "Allow"

    actions = [
      "ssm:DescribeInstanceInformation",
      "ssm:ListCommandInvocations",
    ]

    resources = ["*"]
  }

  statement {
    sid    = "AllowElBRead"
    effect = "Allow"

    actions = [
      "elasticloadbalancing:DescribeTargetHealth",
    ]

    resources = ["*"]

  }

  statement {
    sid = "AllowELBWrite"
    effect = "Allow"

    actions = [
      "elasticloadbalancing:DeregisterTargets",
      "elasticloadbalancing:RegisterTargets",
    ]

    resources = [module.hello_world_alb.target_group_arns[0]]
  }
}
Testing the new document
You can test the automation document by following the same process as before, else you can test the whole stack via changing the execution time of the maintenance window. I’ll be following along with the latter.
While the document is running you can re-use the same command to hit the ALB endpoint from earlier to see how traffic is distributed amongst the instances. You’ll first see that it will only execute on one instance at a time, which was the enhancement we introduced in the last post.
When we drill down into each invocation we can see the automation steps doing their magic.
We can have a look back at the ALB metrics again to see if we received any errors.
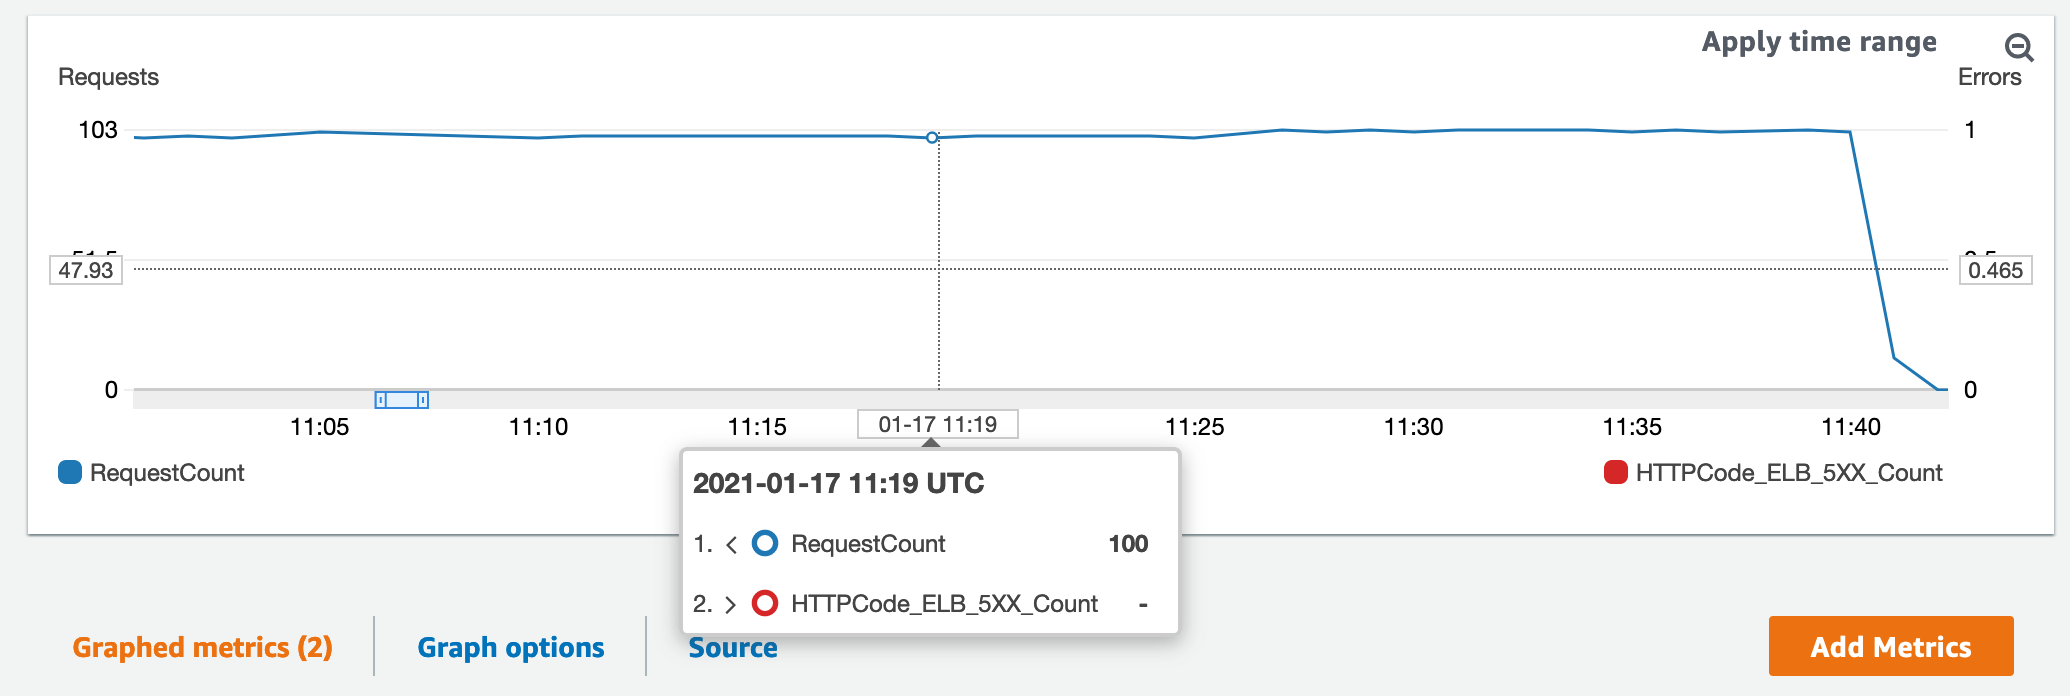
No error - no problem!
Conclusion
Each post prior to this one in the series has been leading up to where we are now - a means of achieving automated zero downtime maintenance for anything that sits behind an AWS ALB.
SSM is very much a bit of a beast and I hope that this series has helped clear the fog and given yourselves an idea of what you can do with SSM to automate a variety of tasks in your AWS estate.
Happy automating! 💪 🙌