Automate Instance Hygiene with AWS SSM: Maintenance Windows
Using SSM Maintenance Windows to automate SSM Documents, tracking historical invocations, and storing their log output in S3
Last time we looked at writing our own SSM Command Document for the purpose of executing a healthcheck script on a set of EC2 instances across multiple platforms.
In this post we’ll be exploring how we can automate this using maintenance windows - also within the SSM suite. This is something I’ve covered before, but want to extend on that to show how its done.
tl;dr
- We can use SSM Maintenance Windows to automate our newly created command documents on a schedule
- Multiple command documents can be combined in a maintenance window, such as a patching event followed by a healthcheck
- This provides us with a means of viewing historical invocations on whatever workflow we’ve automated
- By storing command outputs to S3, we can ensure we can recover logs that are too large to display in the console
- Using S3 Lifecycle Rules we can remove aged logs
Once again all the Terraform code for this post is available on GitHub. It is split into two parts:
- aws-ssm-automation-1-barebones is for the barebones walkthrough
- aws-ssm-automation-1-logging is for the logging enhancement
Intro to Maintenance Windows
Maintenance Windows, are a means of executing some automation workflow in your AWS estate on a schedule. Got an SSM Document you’ve written and want it automated? What about a Lambda you want invoked at a regular schedule? Or maybe it’s a Step Function? Whatever the use case, Maintenance Windows are for you - just don’t be fooled by the name - they don’t necessarily have to be just for maintenance!
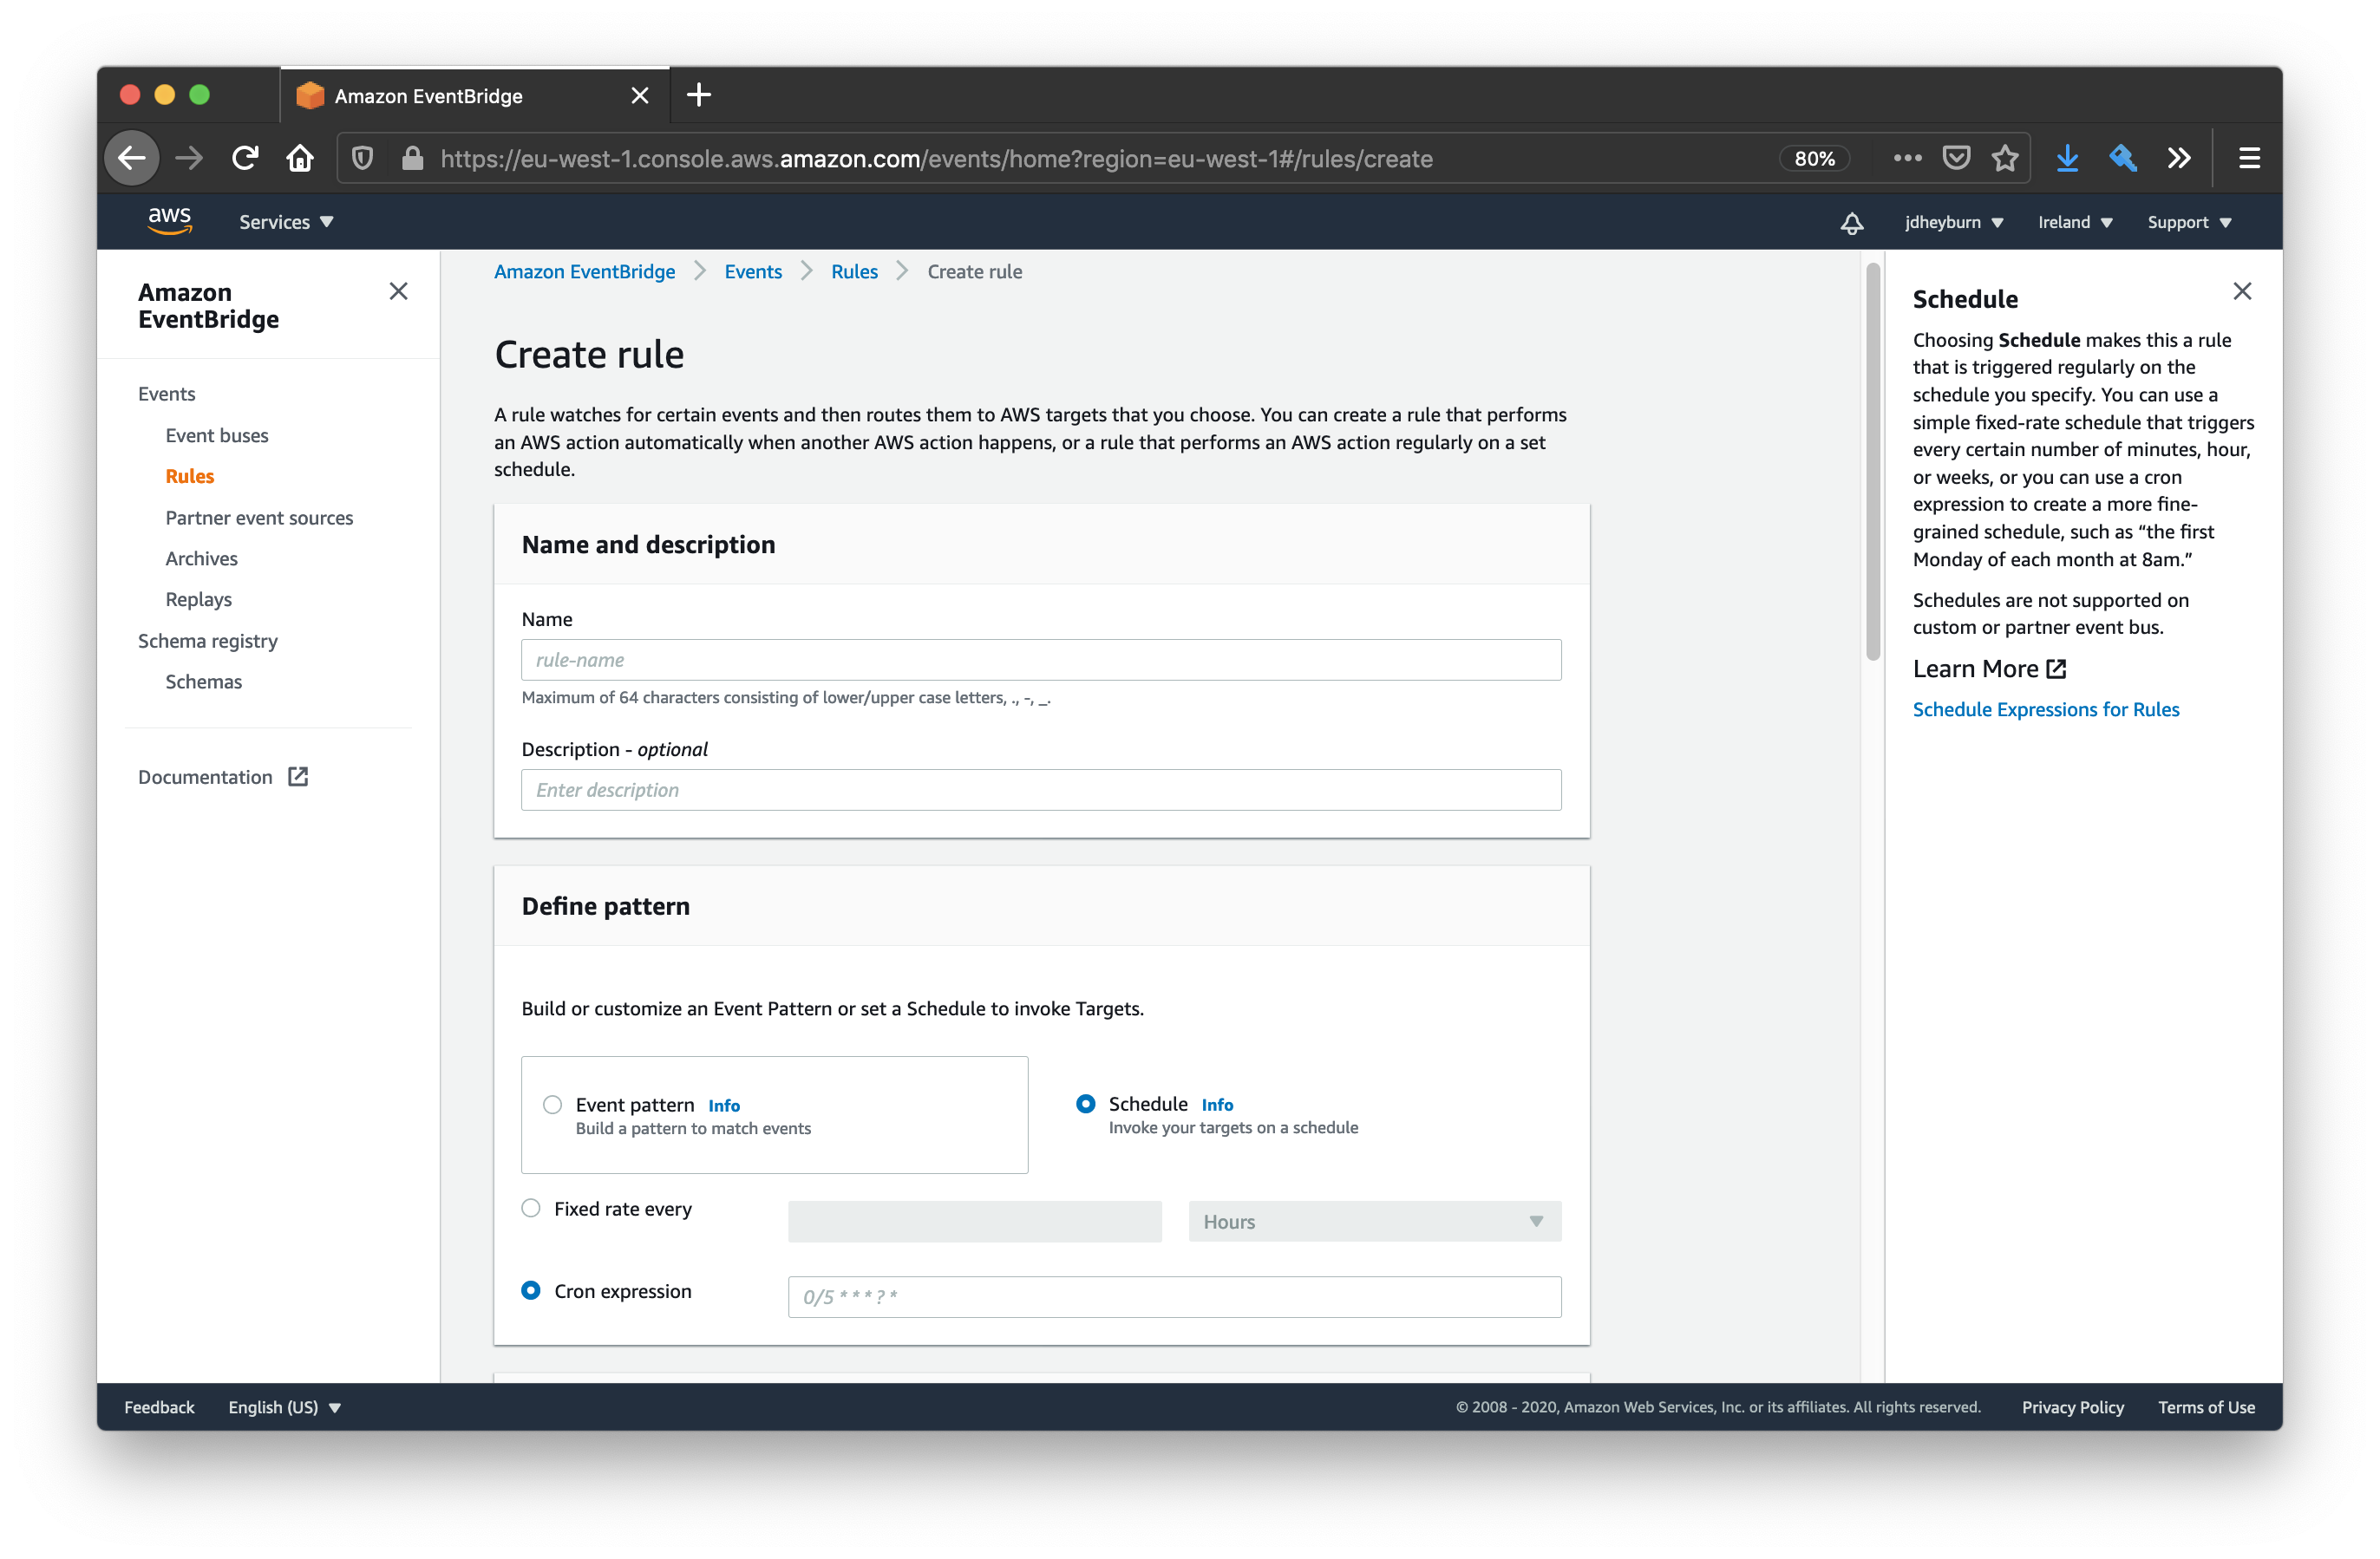
Similarities to EventBridge Rules
“But wait”, I hear you ask, “don’t CloudWatch/EventBridge Rules also allow you to invoke events on a schedule too?”
Yes they do - both Maintenance Windows and EventBridge Rules (the bigger sibling of CloudWatch Rules) use cron expressions to define the schedule they should run on. The primary difference between the two is that Maintenance Windows allow you to specify the timezone that the cron expression adheres to, whereas EventBridge is tied to UTC.
No timezone, no party
So using maintenance windows can be handy if you’re in a non-UTC timezone and you don’t have to constantly convert your local timezone to UTC to schedule events. More importantly, maintenance windows will respect daylight savings time (DST) if your timezone observes it, so you can be sure your automation will be invoked at the same time in the specified timezone throughout the year.
On the other hand, EventBridge Rules are fixed to UTC; meaning if your timezone does observe DST, then you’ll find your automation could be off by an hour for some portion of the year (unless you change it of course - but who wants to be changing automation twice a year??).
I don’t think I’ve ever met a software engineer that’s a fan of DST!
Notably as well, you can view the execution history of maintenance windows as they’ve occurred in the past, allowing you to quickly see whether a particular invocation was successful or not - and drill down into any failures.
I’m not bashing EventBridge Rules, in fact, it is easier to set up than Maintenance Windows. But there’s always the right tool for the job.
For the rest of this post, we’re going to be exploring how to automate the command document we created last time. Later on in the series we’ll be looking at using maintenance windows to automate automation documents.
Automating command documents with maintenance windows
So what’s the purpose of creating the command document we achieved last time? Well we’re not going to be manually invoking it like what we have been doing so far - as engineers we need to be automating as many repetitive tasks as possible.
To summarise where we are now, we’ve produced a Command document which when executed, automates the following:
- Downloads a healthcheck script from S3
- Executes the healthcheck script, failing the command invocation if healthcheck does not pass
Healthchecks are important to run both continuously in our environment, as a means of monitoring and verifying the estate is working as intended, before your users notice. They are also necessary to run after a change has been introduced to the environment, such as a new code deployment, or even a patching event via the AWS-RunPatchBaseline document.
Barebones maintenance window with AWS-RunPatchBaseline
We’re going to use Terraform again to build out a minimal maintenance window. You can view the code for it here. You’ll notice the repository this file sits in is identical to the one from the first post, except I’ve included the new resources that will enable us to accomplish the requirement.
Here is a breakdown of each of the resources we’re going to create.
Maintenance Window
This creates the maintenance window resource, which is then referred to in the subsequent resources we create.
- It’s nothing more than that cron expression I mentioned earlier, along with the timezone it should execute in
- We specify how long the window lasts for, and the cutoff; both of which are specified in hours
- The cutoff indicates how long before the end of the window should AWS not schedule any new tasks in that window
resource "aws_ssm_maintenance_window" "patch_with_healthcheck" {
  name              = "PatchWithHealthcheck"
  description       = "Daily patch event with a healthcheck afterward"
  schedule          = "cron(0 9 ? * * *)" # Everyday at 9am UK time
  schedule_timezone = "Europe/London"
  duration          = 3
  cutoff            = 1
}
Maintenance Window Target
We need a means of telling the window what instances to target, and the aws_ssm_maintenance_window_target resource is how you do it. Below I’m demonstrating two methods of doing this:
- Specify the instance IDs directly
- Handy if you have a fixed list of instances you only want to be included in the maintenance window
- Target instances by their tags
- This is much for scalable, and means you don’t have to keep adding instance IDs to the list
- When the maintenance window executes, it will filter instances with this tag key and value combo for what to target
An optimum tag to use would be
Patch Groupdescribed here - which I have mentioned previously. For the sake of this demo, we will keep it simple by targeting instance IDs.
resource "aws_ssm_maintenance_window_target" "patch_with_healthcheck_target" {
  window_id     = aws_ssm_maintenance_window.patch_with_healthcheck.id
  name          = "PatchWithHealthcheckTargets"
  description   = "All instances that should be patched with a healthcheck after"
  resource_type = "INSTANCE"

  targets {
    key = "InstanceIds"
    values = concat(
      module.windows_ec2.id,
      module.linux_ec2.id
    )
  }

  # Using tags is more scalable
  #   targets {
  #     key    = "tag:Terraform"
  #     values = ["true"]
  #   }
}
Maintenance Window Tasks
Patching task
Now for the tasks… remember that we want to execute our healthcheck SSM document after a patch event right? We need to build a task for executing the AWS-RunPatchBaseline document.
resource "aws_ssm_maintenance_window_task" "patch_task" {
  window_id        = aws_ssm_maintenance_window.patch_with_healthcheck.id
  task_type        = "RUN_COMMAND"
  task_arn         = "AWS-RunPatchBaseline"
  priority         = 10
  service_role_arn = aws_iam_role.patch_mw_role.arn

  max_concurrency = "100%"
  max_errors      = 0

  targets {
    key    = "WindowTargetIds"
    values = [aws_ssm_maintenance_window_target.patch_with_healthcheck_target.id]
  }

  task_invocation_parameters {
    run_command_parameters {
      timeout_seconds  = 3600

      parameter {
        name = "Operation"
        values = ["Scan"]
      }
    }
  }
}
Let’s run through the main attributes:
window_id- the maintenance window to associate this task withtask_type- what kind of task this is- since we’re executing a command document, the value here is
RUN_COMMAND
- since we’re executing a command document, the value here is
task_arn- the ARN of the document you wish to run- note the document name can also be used here, as demonstrated above
priority- defines in what order should tasks be executed in, whereby the lower the number given, the earlier the task is executed in the window- e.g. a task priority of
1gets executed before one with10 - tasks with the same priority get executed in parallel
- e.g. a task priority of
service_role_arn- tells which IAM role should be assumed to execute this task as- we’ll get an explanation of this later
max_concurrency- specifies how many instances this task should be invoked on simultaenously- it can take a percentage as a value, only applying to that percentage of target instances at a time
- i.e.
50%indicates only half of targeted instances will have the task executed at a time
- i.e.
- or it can take a fixed number such as
1; indicating that only one instance should have this task executed at a time 100%indicates this task will be invoked on all targets at the same time
- it can take a percentage as a value, only applying to that percentage of target instances at a time
max_errors- indicates how many errors should be thrown before we abort further invocations0indicates any error will abort the maintenance window and set its result to failed
The targets block allows us to define what instances to target this on - we’re referencing the aws_ssm_maintenance_window_target resource we created previously.
Lastly the task_invocation_parameters allows us to customise how the document should be ran via the parameter setting - which is passed to the document. For this example we’re only performing the Scan operation on the document, for testing purposes.
Scanwill only check for missing patches - it won’t actually install them.
A full list of available commands can be found in the AWS-RunPatchBaseline command document.
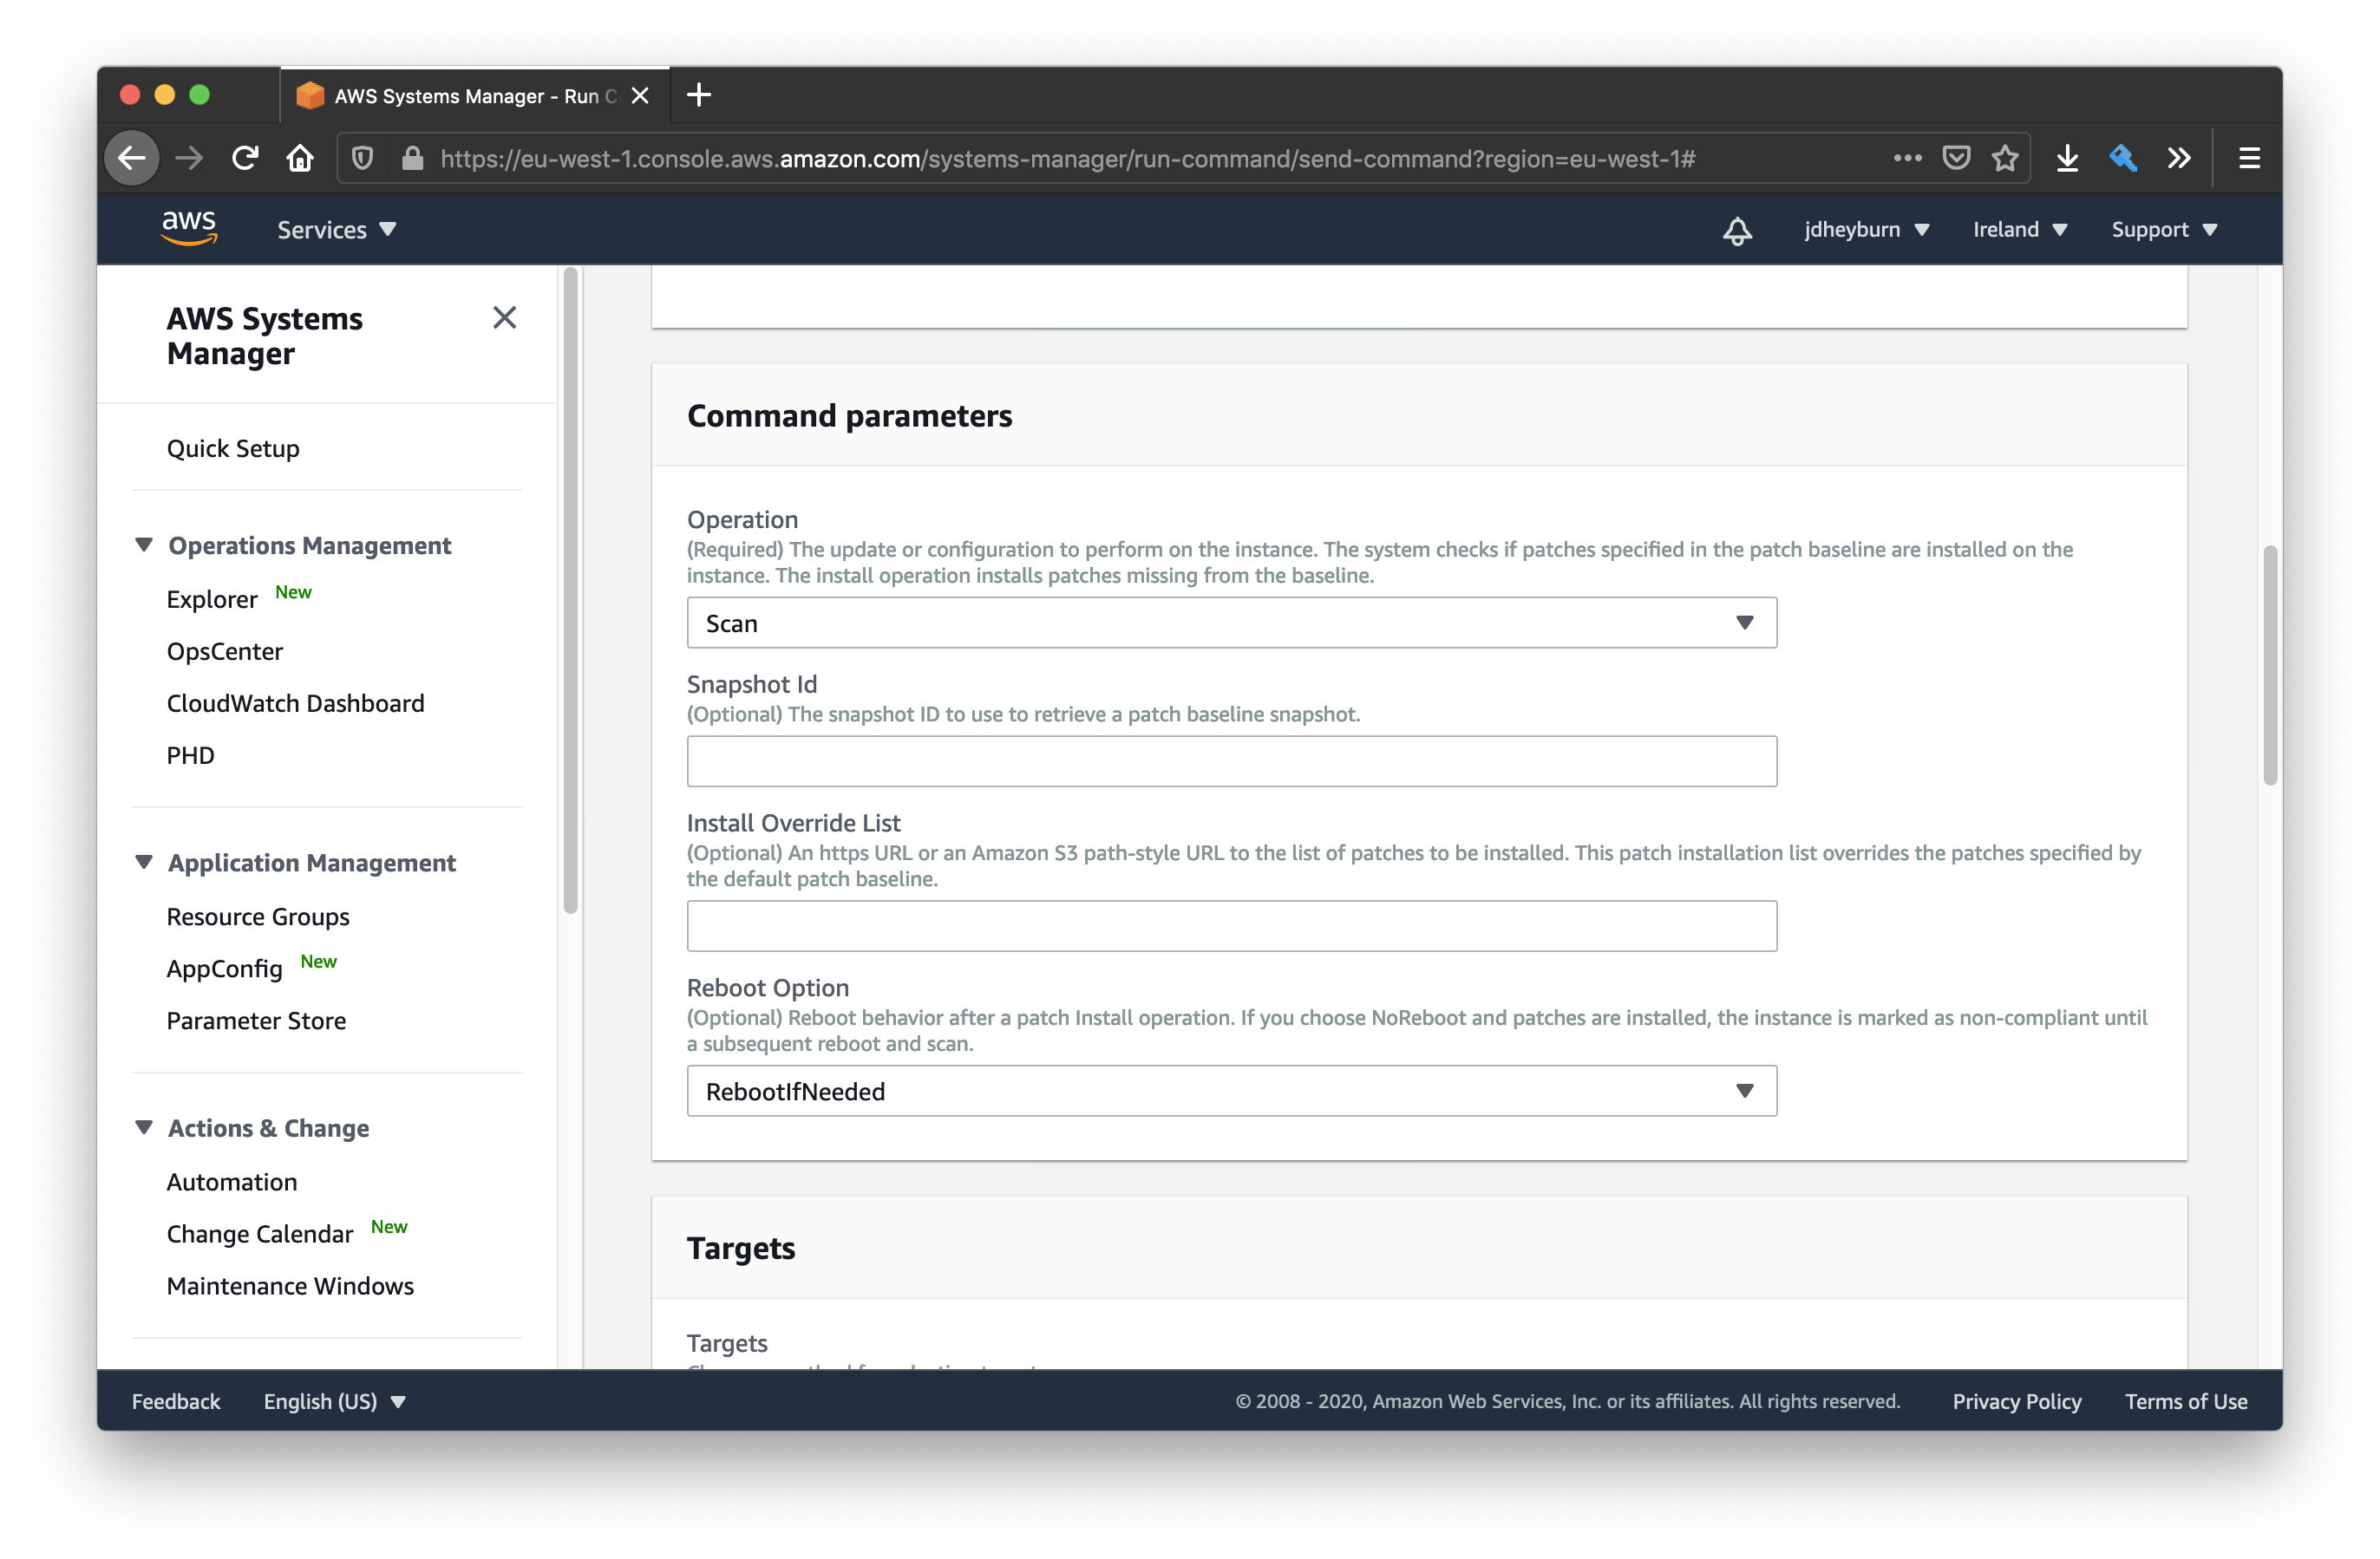
In the console GUI we can see the available parameters for the AWS-RunPatchBaseline document
Healthcheck task
Next we want to define the healthcheck task.
resource "aws_ssm_maintenance_window_task" "healthcheck_task" {
  window_id        = aws_ssm_maintenance_window.patch_with_healthcheck.id
  task_type        = "RUN_COMMAND"
  task_arn         = aws_ssm_document.perform_healthcheck_s3.arn
  priority         = 20
  service_role_arn = aws_iam_role.patch_mw_role.arn

  max_concurrency = "100%"
  max_errors      = 0

  targets {
    key    = "WindowTargetIds"
    values = [aws_ssm_maintenance_window_target.patch_with_healthcheck_target.id]
  }

  task_invocation_parameters {
    run_command_parameters {
      timeout_seconds  = 600
    }
  }
}
There’s not a whole lot of difference here compared to the patching task; our healthcheck script takes no parameters so we can leave them out (although if yours does, you’ll need to add it here!), and the task_arn points to the command document we created last time.
Probably the most significant change though is the priority. Remember that the priority number indicates the ordering of tasks to be invoked? Our patching task had a priority of 10, whereby our healthcheck task is 20. This means the patch task will be invoked before the healthcheck one.
I could have set the priority of the patching and healthcheck tasks to
1and2respectively to achieve the same thing.However, giving some distance between them means you can programmatically add new tasks before/after each other.
Want a post-patch, pre-healthcheck task? Attach a new task with priority
15!
IAM role for maintenance window
We’ve been referencing aws_iam_role.patch_mw_role.arn as our task service_role_arn. You can view the code for it here - but let’s run through them quickly.
All we’re doing is creating an IAM role, allowing the EC2 and SSM AWS services to assume said role, and applying the predefined AWS policy AmazonSSMMaintenanceWindowRole to that role. This policy gives some basic permissions to the role which allow it to execute commands and more on the instances.
data "aws_iam_policy_document" "patch_mw_role_assume" {
  statement {
    actions = ["sts:AssumeRole"]

    principals {
      type = "Service"

      identifiers = [
        "ec2.amazonaws.com",
        "ssm.amazonaws.com",
      ]
    }
  }
}

resource "aws_iam_role" "patch_mw_role" {
  name               = "PatchingMaintWindow"
  assume_role_policy = data.aws_iam_policy_document.patch_mw_role_assume.json
}

data "aws_iam_policy" "ssm_maintenance_window" {
  arn = "arn:aws:iam::aws:policy/service-role/AmazonSSMMaintenanceWindowRole"
}

resource "aws_iam_role_policy_attachment" "patch_mw_role_attach" {
  role       = aws_iam_role.patch_mw_role.name
  policy_arn = data.aws_iam_policy.ssm_maintenance_window.arn
}
Testing the barebones maintenance window
Once we’ve ran terraform apply on all the above, we can test the maintenance window out. Currently we have it set to run at 9am UK time, which may or may not be a long time away - so change it manually in the console to a time not far away from your time now.
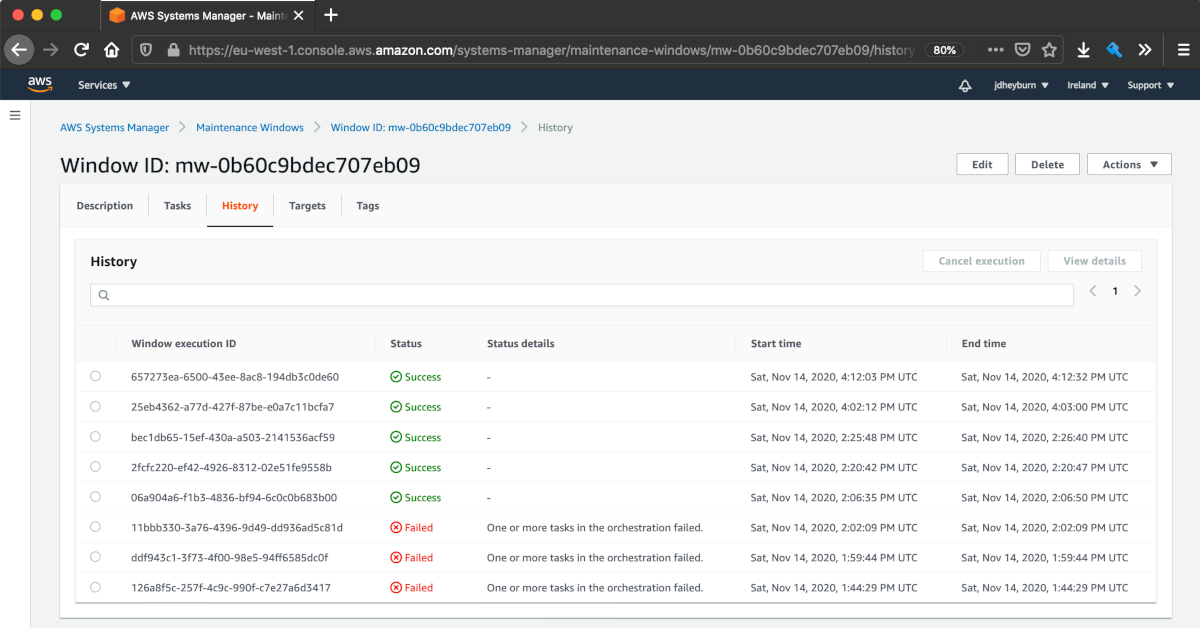
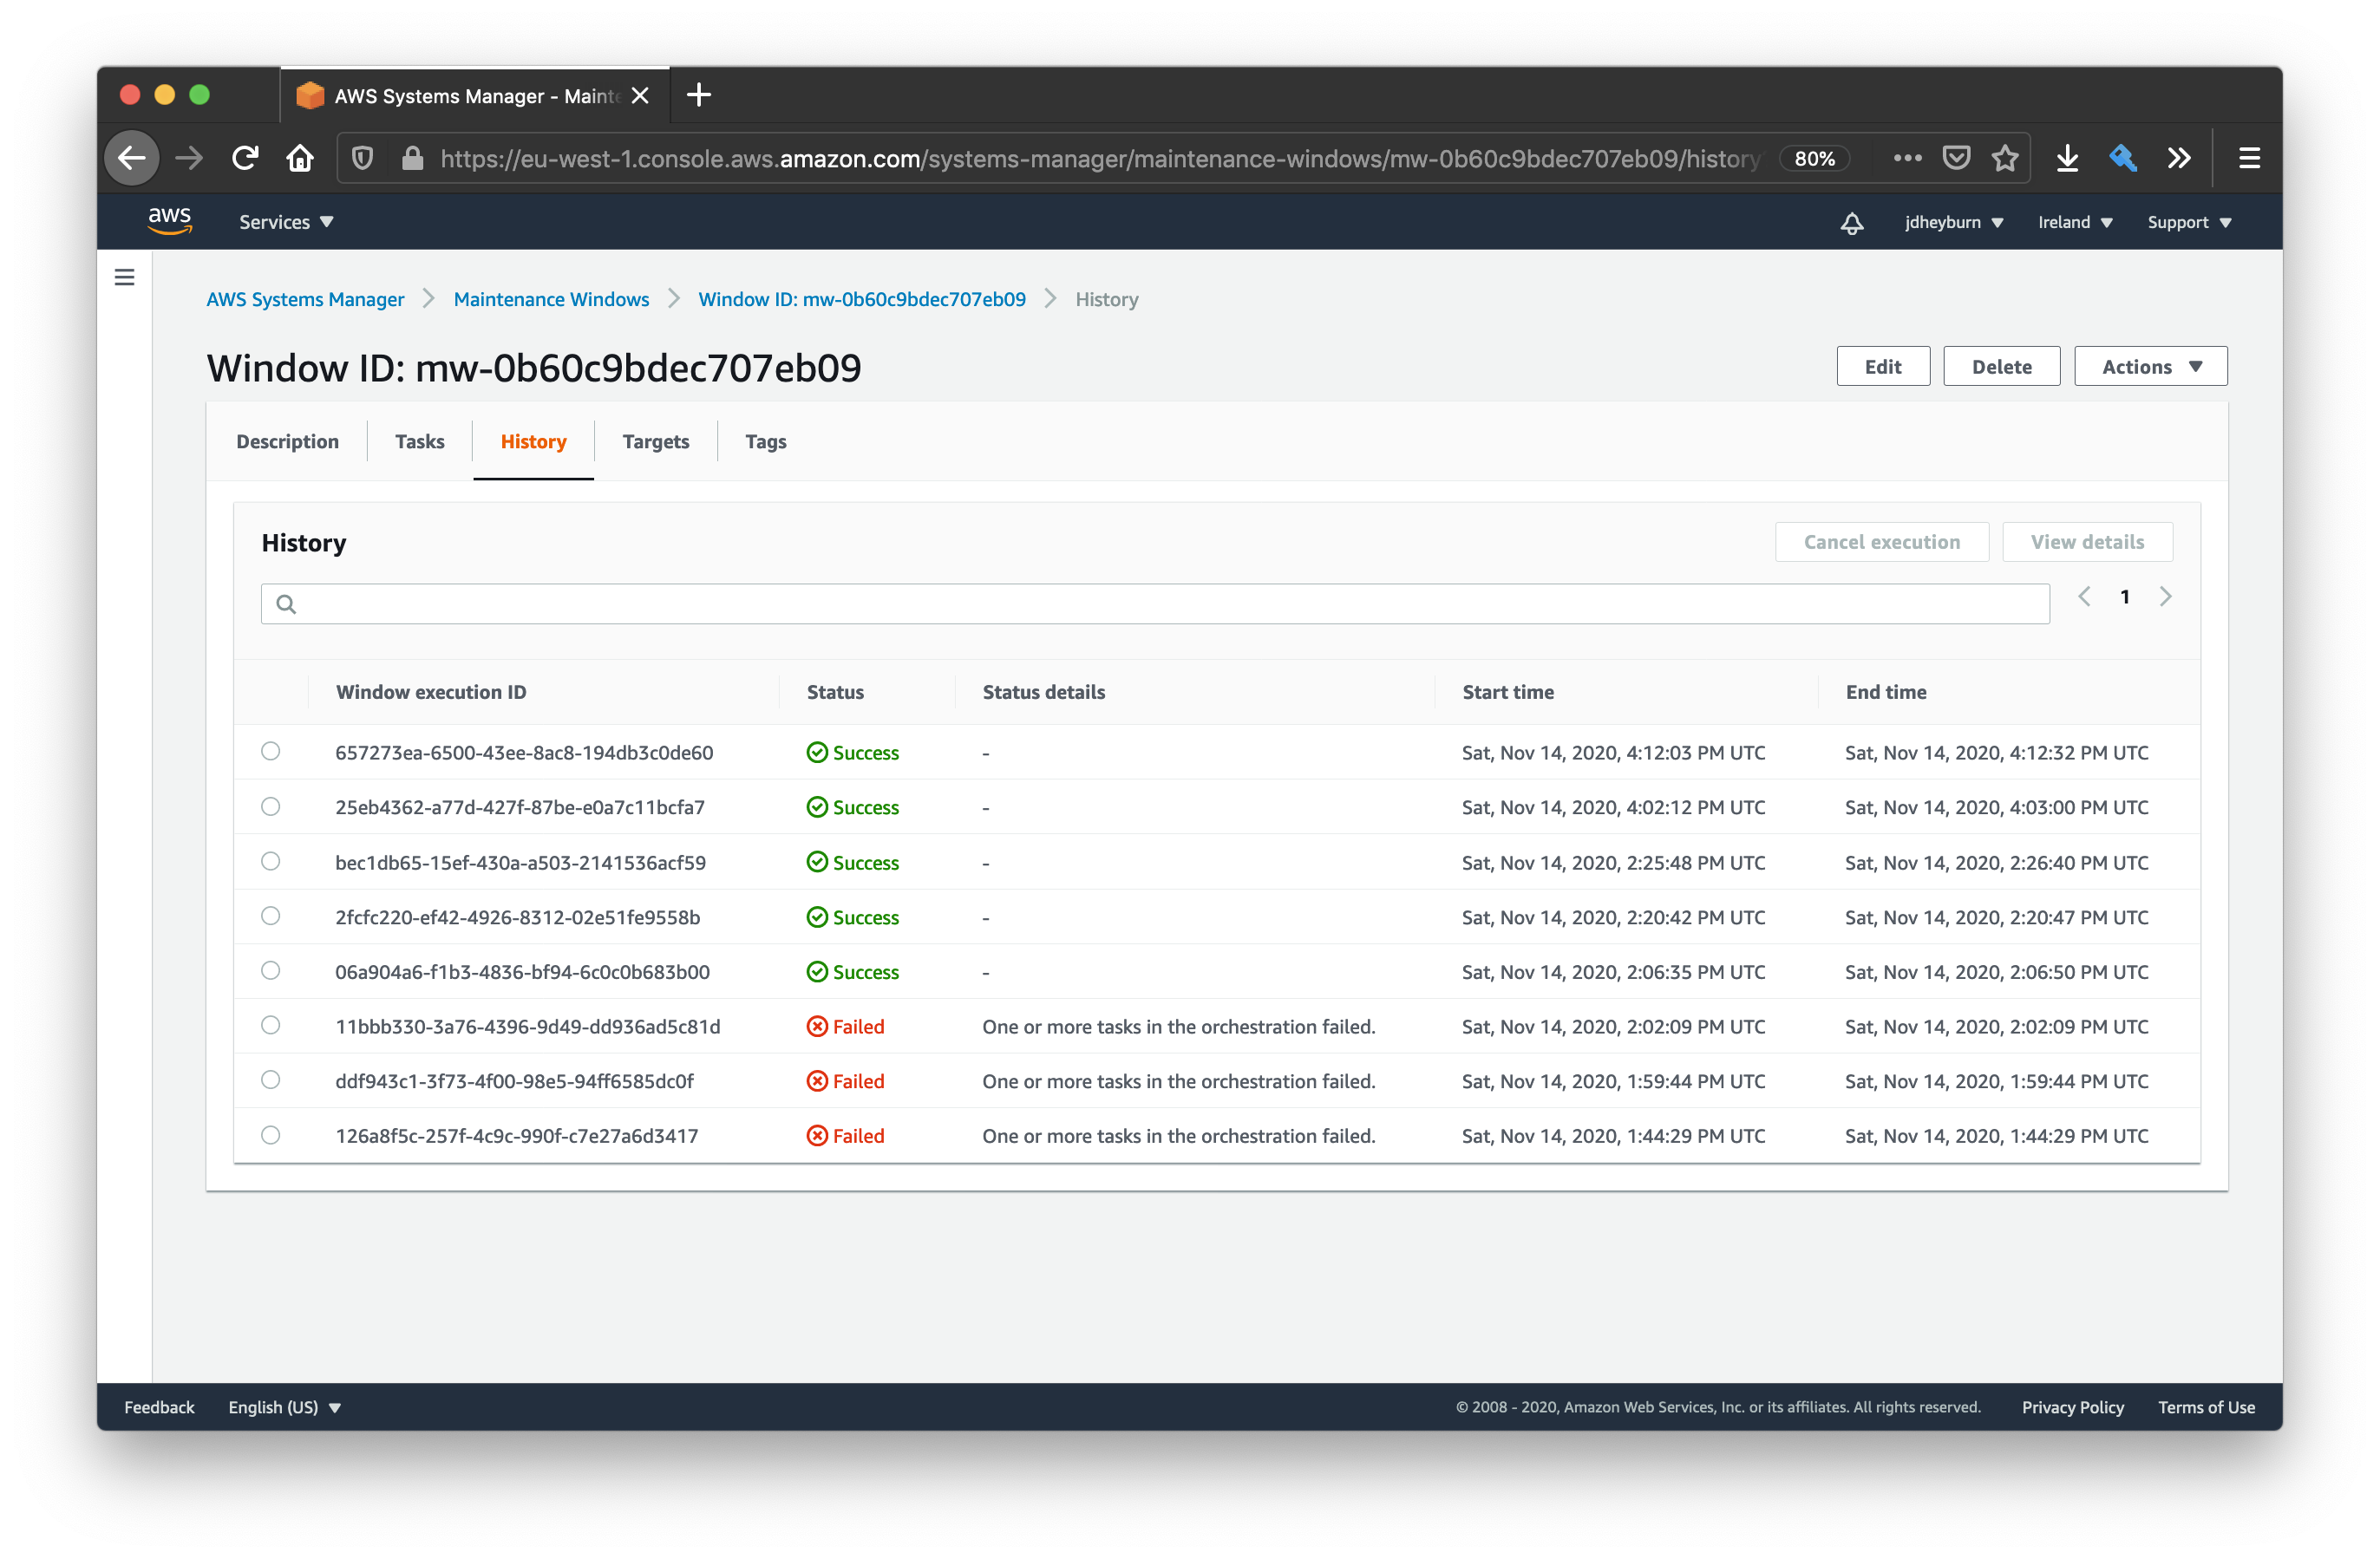
Once it’s done executing, you can navigate to the history tab to view the execution.
Let’s hope you have more luck on your first attempts running this than I did!
You can select any execution and drill down into it with the View details button.
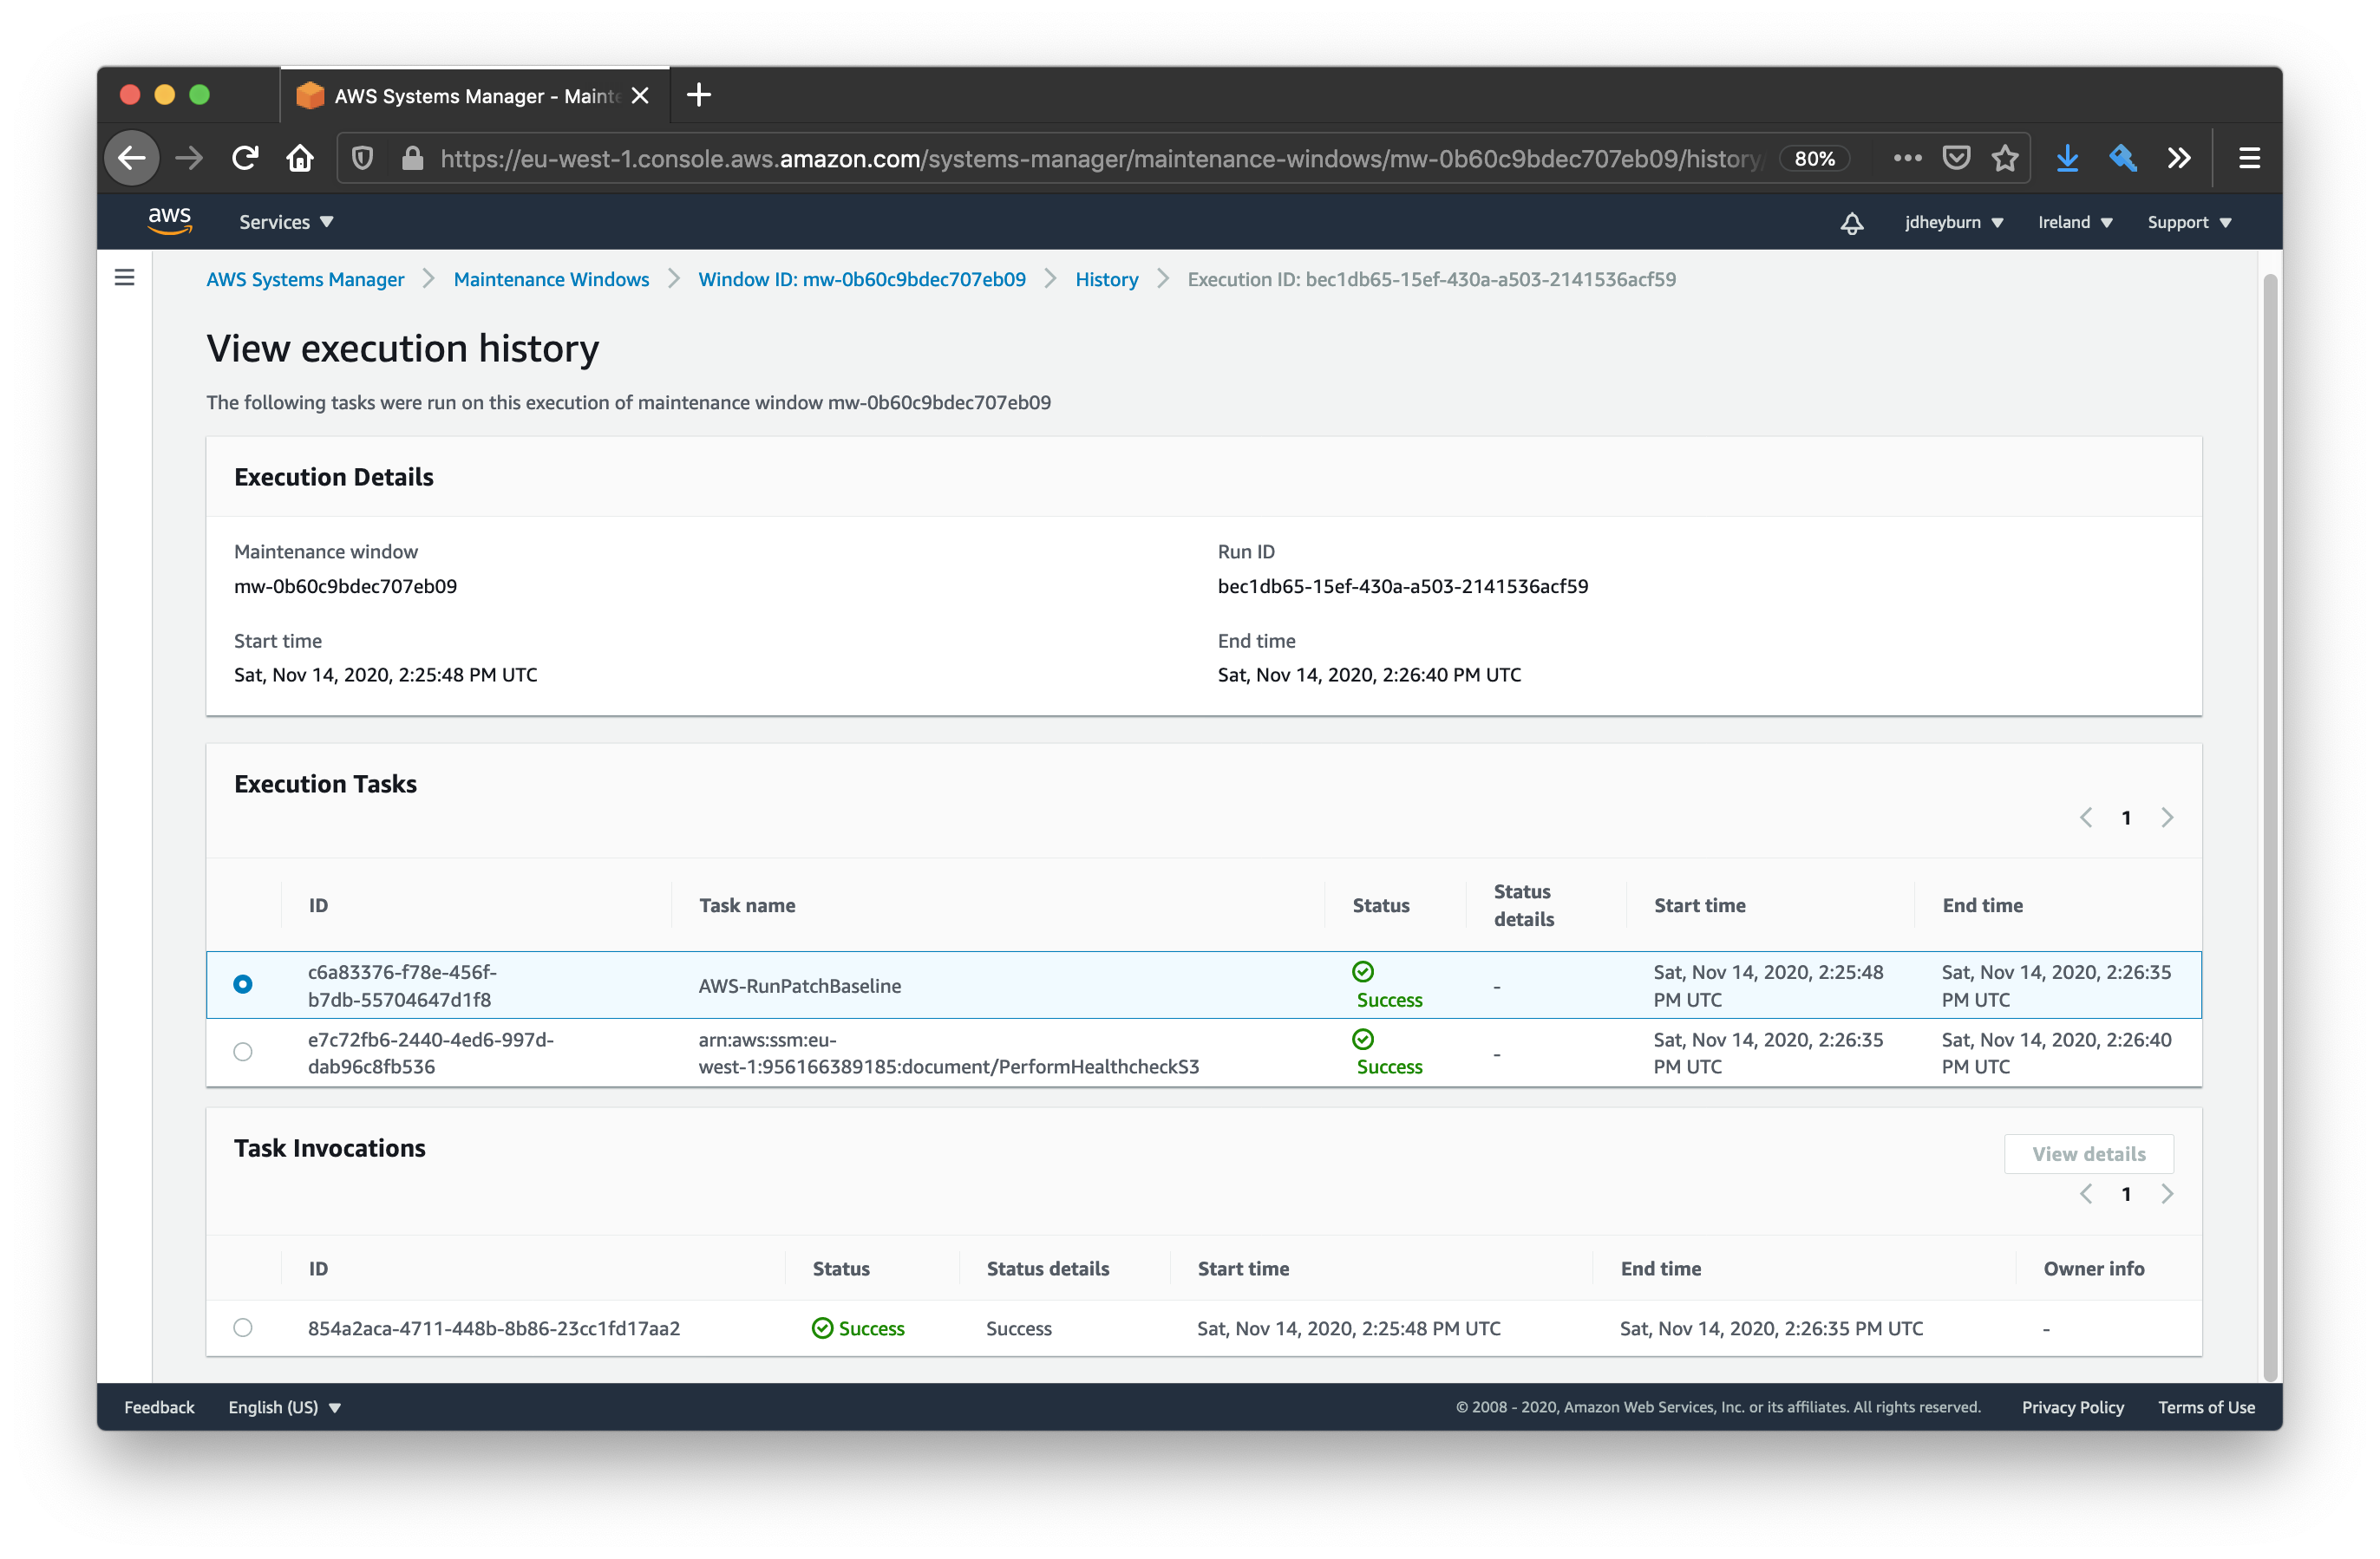
You can see that the tasks got executed in the order we defined them in
We can go deeper in the execution details and pull out the result of individual commands by selecting View details on the task invocation.
The maintenance window has redirected us to the same page as when we manually invoked the command documents in the last post
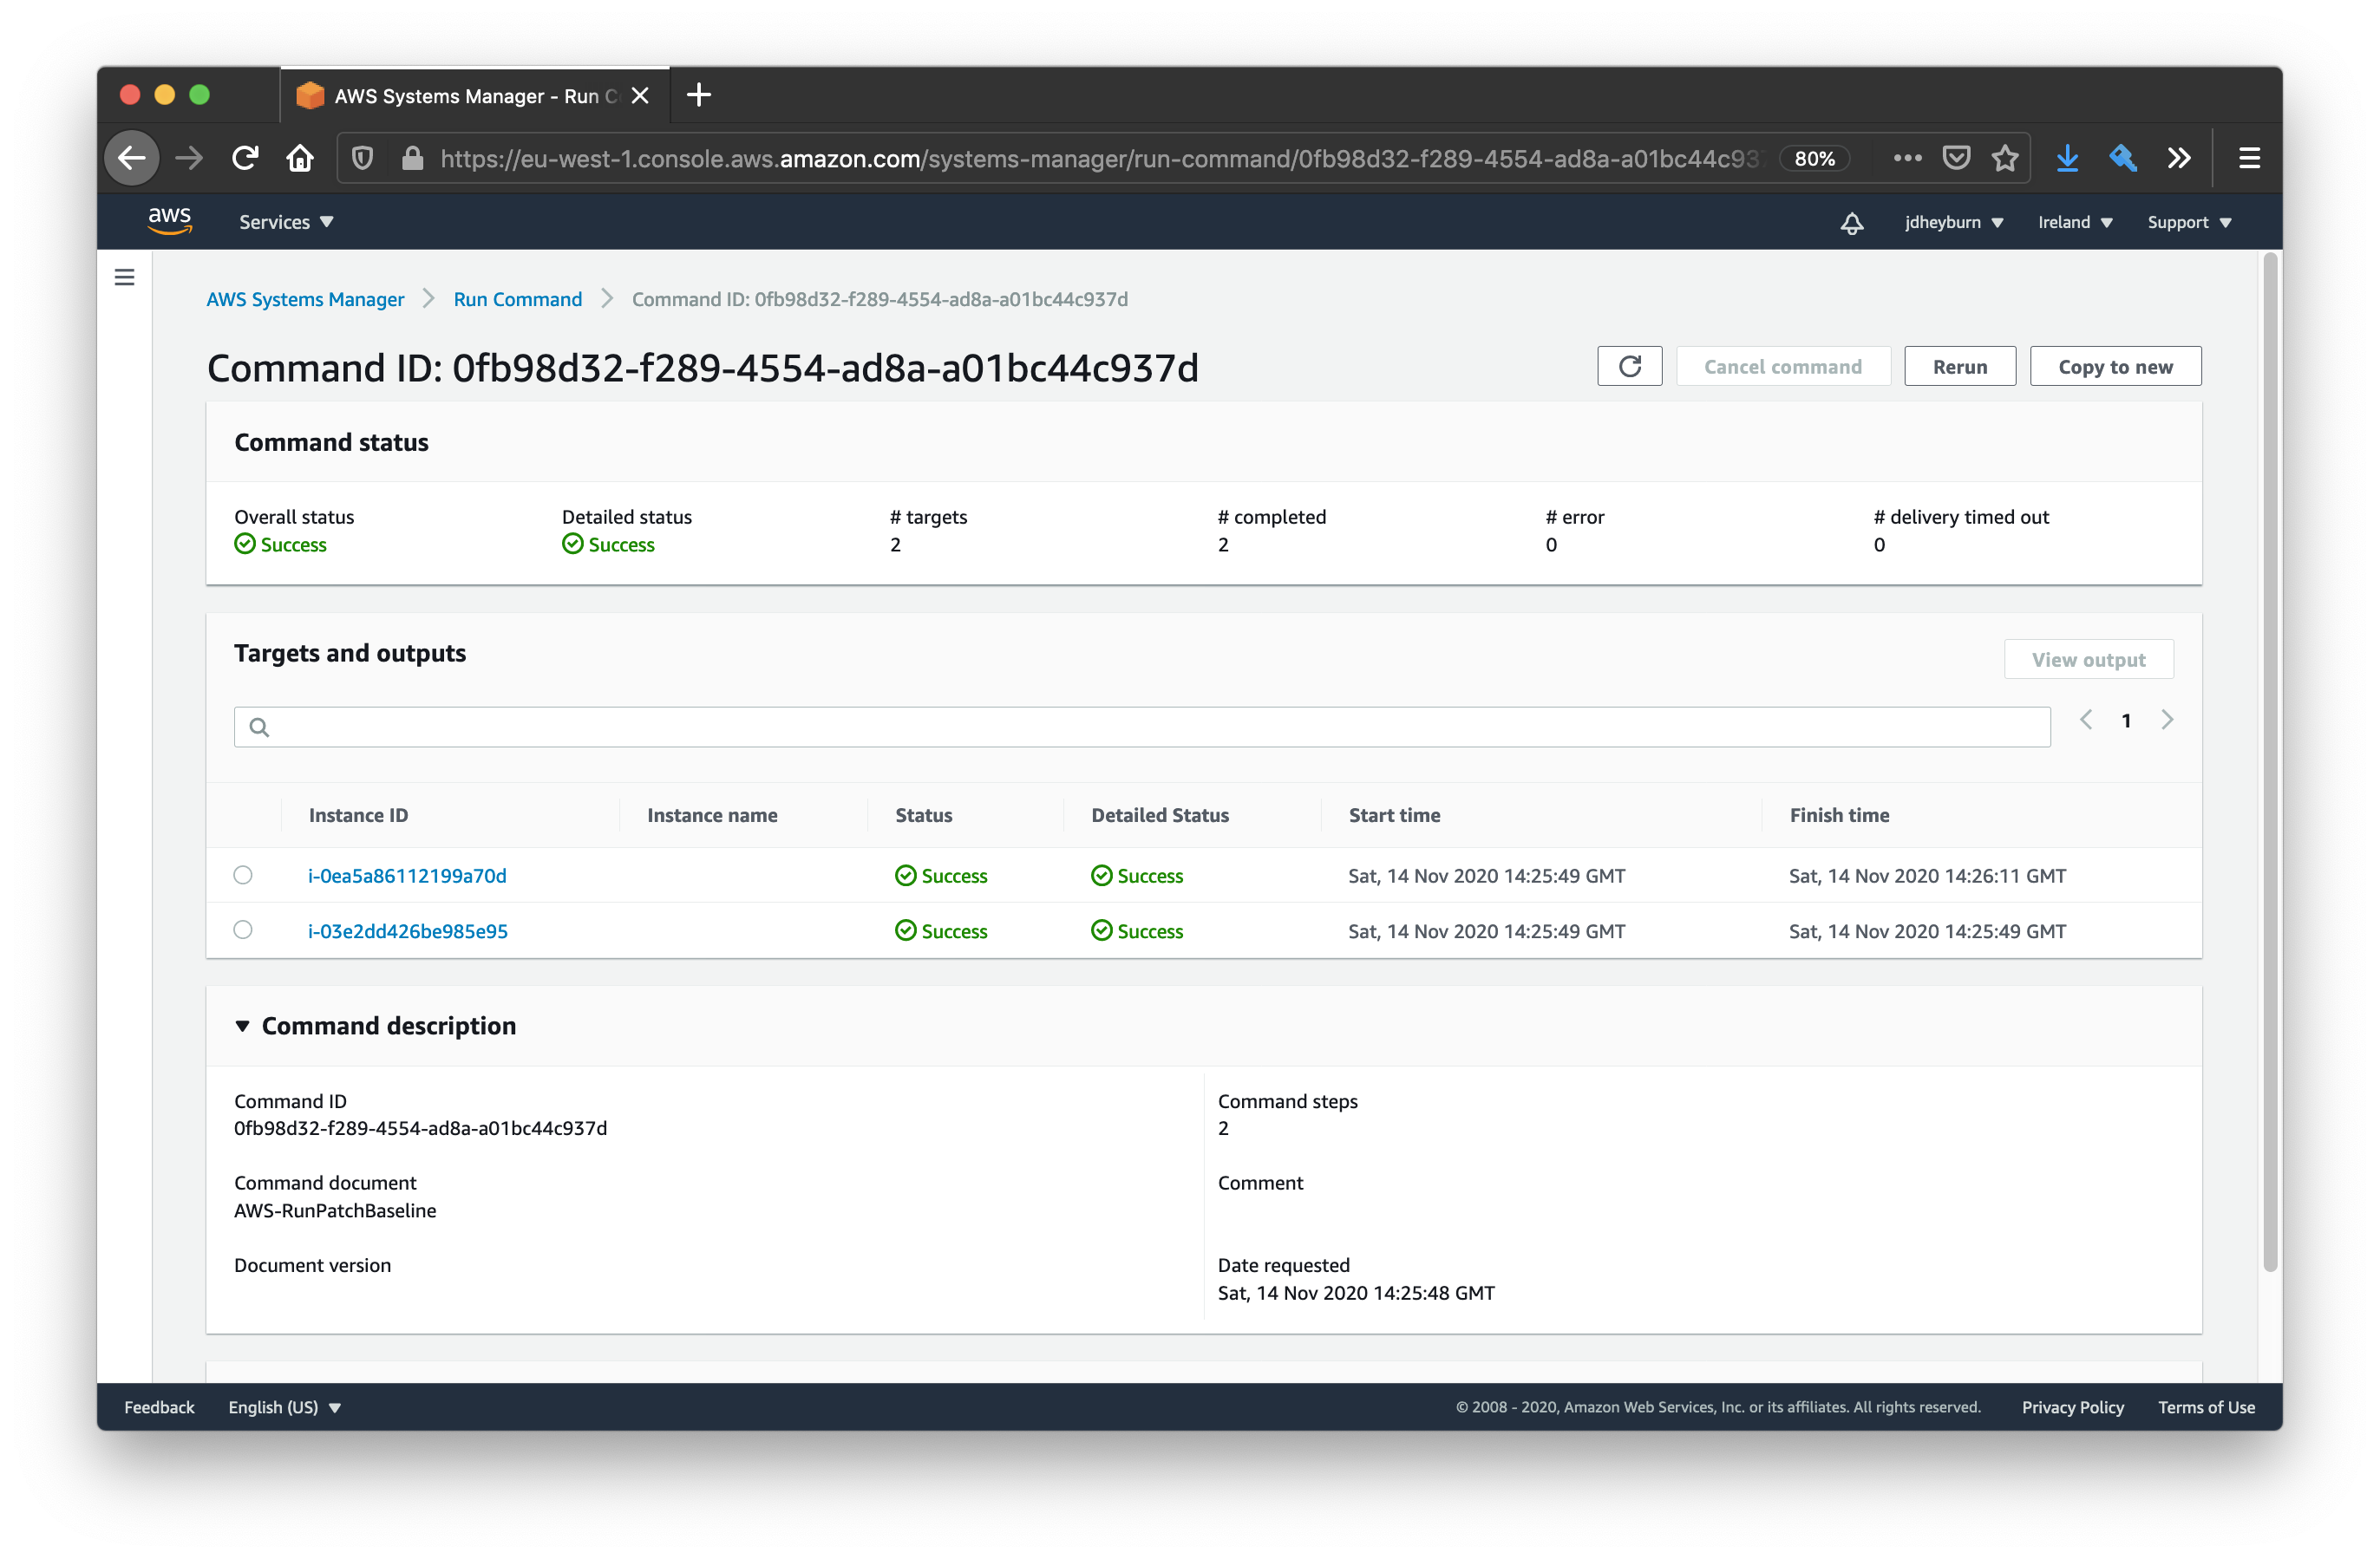
Clicking on one of the instance IDs in the above screenshot will take us to the command output for that instance.
Logging command output to S3
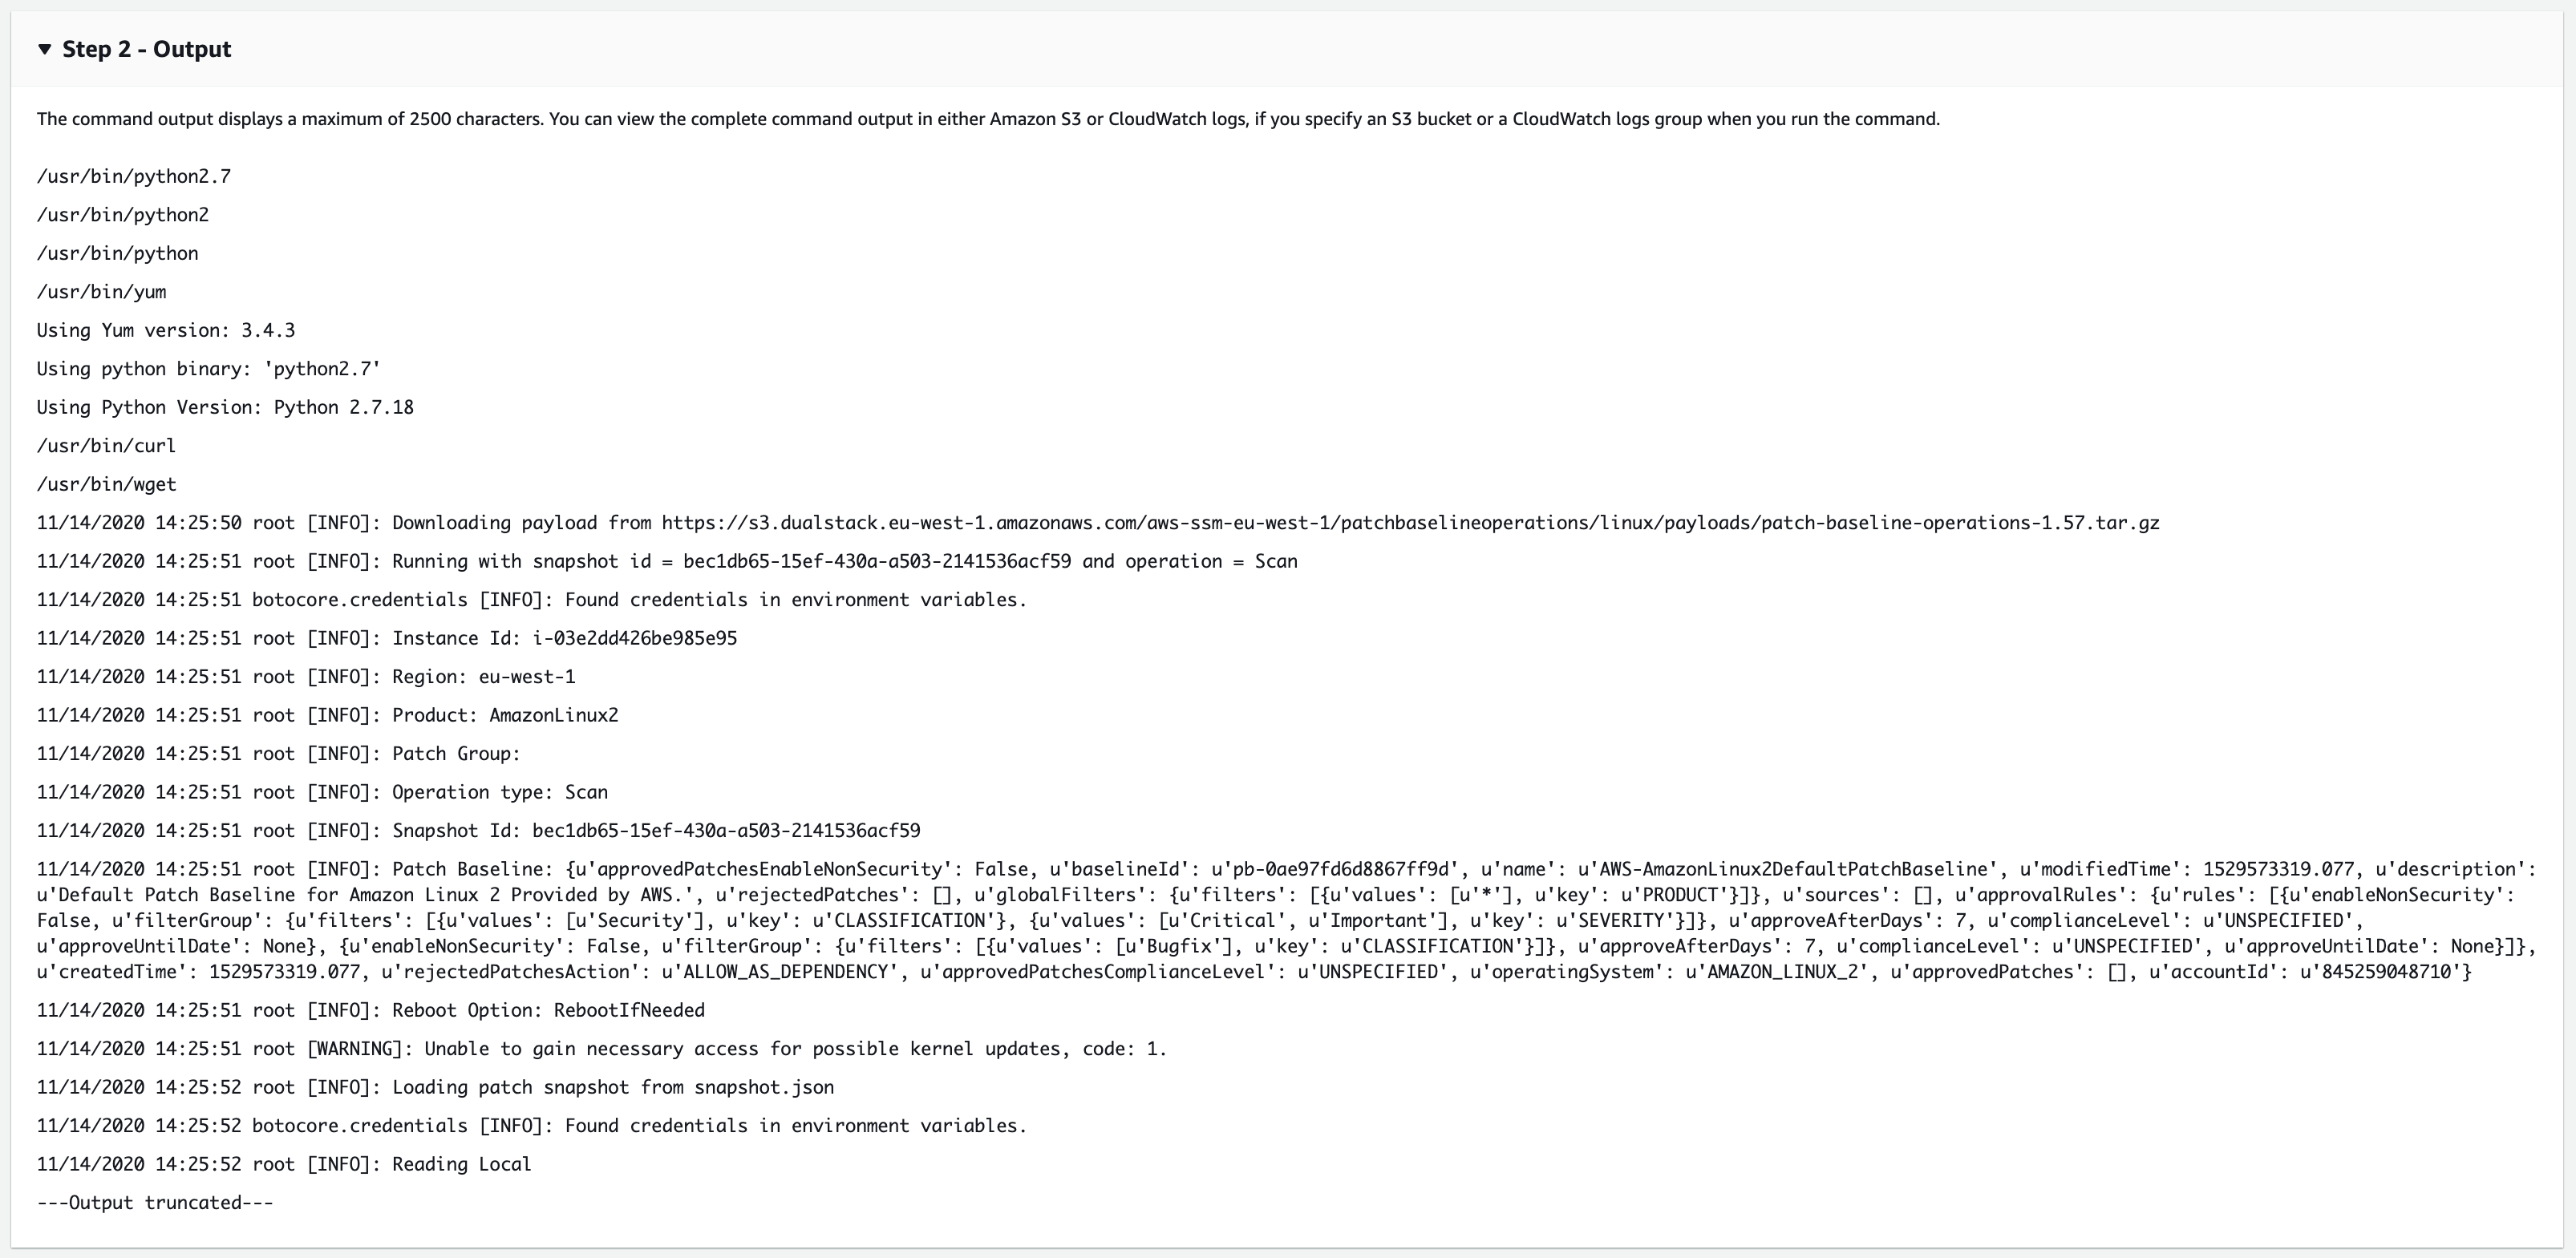
Maintenance windows by default only capture the first 2500 characters of a command output, if your command outputs more than this then it gets truncated. This can be a problem if you have a task failure and need to examine the output for the reason why it failed.
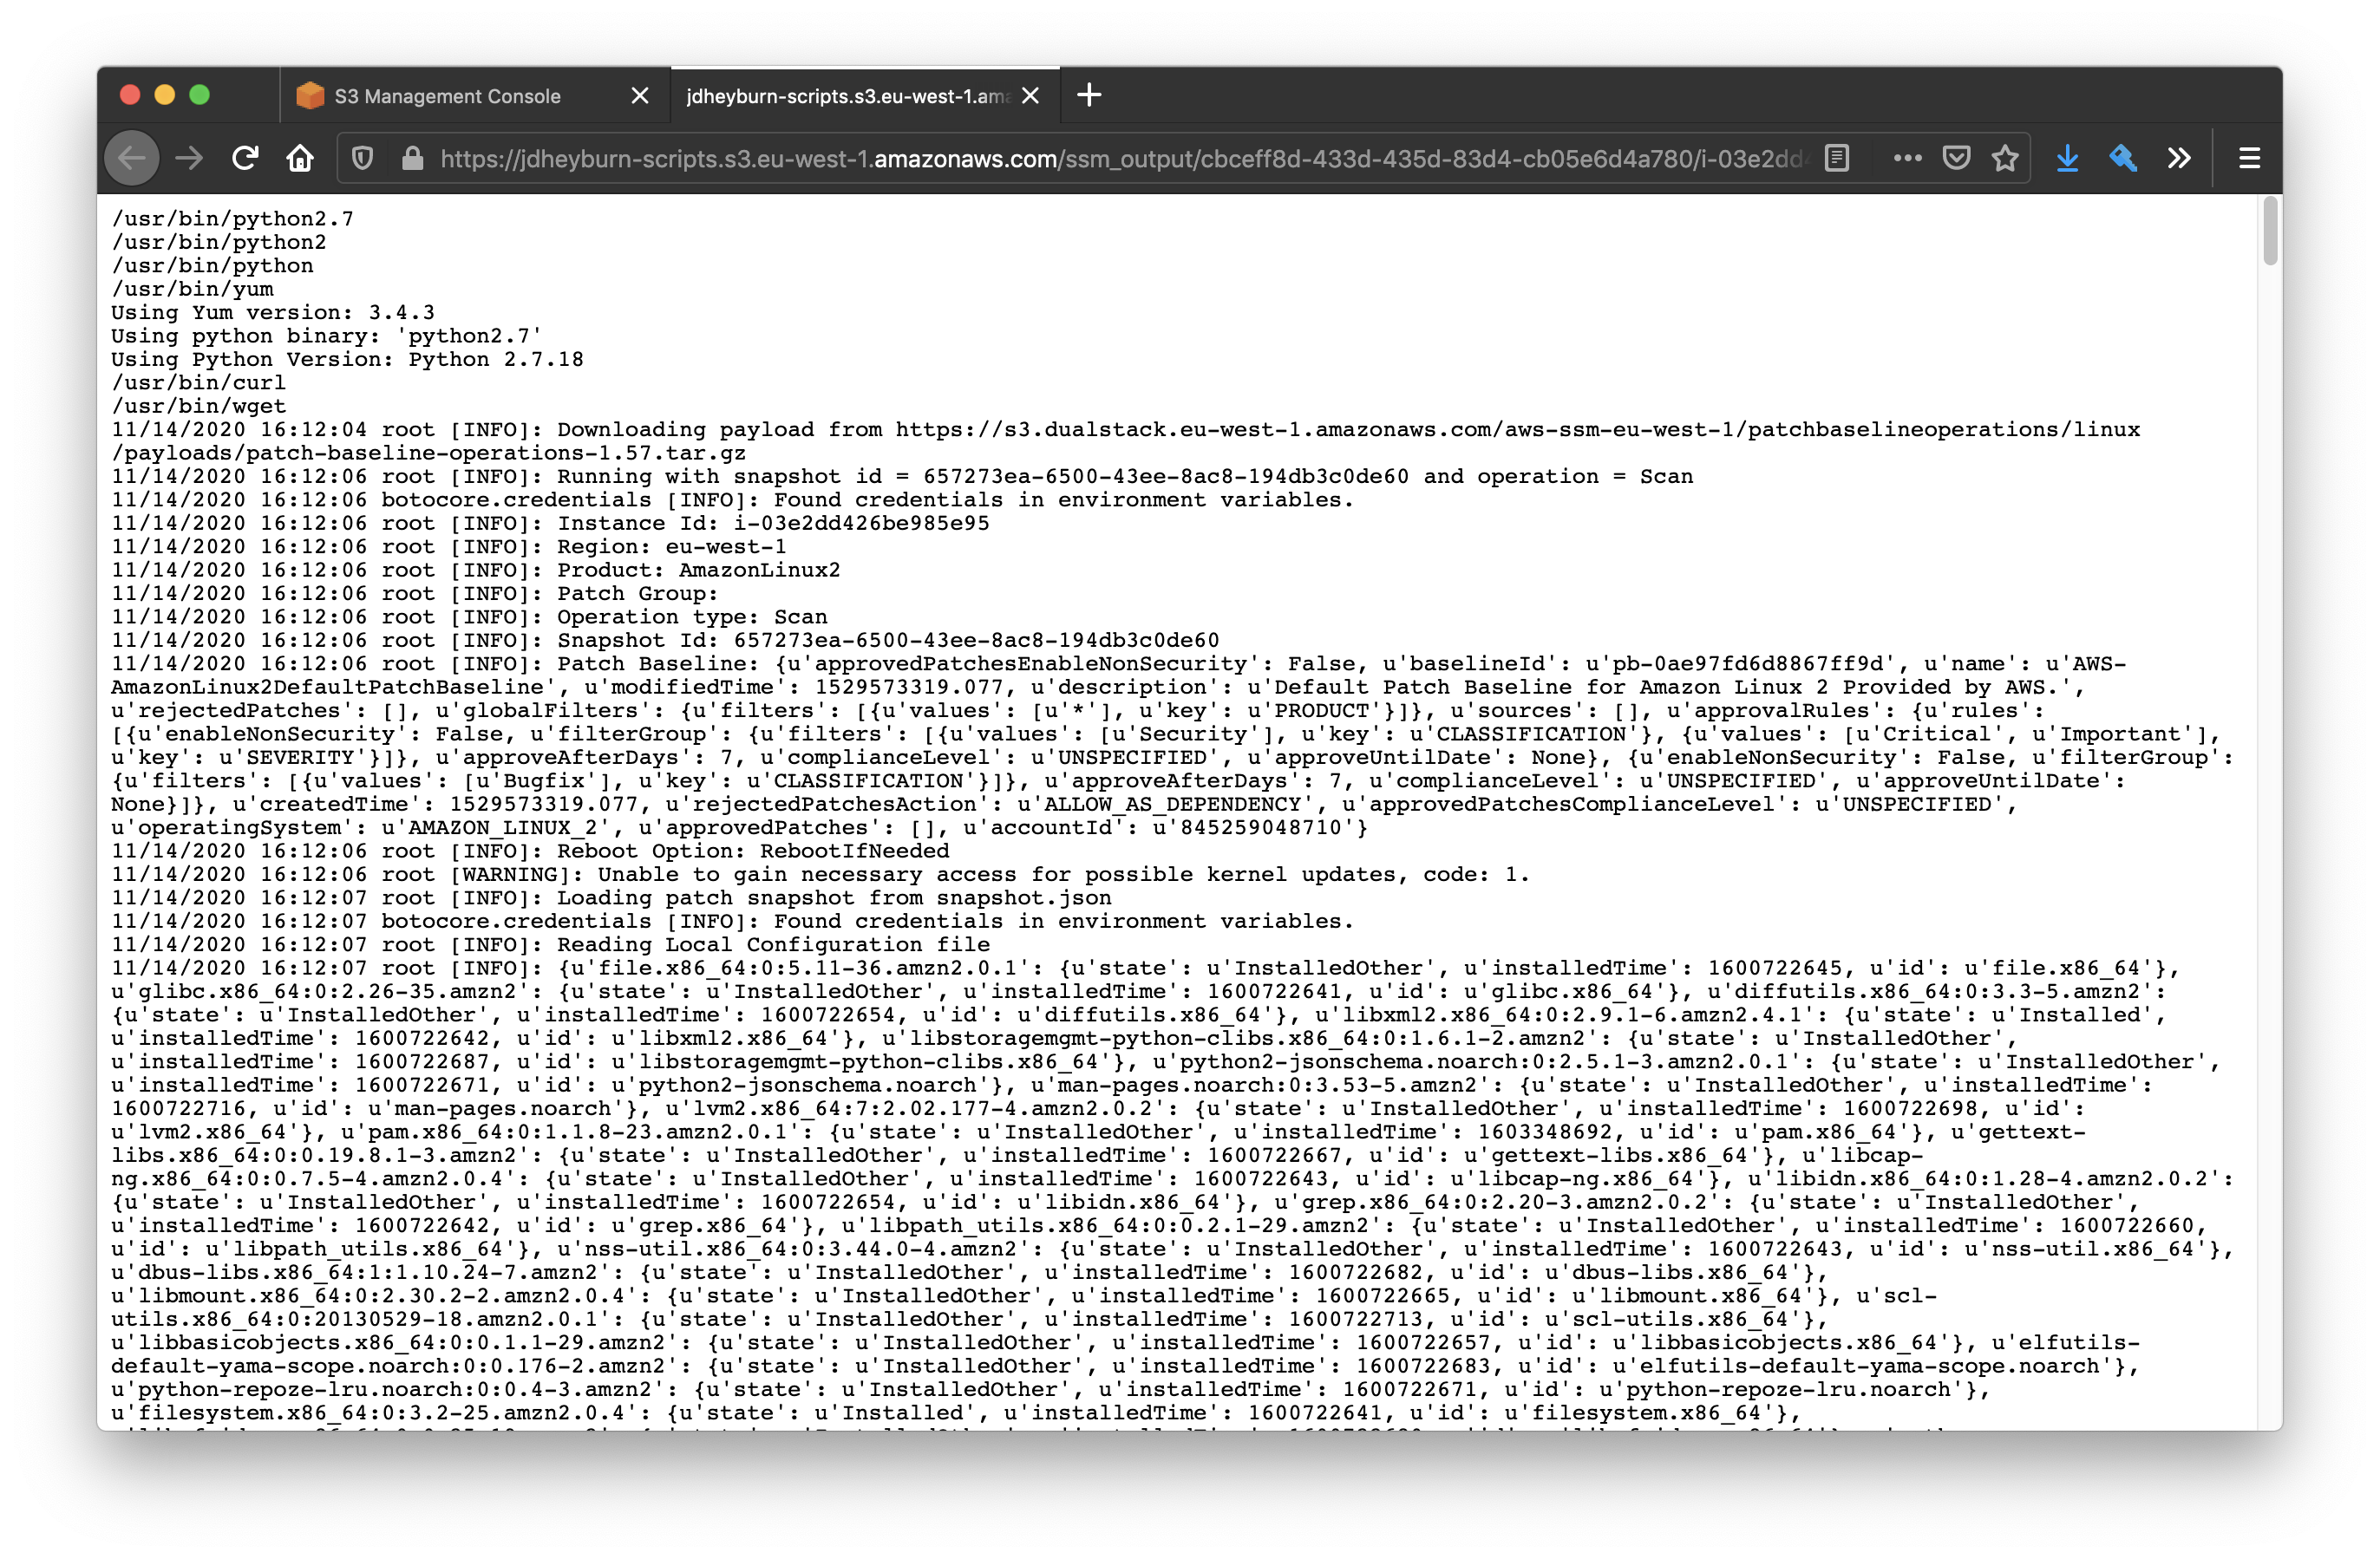
Take the AWS-RunPatchBaseline output on a Linux instance for example. It’s pretty hefty, and so we lose a lot of context on what actually happened:
Method
To combat this, maintenance windows allow you to dump command output to an S3 bucket, so that you can retrieve it later. In the last post we created an S3 bucket to store our SSM scripts (aws_s3_bucket.script_bucket.arn), we can reuse that bucket to store our command logs too.
In order to do this there are some steps we need to take:
- The S3 bucket policy needs to permit the EC2 instance role
aws_iam_role.vm_basetos3:PutObjecton"${aws_s3_bucket.script_bucket.arn}/ssm_output/*"ssm_output/is the directory/prefix in the S3 bucket where we will store the logs
- The KMS key used to encrypt objects in the target S3 bucket needs to permit instance role
aws_iam_role.vm_basetokms:GenerateDataKey - The instance role
aws_iam_role.vm_baseneeds permissions to do the above on its respective side
You can view the changes required in GitHub:
Once that is done we’ll need to add some new attributes to the maintenance window tasks, telling it where to dump the command output to.
resource "aws_ssm_maintenance_window_task" "task_name" {

  # ... other attributes hidden

  task_invocation_parameters {
    run_command_parameters {
      output_s3_bucket     = aws_s3_bucket.script_bucket.id
      output_s3_key_prefix = "ssm_output/"

      # ... other attributes hidden
    }
  }
}
When you have the new config written, then you can terraform apply and run another test on the maintenance window.
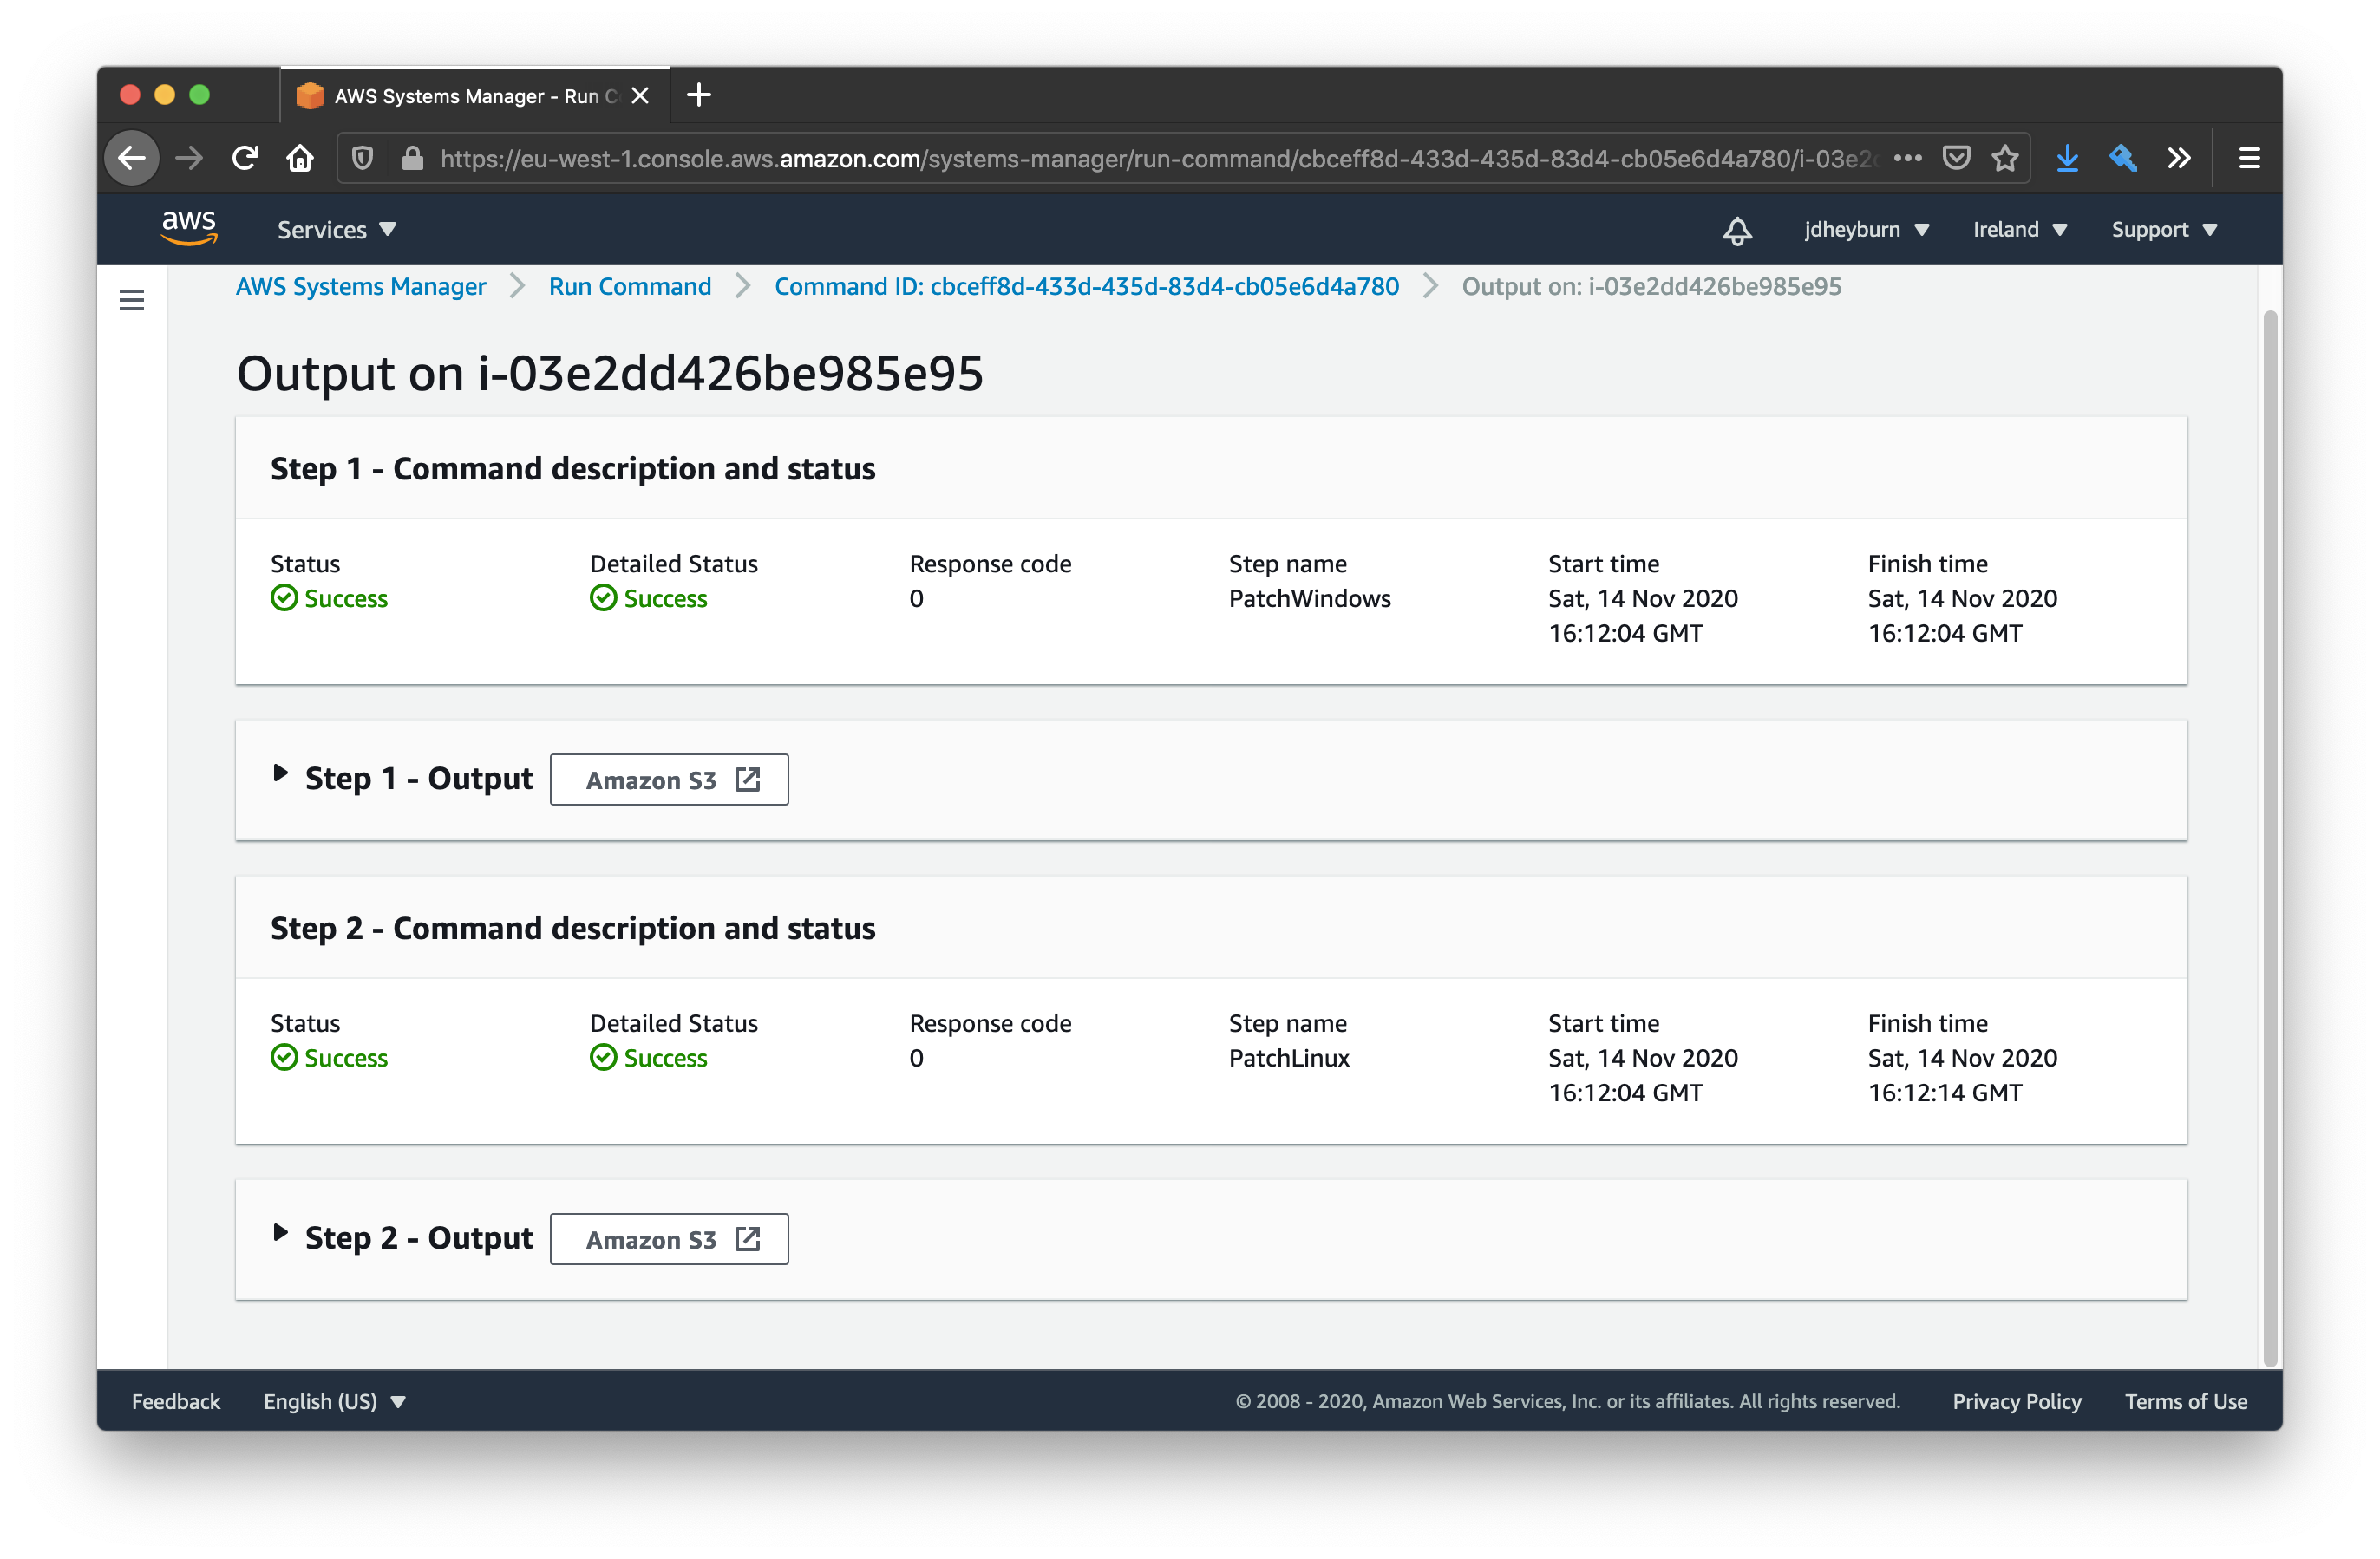
We now get a button that can redirect us to where the logs are stored in S3
If we click on this button, we can view the logs being stored in S3. Follow the path in S3 until you reach the S3 object containing the logs.
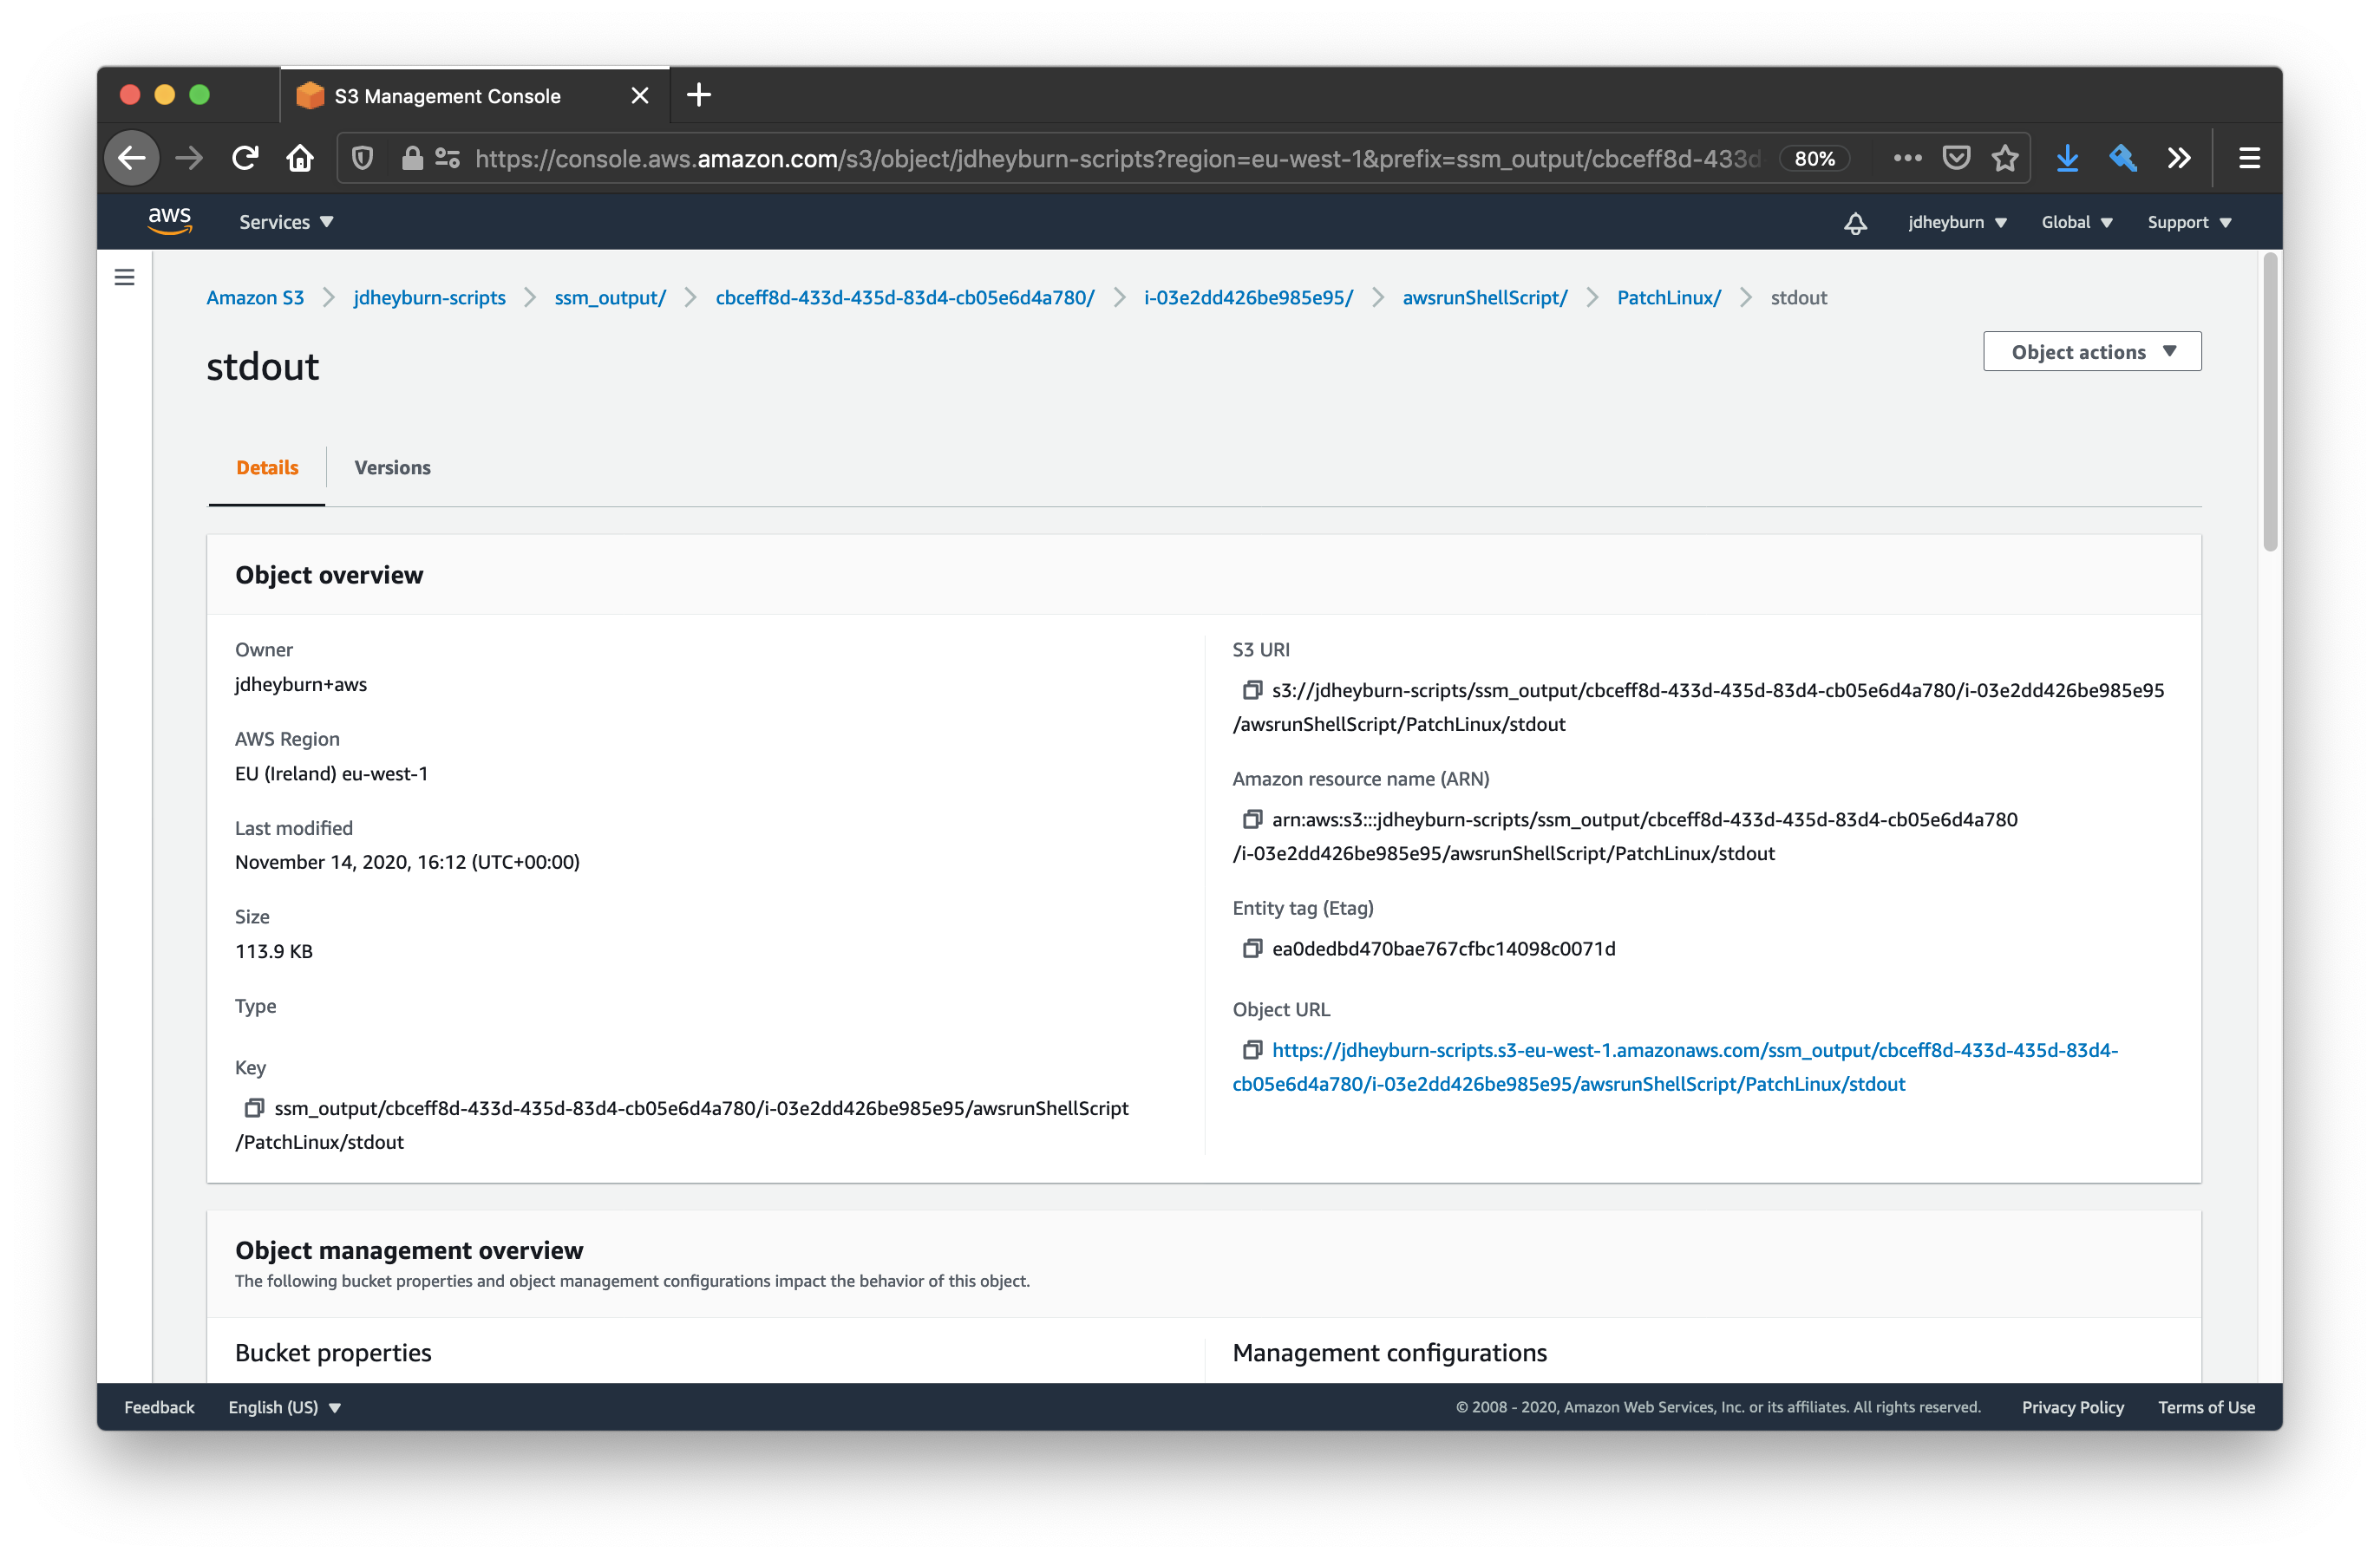
Now you can open this using the Object actions button in the top-right hand corner to view the entire logs!
Logging problems
It’s worth noting that SSM does not raise an error if an instance cannot push logs to S3 - the Amazon S3 button will redirect you to an object in S3 that does not exist. So if your logs are not appearing in S3 then ensure you’ve followed the steps above.
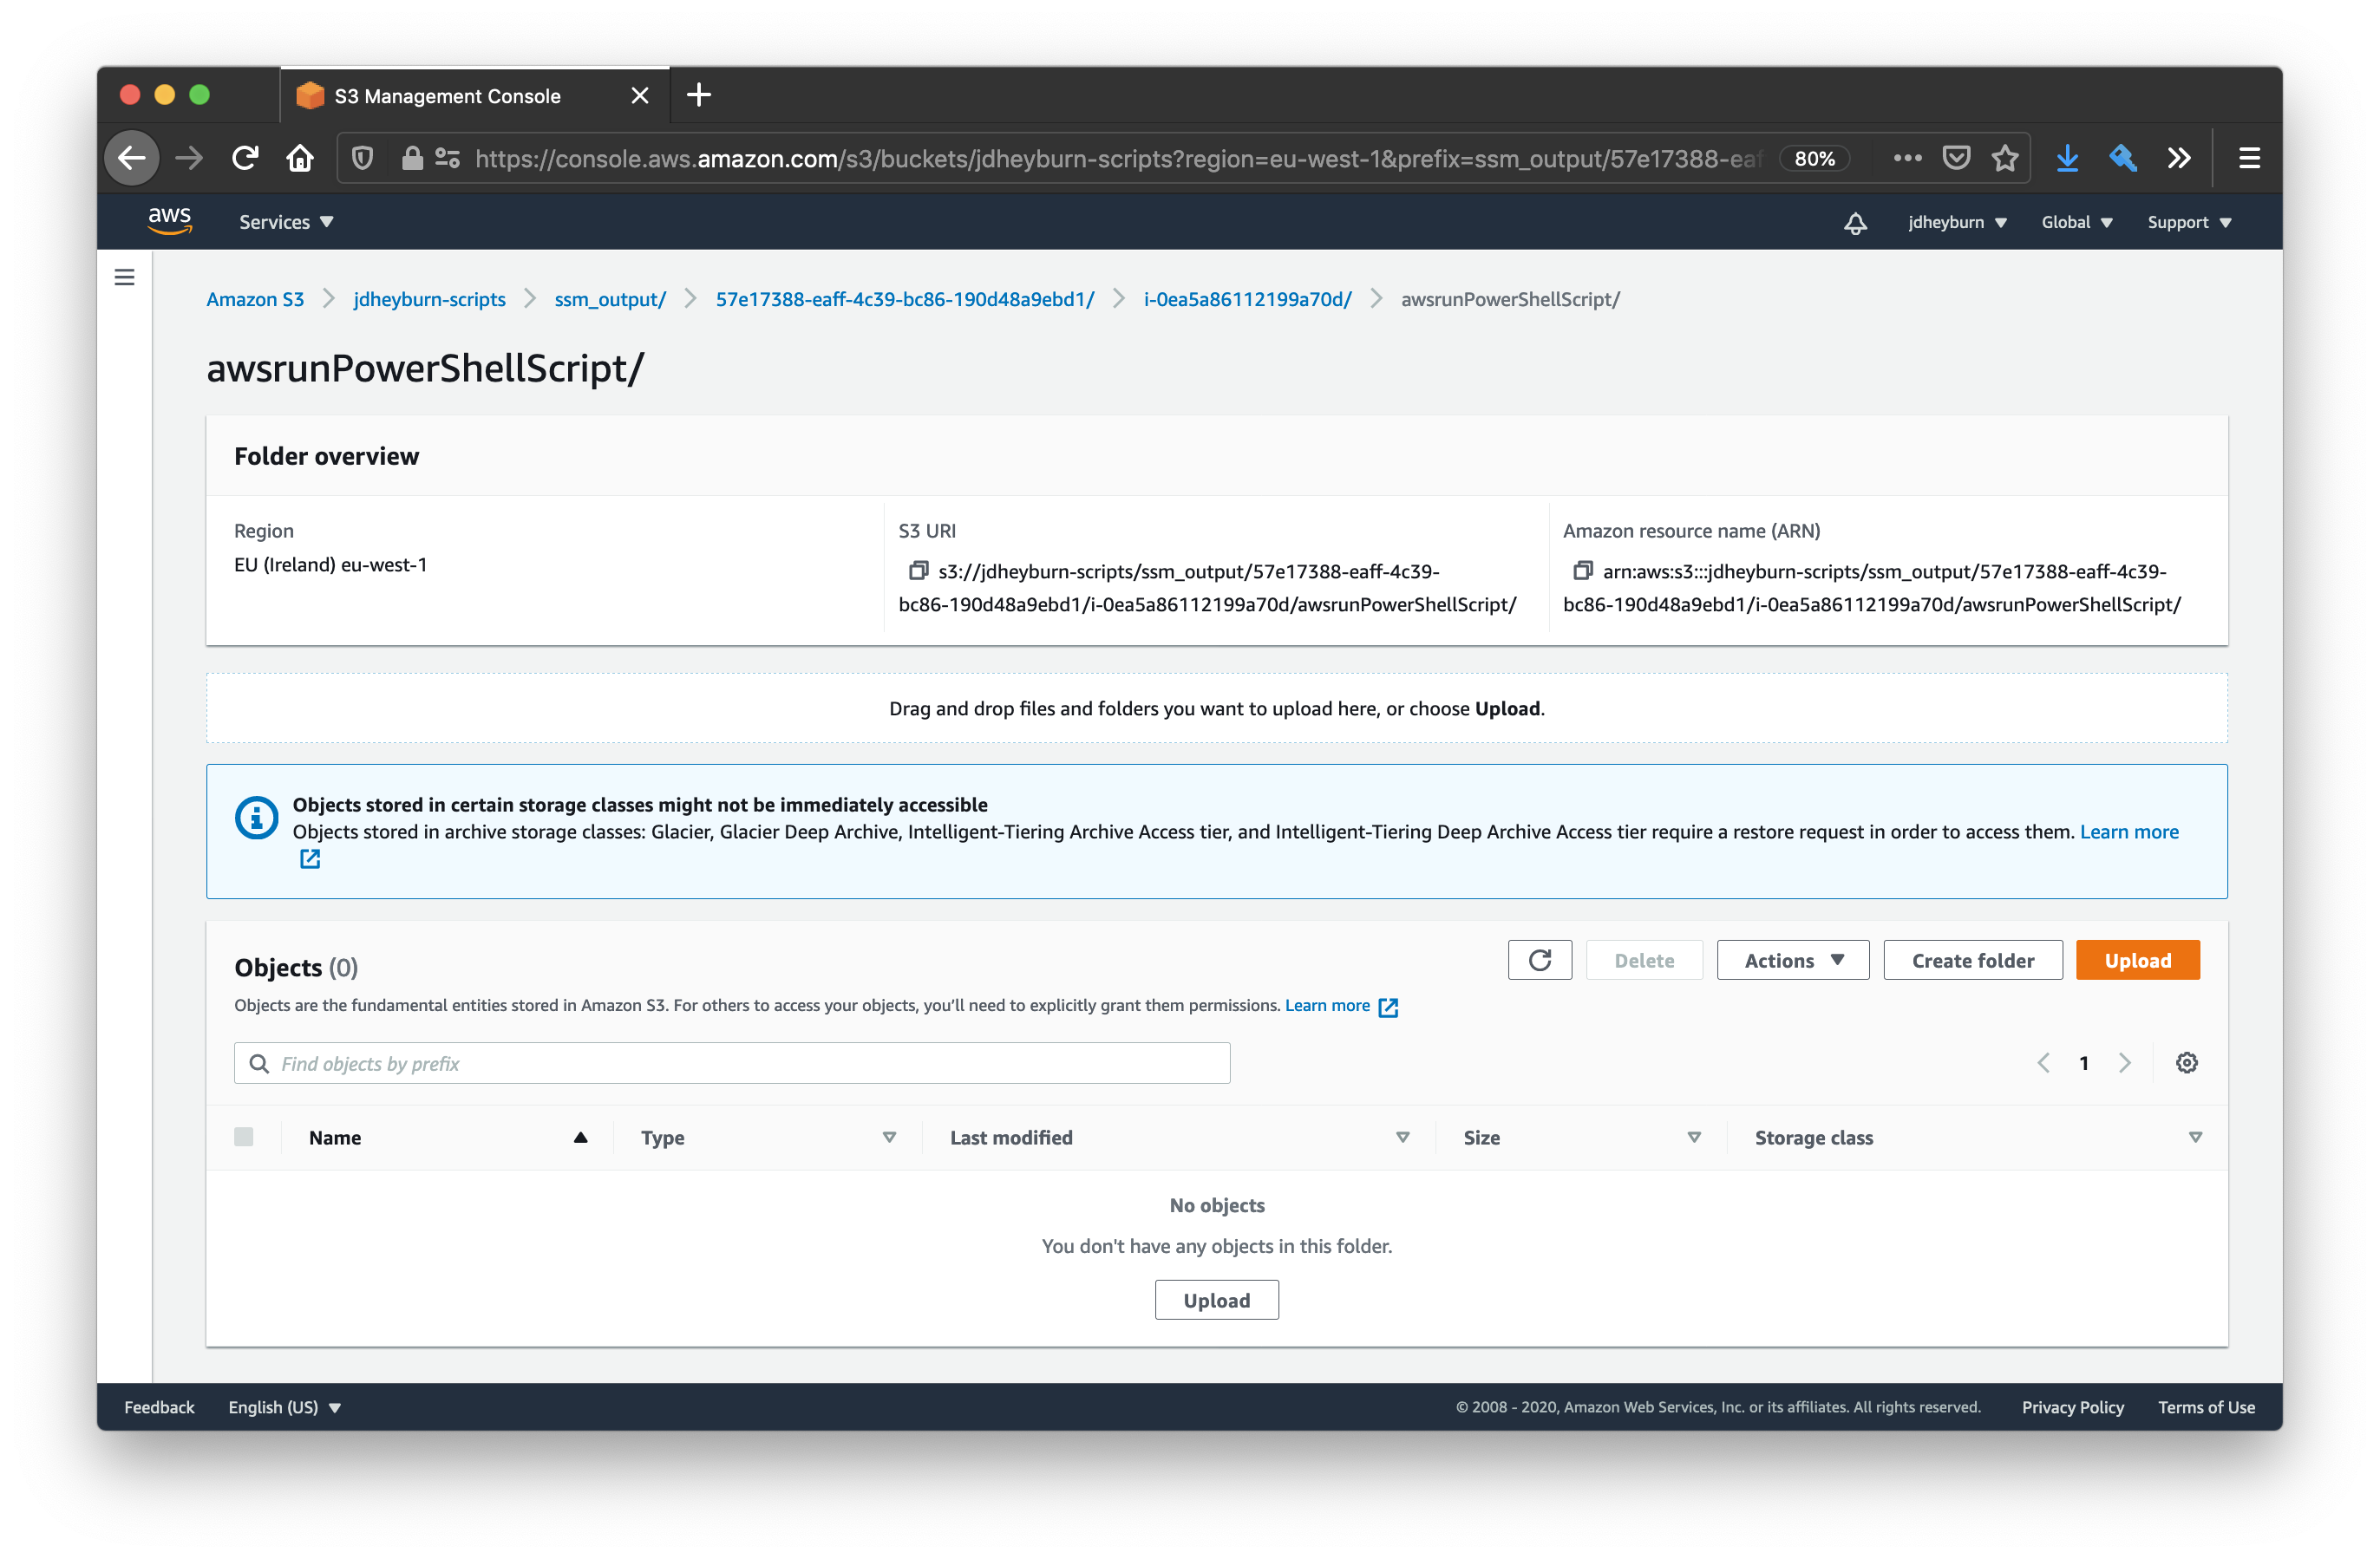
An example showing if logs were not successfully uploaded to S3 - if you get this then double check you’ve set everything up right!
Removing old command logs
Now that we have maintenance windows storing our logs in S3, we should ensure we’re maintaining a good level of hygiene by removing old logs - otherwise our S3 bucket is going to store more and more logs, costing us more money.
S3 has a feature called Lifecycle Rules which tells S3 how to handle objects throughout their lifecycle. We can tell it to move old files to a cheaper storage class, archive them to S3 Glacier (AWS’s long-term storage service), or just simply delete them!
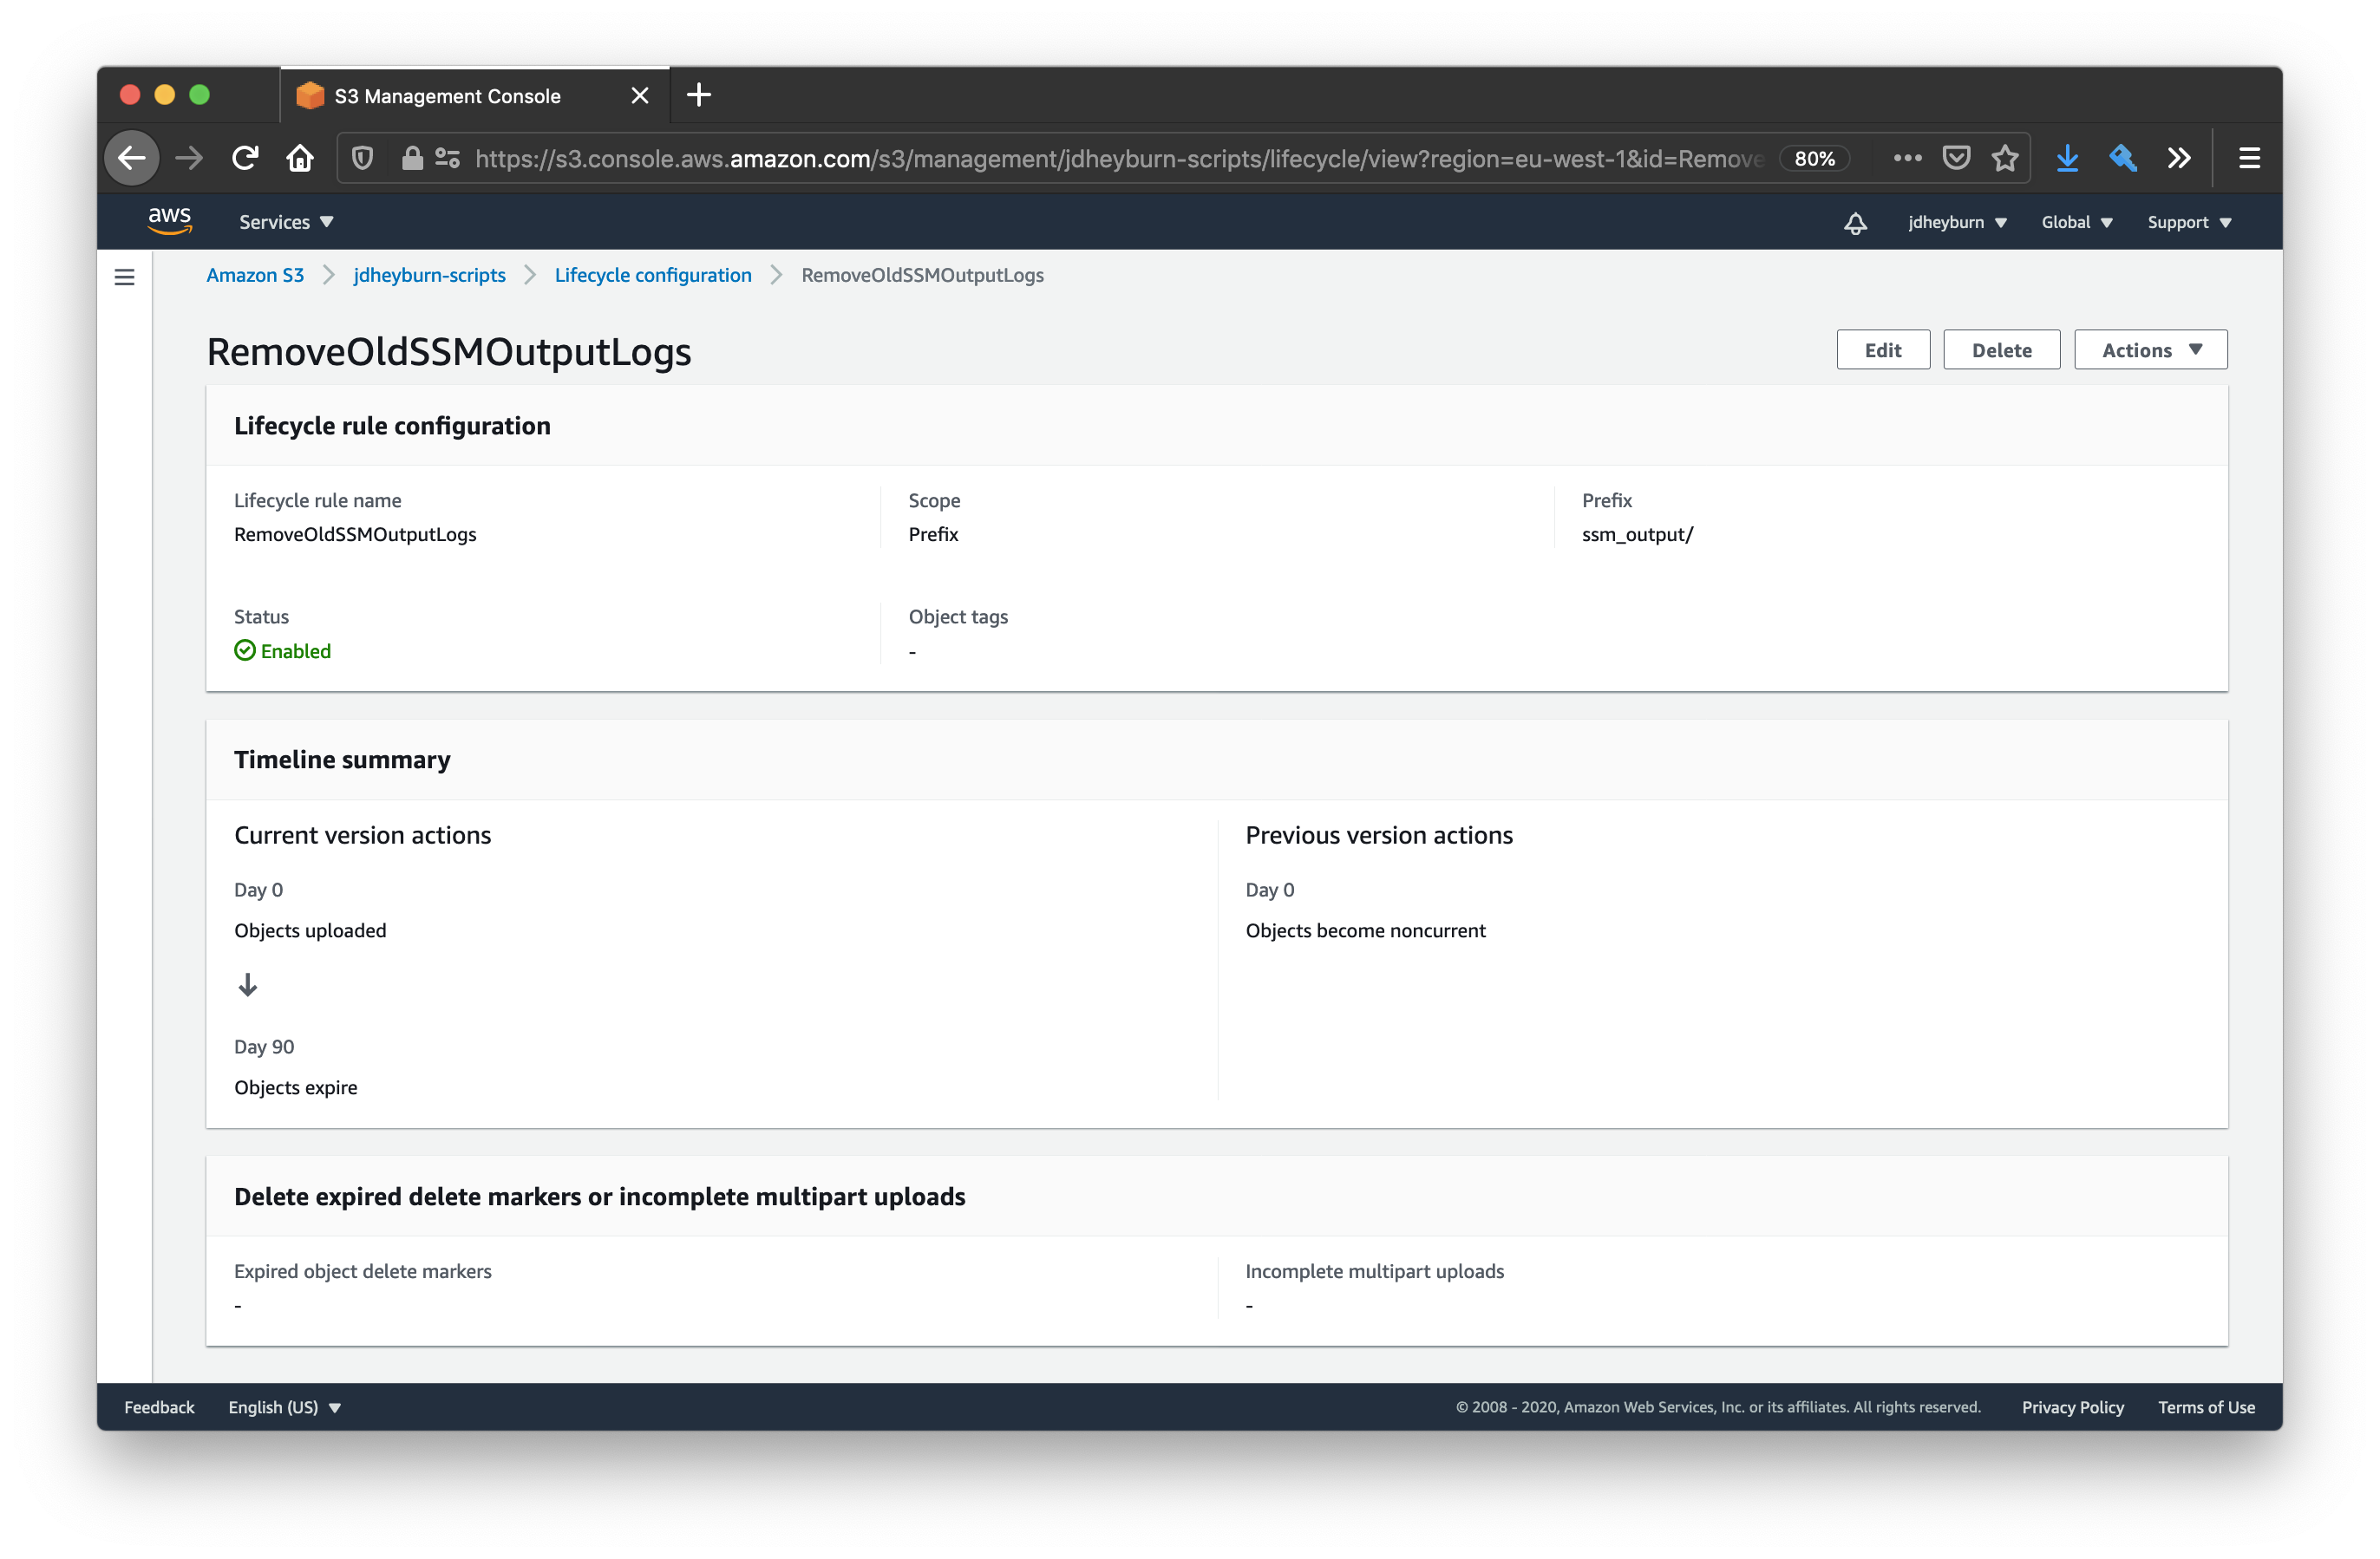
Given we’re not exactly sentimental with logs, we can define a policy that will remove any logs older than 3 months (90 days).
This is very easy for us to add, we simply need to make the addition below to our aws_s3_bucket resource.
resource "aws_s3_bucket" "script_bucket" {
  # ... other attributes hidden

  # Remove old SSM command output logs
  lifecycle_rule {
    id      = "RemoveOldSSMOutputLogs"
    enabled = true

    prefix = "ssm_output/"

    expiration {
      days = 90
    }
  }
}
You can add more rules if you like, such as a transition block to move it to cold storage before deleting if you wish. Take a look at the Terraform documentation for the resource for example of this.
Logs older than 90 days certainly do not spark joy…!
Conclusion
With the first two posts of this series, you have enough to be able to create your own automated series of commands that can be executed on your EC2 instances.
You can also use SSM documents to retrieve files from instances - such as log files. Or even use them to update third-party software on the instances.
The next post and thereafter we’ll be exploring the Command Documents sibling; Automation Documents, and exploring how these can further enhance automation to other AWS services beyond EC2 instances.